- Water Service—Municipal
- Water Service—Your Own Well
- Water Heaters
- Piping and Valves
- Water Softener
- Garbage Disposal
- Hose Bibs (Exterior Hose Faucets)
- Water Hammer Arresters
- Drainage, Waste, and Vent System
- Sewer and Septic Systems
- Irrigation Systems
- Natural Gas and Propane
- Heating Oil
Water Service—Municipal
Most homes in urban areas receive water from municipal water systems. The original water source may be a lake, a river, or large, deep wells and storage facilities. Municipalities are required to test water for safety and purity. Often they filter the water and treat it with chemicals. If you have questions about the quality of your water supply, contact your local water utility.
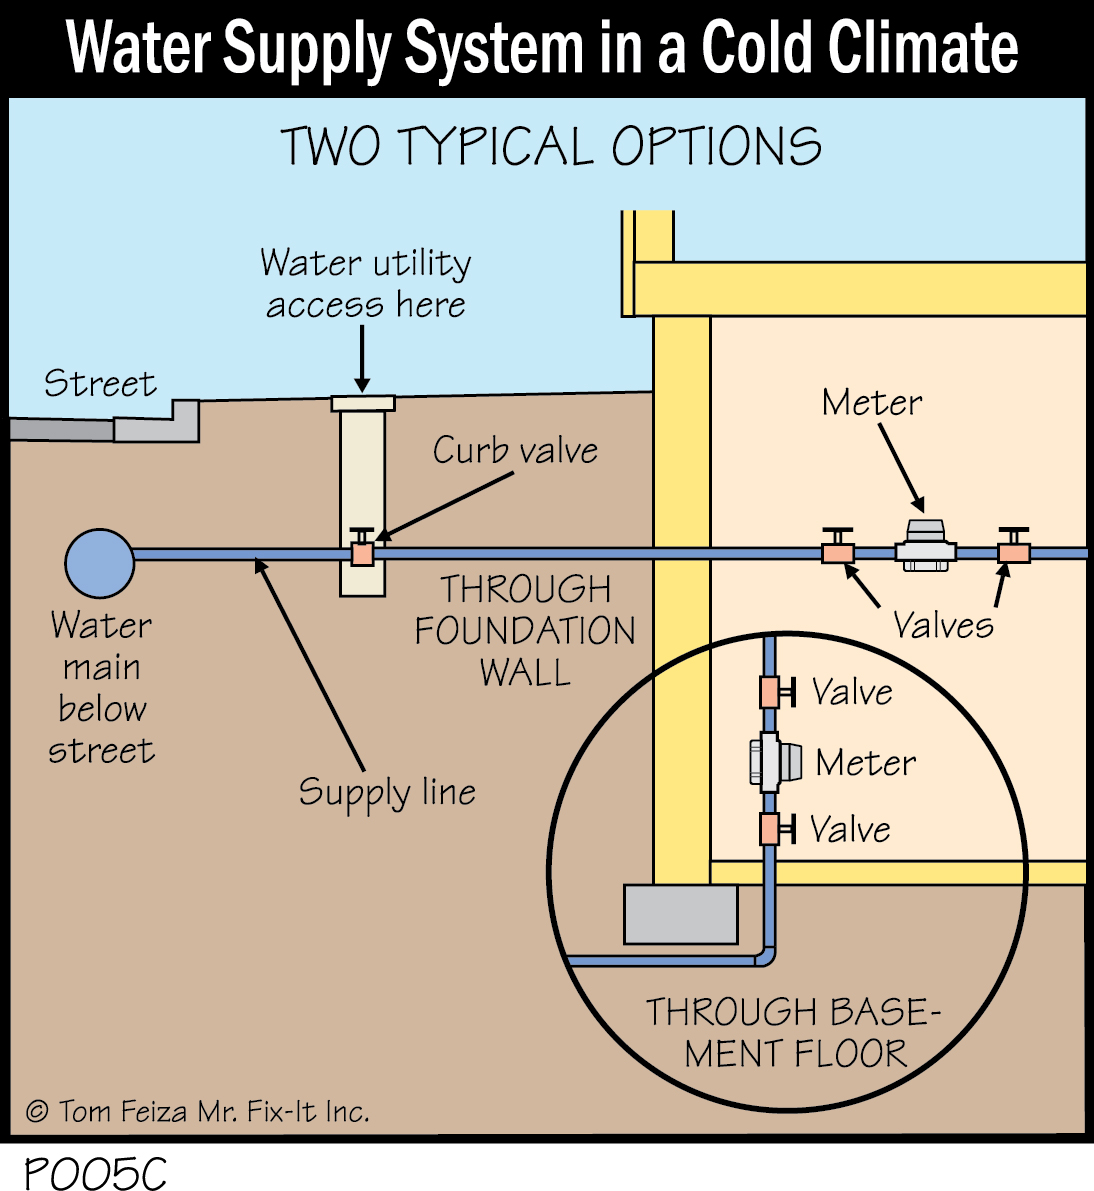
In a cold climate municipal system, water is distributed through piping mains beneath the streets. It enters your home under the basement slab or at the first floor slab. In cold climates, piping is buried below the frost line.
Inside the house, there is usually a shutoff valve, a meter, and then a second shutoff valve. You can use either of these valves to turn off the water, but the second valve is used more often. Sometimes the valve on the street side of the meter can only be operated with a wrench.
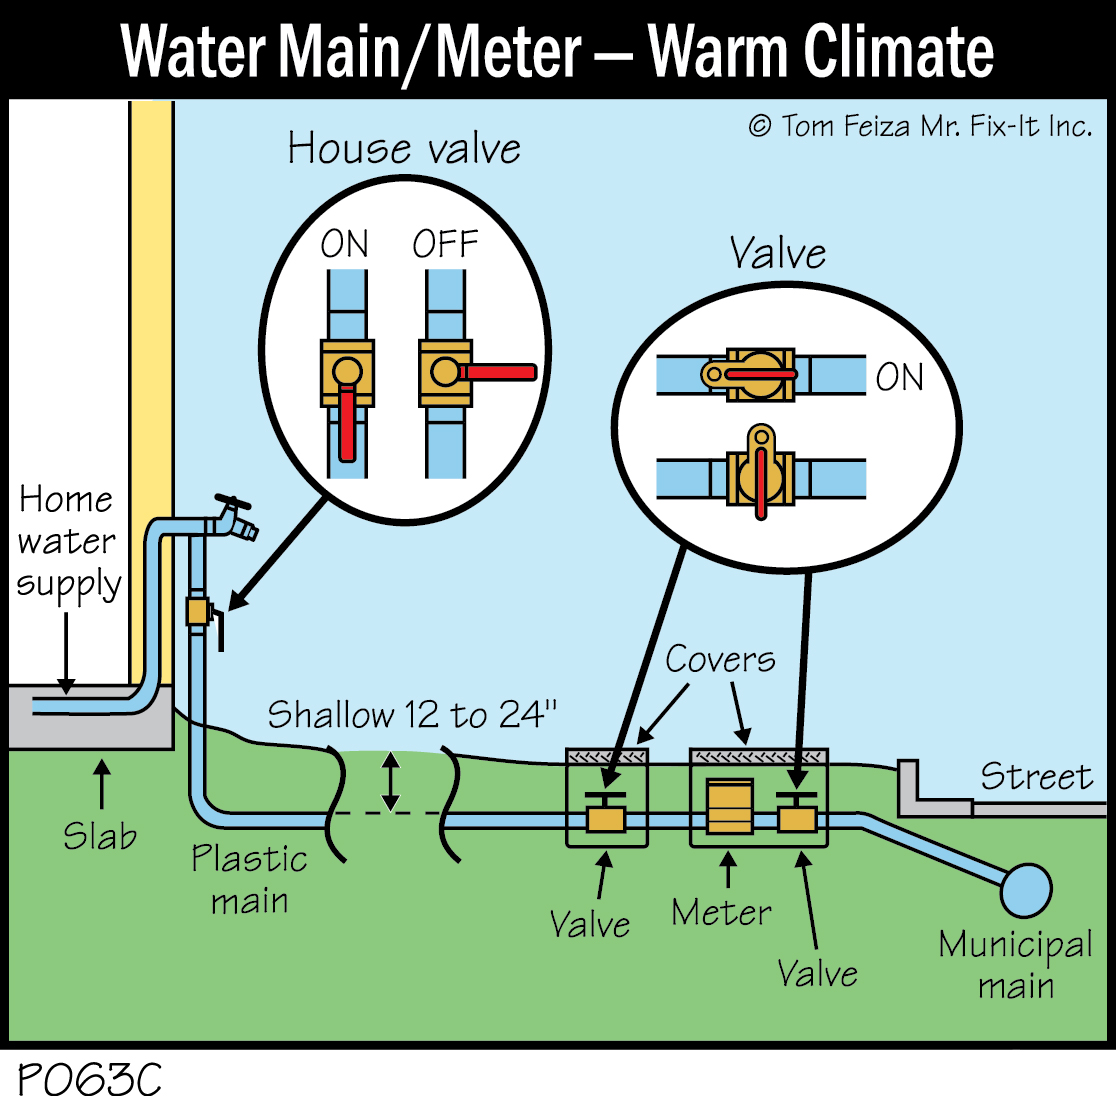
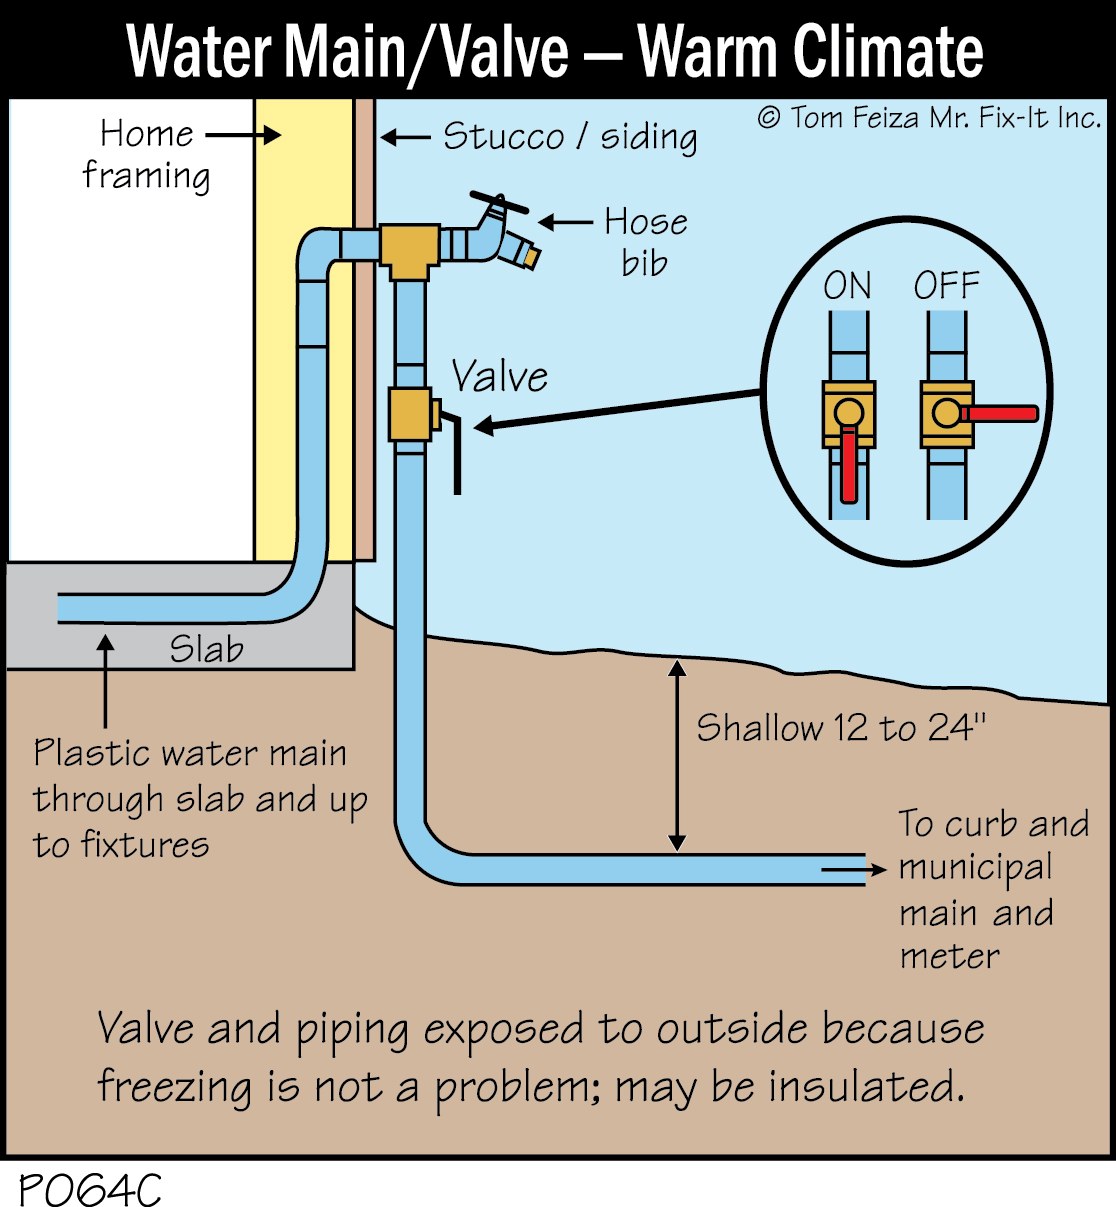
In a warm climate, we don’t need to worry about frozen ground and frozen pipes, so water mains can be installed just below the surface of the soil.
In many cases there is no basement, and the water meter may also be installed in a shallow box near the street. Often the main water shutoff is located on the side of the home near the street, and the meter and additional valves will be located in shallow boxes near the curb. Any of these valves will turn off all water to the home.
Water is distributed through the house by steel, plastic or copper piping. Check your system, identify valves, and look for any potential problems. Locate the main that feeds the water heater, and check for a shutoff valve before the water heater in case you need to turn off all hot water in your home.
Must Know / Must Do – Municipal Water Supply
- Make sure that all adults in your home know how to turn off the main water shutoff valve.
- If the valve is old, rusted or leaking, have it serviced by a plumber so it will function when needed.
Water Service—Your Own Well
Well, well, well…OK, that’s pretty corny; but if your home has a sick water delivery system, you can lose your water supply and spend hundreds of dollars on repairs.
Most damage to private wells comes from lack of basic homeowner knowledge. As one service company representative told me, “Waterlogged pressure tanks sell more replacement pumps than any marketing I could possible do.”
Do you know the symptoms of a waterlogged tank? Can you correct simple well problems? Do you know how to turn off your well water system?
Let’s walk through the basics of a residential well water system and discuss how you can recognize common problems and correct them. We will discuss the most common systems in residential use. If you are presently on a municipal water system, fine—you still may enjoy the information or save it for your brother up north. You should also know that most municipal water systems are just larger versions of residential systems.
The Basic System
Most wells have a 6” steel casing that is drilled into the ground to reach a clean water supply. The well casing may extend several hundred feet to reach a clean and adequate water supply. Water rises to a static level of equilibrium inside the steel casing and surrounds smaller internal piping. This internal piping is connected to a pump that lifts the water from the well and delivers it under pressure to your home plumbing system.
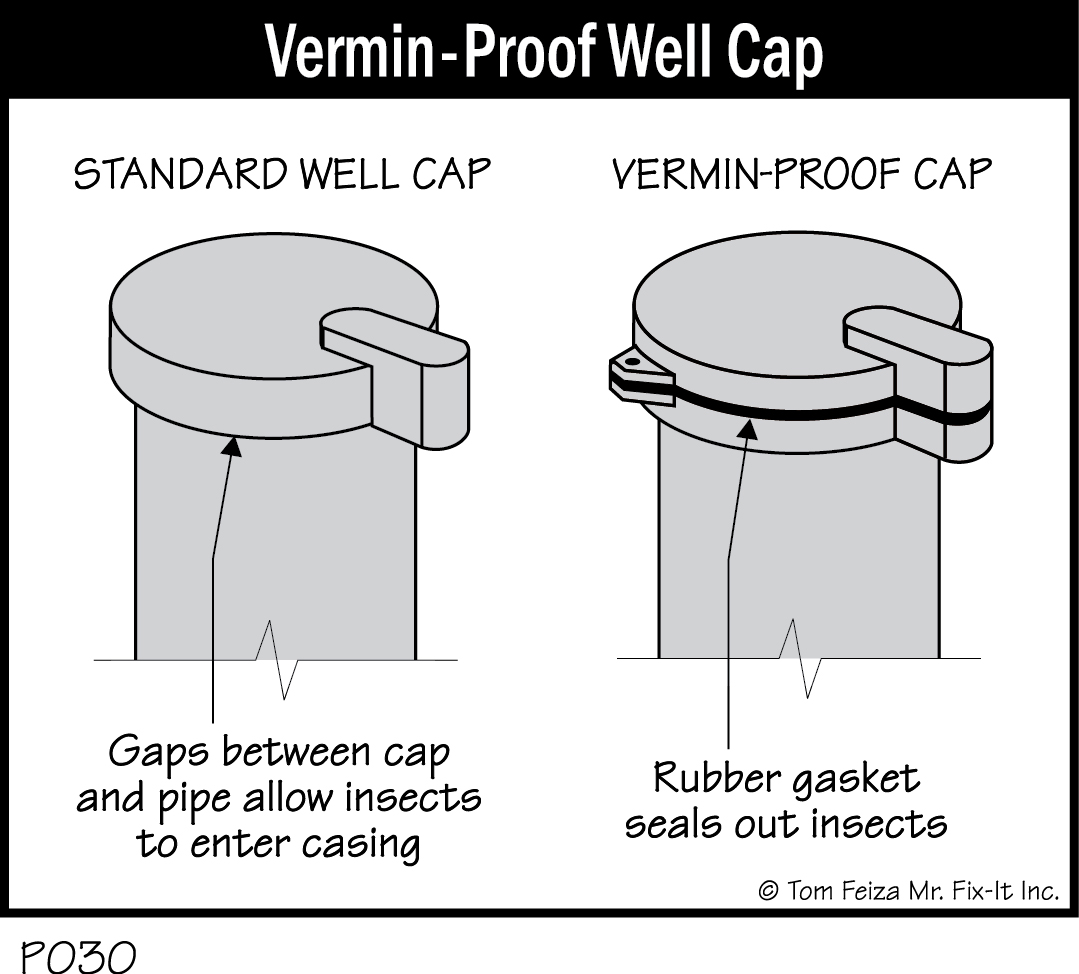
The top of the well casing is covered with a cap and should be 12” above the surrounding soil to prevent contamination from surface water and other sources. The cap should be securely fastened to prohibit tampering. Recently, problems with insects have prompted many people to replace older caps with modern vermin-proof caps.
From the well casing, piping extends underground into your home, entering the basement near a pressure tank. The piping may be steel, copper, or plastic and is installed at least 6 feet below the surface to prevent freezing.
The Pump
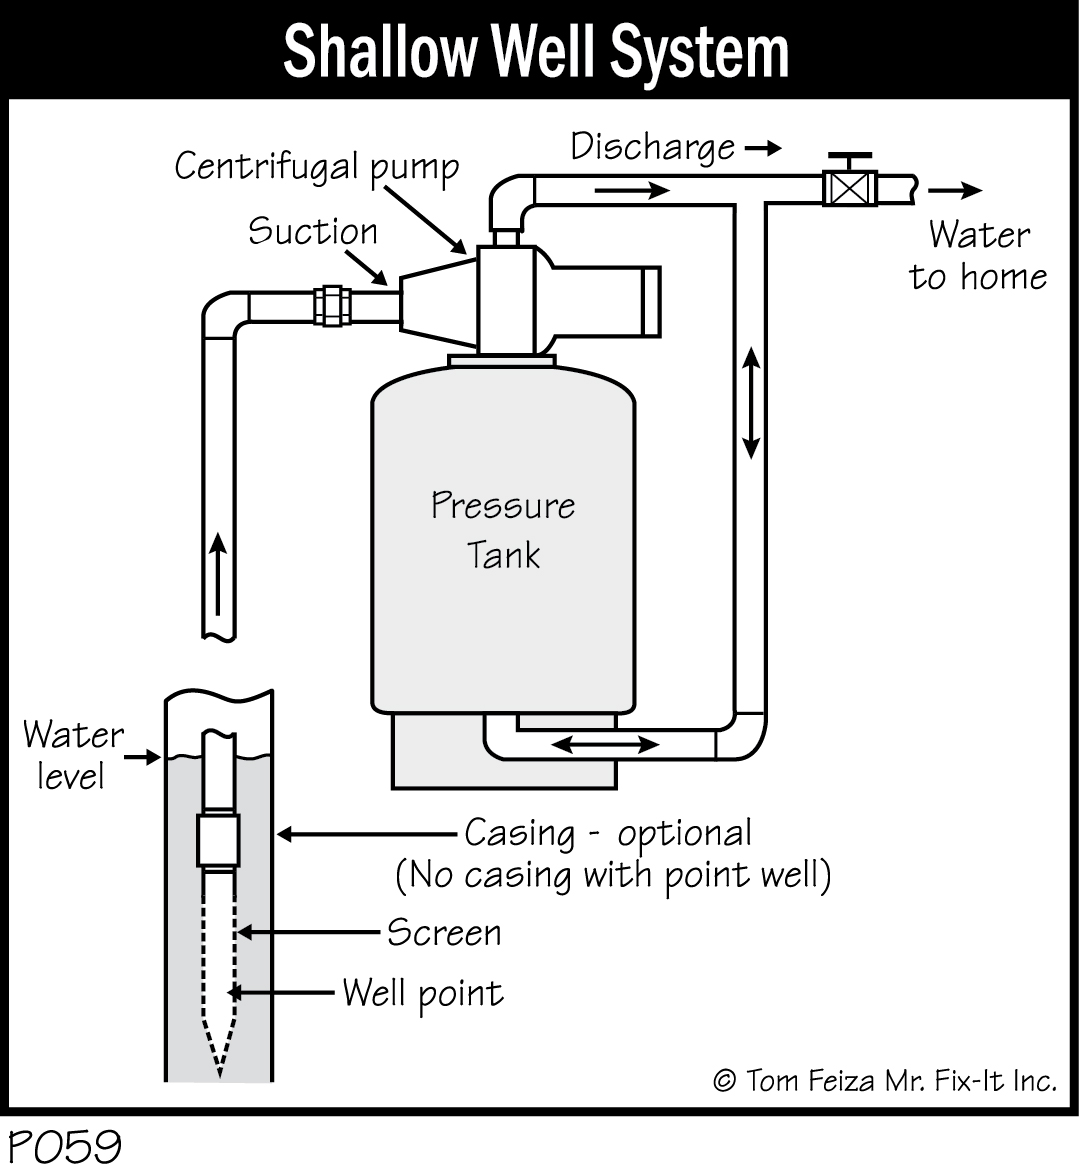
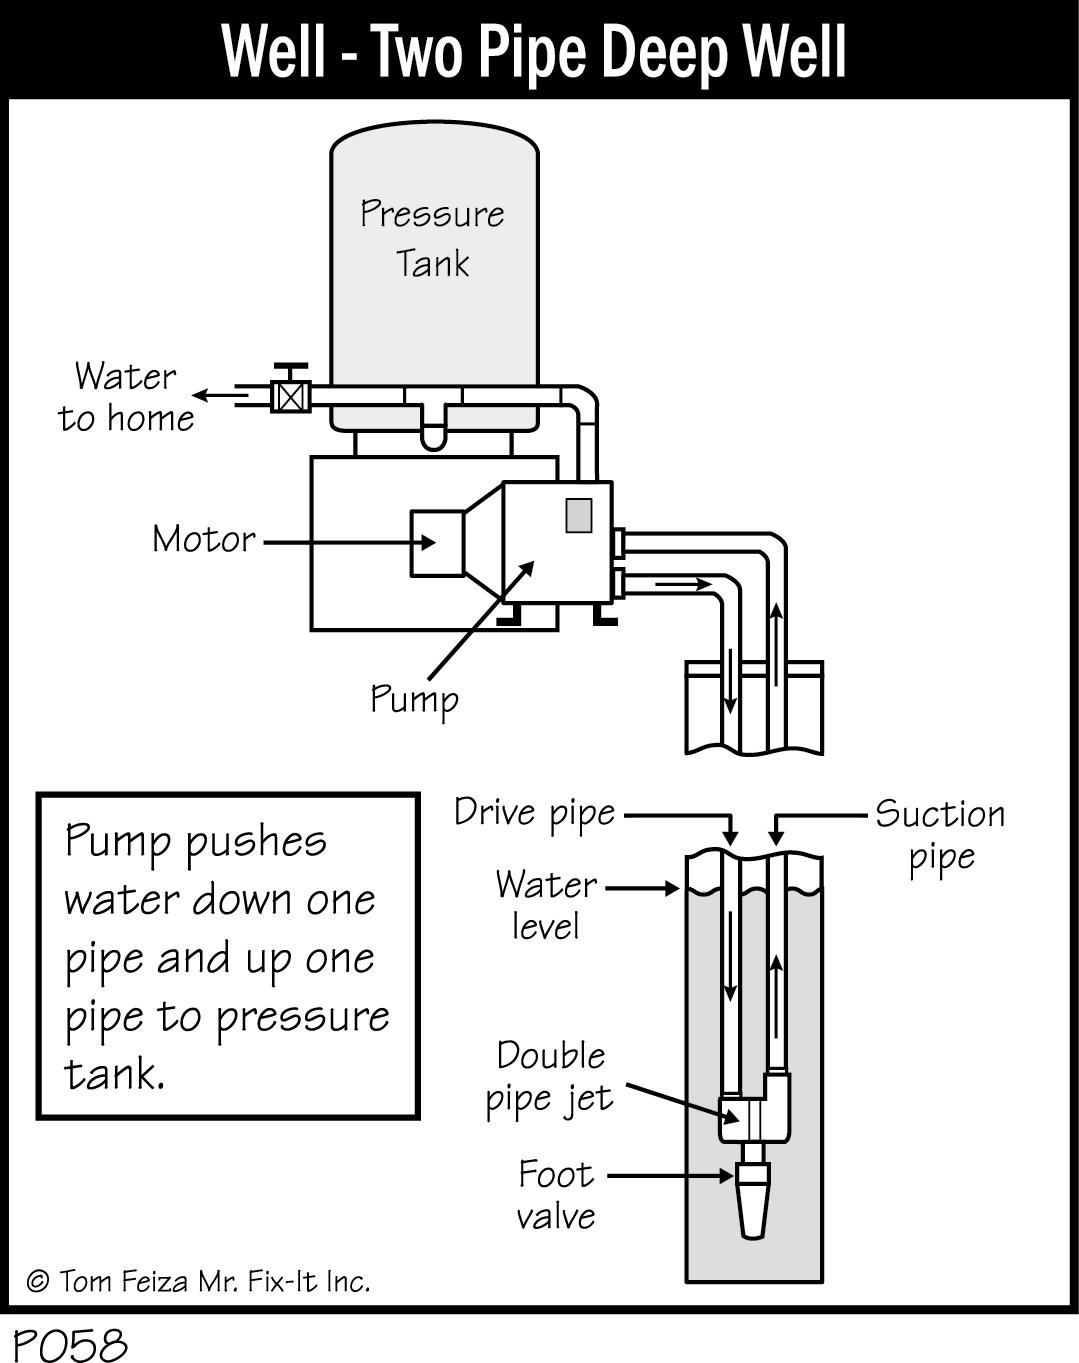
For shallow wells and older systems, a jet-type centrifugal pump lifts water out of the well and delivers it to your home’s piping. This type of pump is surface mounted in a pit near the well head or the pressure tank in the basement. The pump is driven by an electrical motor and is connected to the piping.
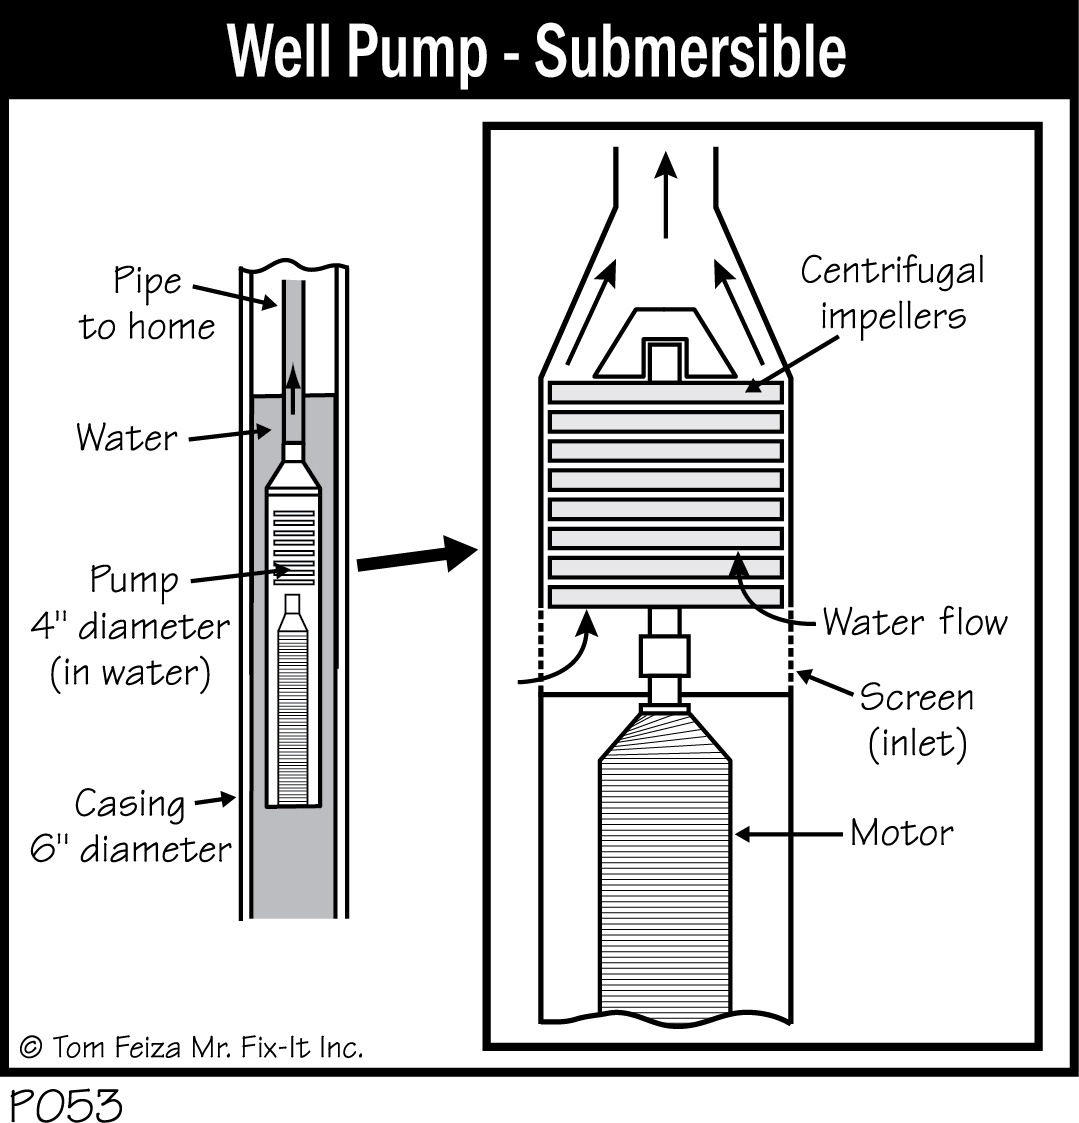
Deeper wells and newer systems use submersible pumps that are placed under the water’s surface inside the well casing. This kind of pump is long and slender—normally only 4” in diameter—and hangs from the supply piping. This type of pump pushes water up and out of the well.
When you “pull” a pump, you physically remove the cap of the well casing and pull the submersible pump out of the hole by the supply pipe.
Working Under Pressure
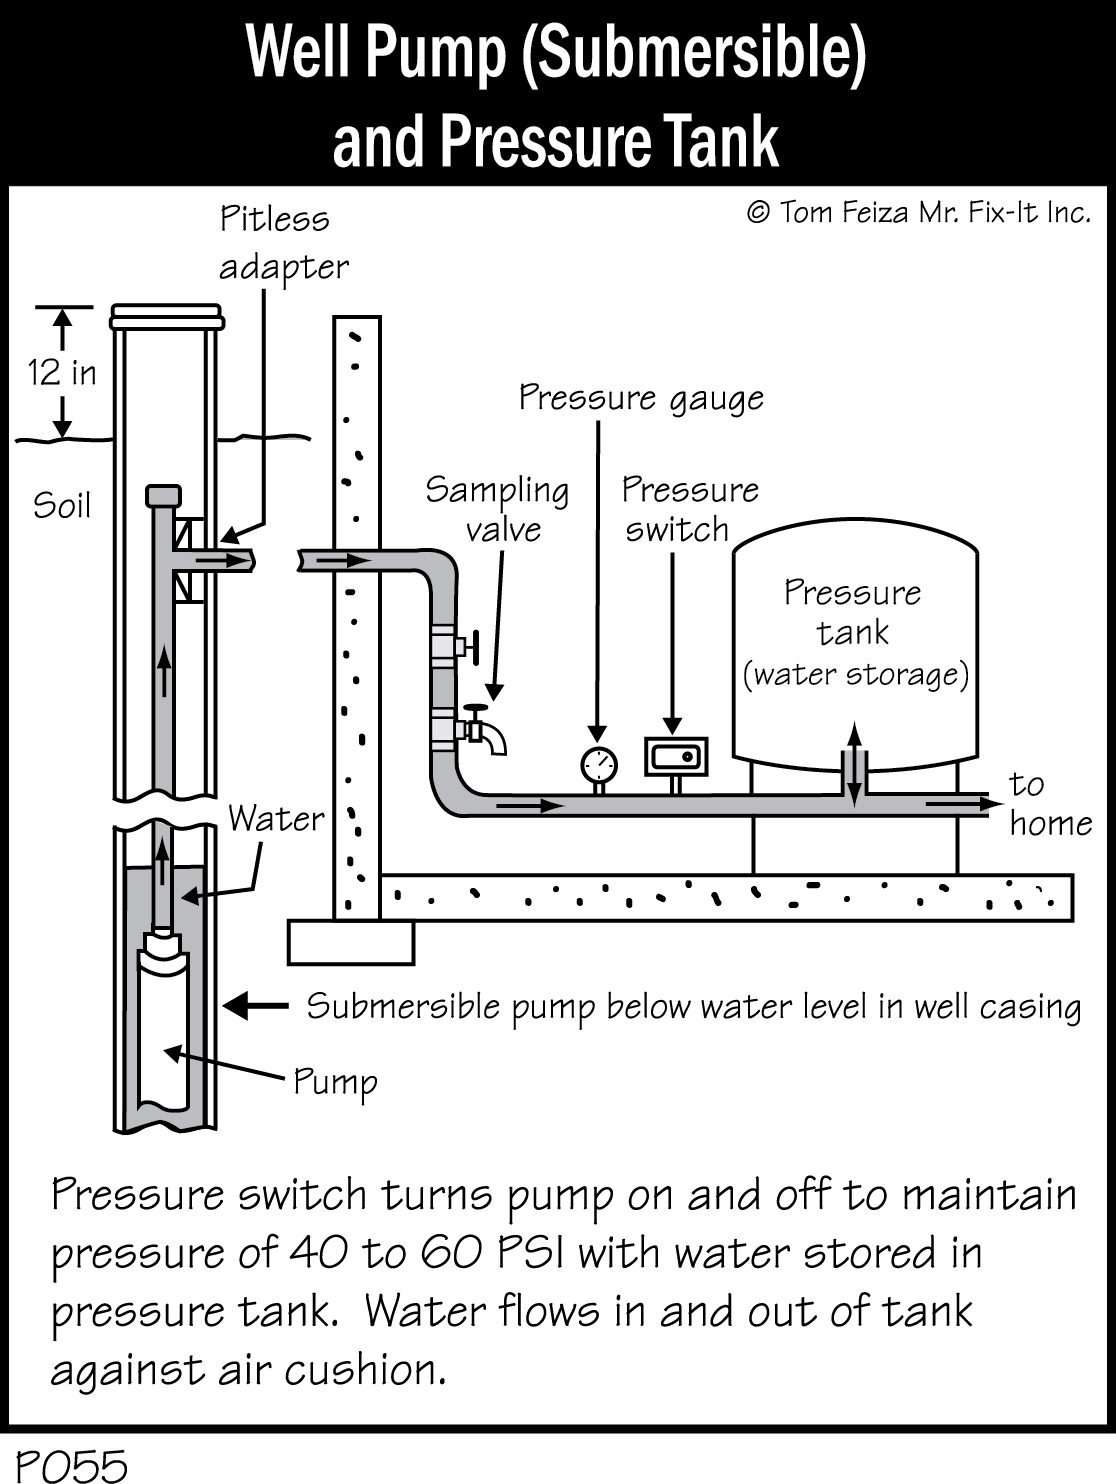
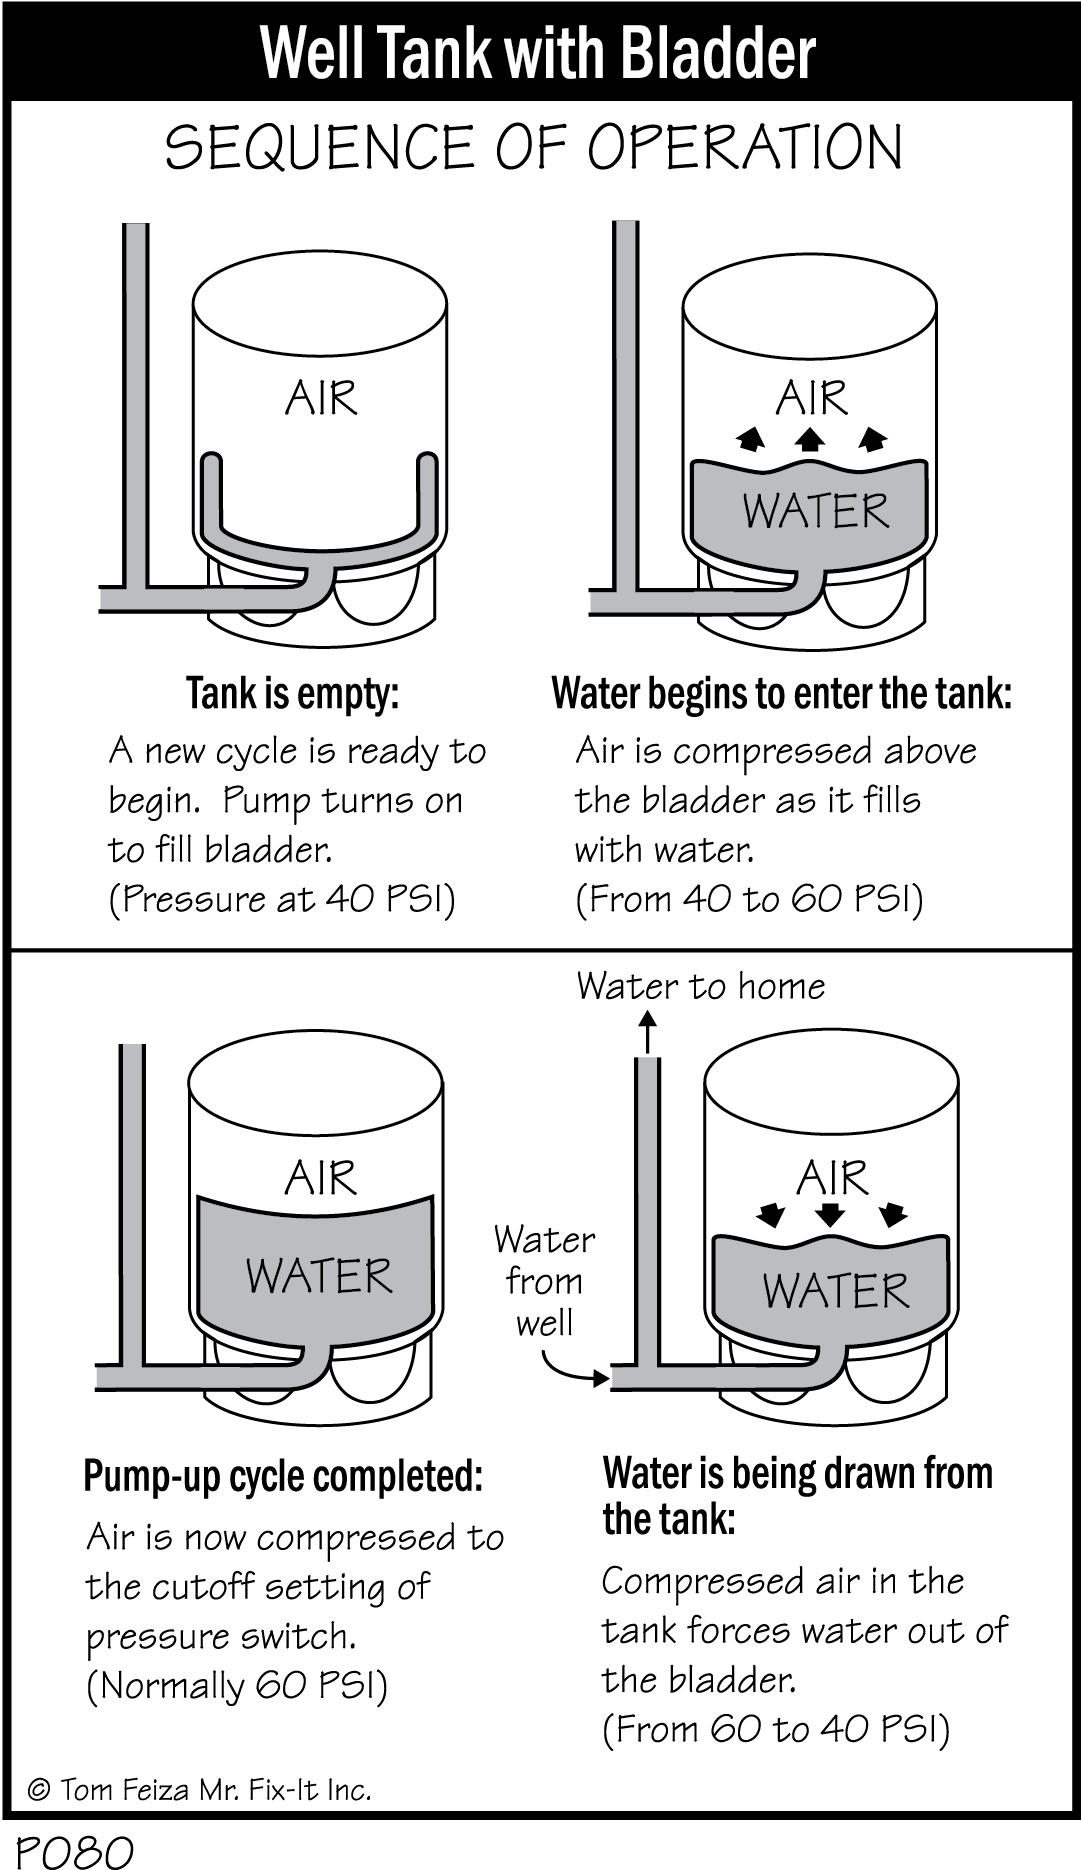
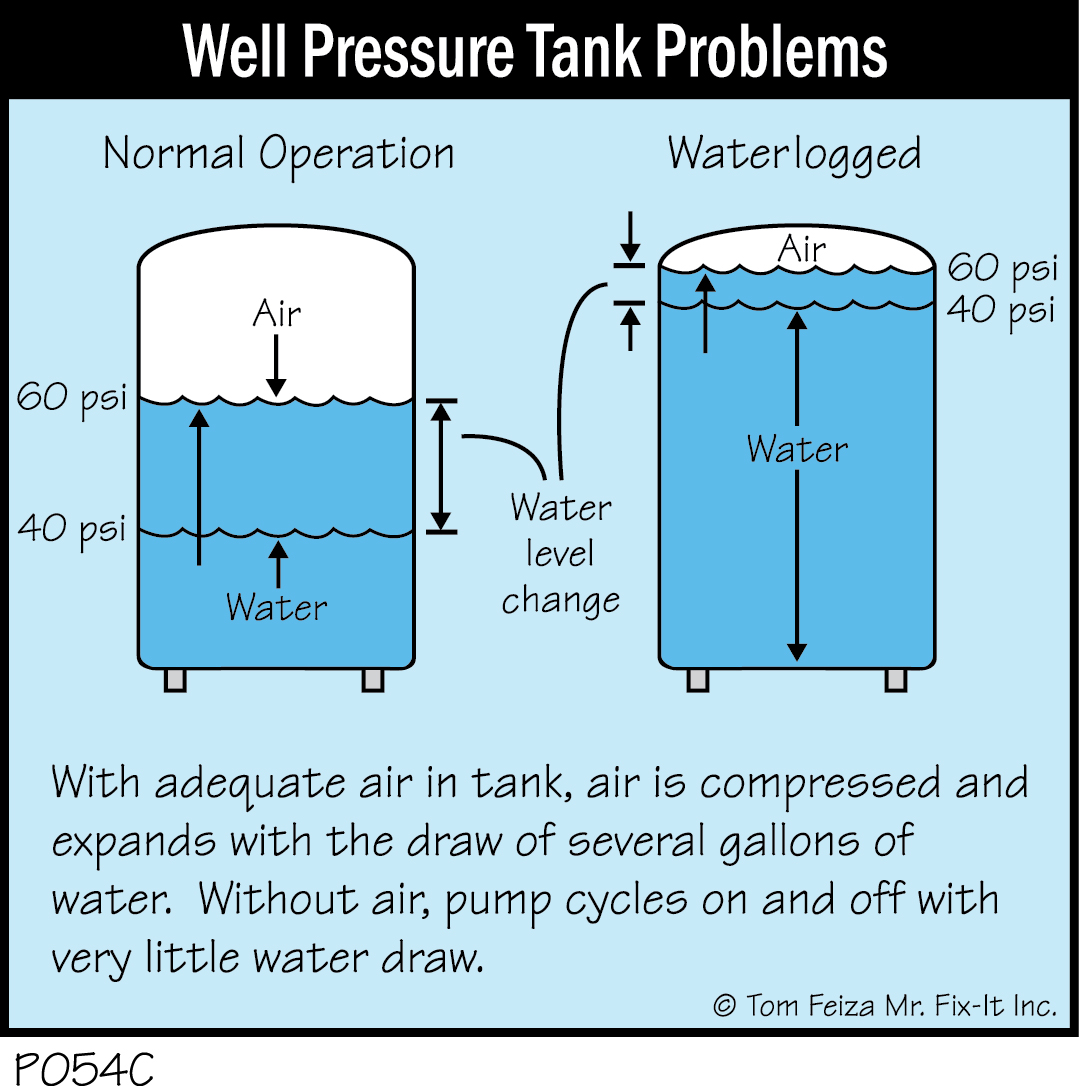
A pressure tank, normally located in the basement, stores water and prevents the pump from turning on and off every time you use water. There is a compressed air cushion above the water in the tank; it expands and compresses with changes in pressure. As you use water in your home, the air cushion in the tank expands to maintain pressure and force water into your piping.
The cushion of air generally varies in pressure within a normal operating range of about 40 to 60 pounds per square inch (psi). As water is used, the pressure decreases; when it reaches 40 psi, an automatic pressure sensing switch turns on the electricity to the pump. With the pump running, water is forced into the tank, raising the pressure of the air and water. As the tank is fully recharged with water, the pressure approaches 60 psi, and the pressure switch turns the pump off.
This pumping cycle repeats automatically as you use water from the tank. If you use a small amount of water, the pump will not need to start. You may notice a slight variation in pressure in your home as the system cycles slowly between 40 and 60 psi. When the system operates properly, the slow pressure changes are barely noticeable. A larger tank will draw more water per cycle, and there will be less pressure variation.
Tank Types Make a Difference
There are four basic types of pressure tanks. The conventional or galvanized “air over water” tank, generally found on systems over 30 years old, holds water in direct contact with the air cushion. This tank loses its air cushion as air is absorbed in the water, so you will need to service it several times per year to maintain the air cushion. You will recognize this type as a large, upright, galvanized steel tank.
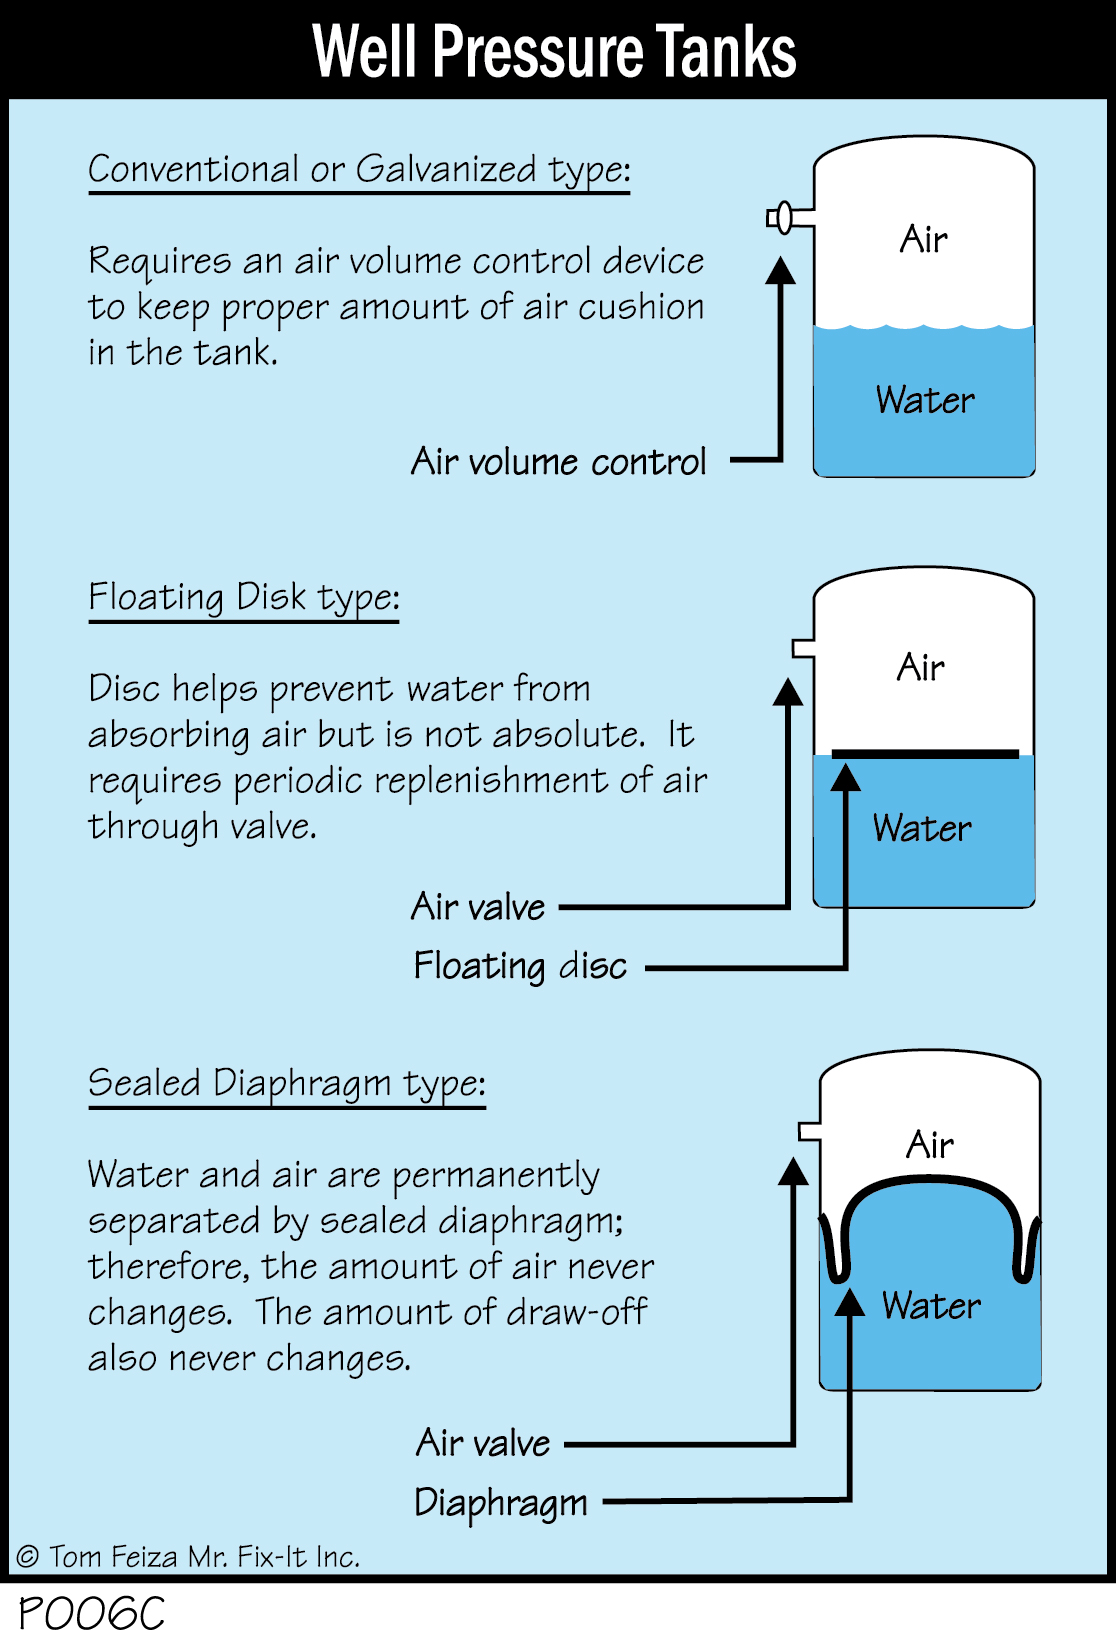
An improved galvanized tank separates the air from the water with a floating disc. This tank will not lose air to the water as quickly, but it still requires routine maintenance.
Some systems are designed with a pump that adds a small amount of air to the system each time to pump starts. This system has a special air release tank, and every time the pump starts you will hear a little “gurgle” or “burp” if you are standing next to the tank. The “burp” results as air enters the tank.
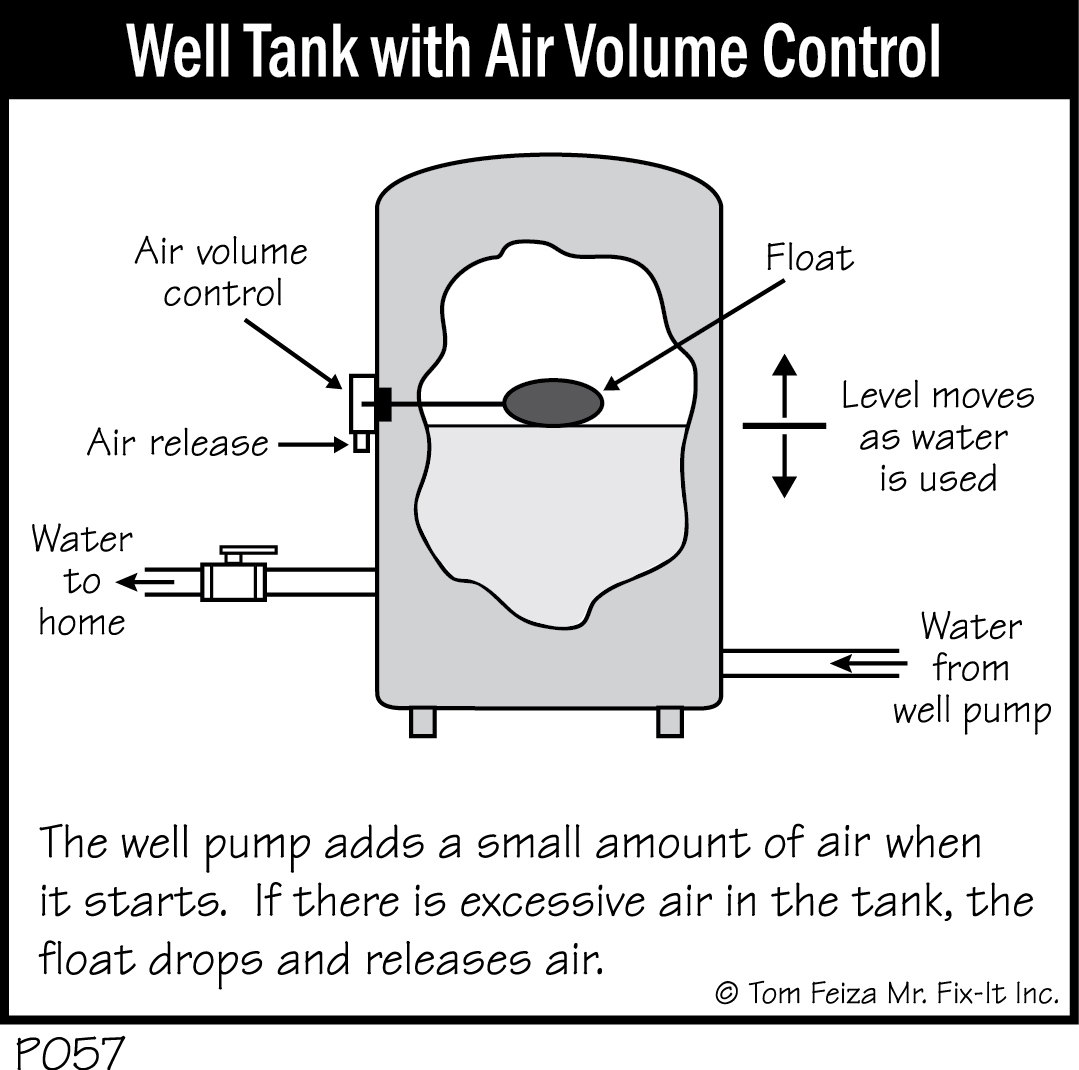
This special air release or air volume control tank never needs additional air because the pump constantly maintains the air supply. If the system has too much air, a float in the tank drops with the water level and allows air to be released from the side of the tank. You will see a small plastic fitting on the side of the tank, and you may notice some water staining below the fitting. When air is released from the tank, some water is often released as well.
A tank with an air volume control is often installed when the well water has contaminates and odor problems. Because the tank eliminates the rubber bladder to hold water, it tends to reduce these problems.
Modern tanks are a big improvement over the older tanks. They are smaller and usually are made of painted steel. Inside the tank, the elements are separated by a sealed diaphragm or bladder which holds either the air or the water. Since there is no direct air/water contact, this tank system maintains the air cushion indefinitely.
Steps to Well Wellness
The best route to a trouble-free well is to become familiar with the system’s important parts and know how it is supposed to look and sound when running properly. Take the time to identify the components of your system and to watch it operate. Read any instructions and information available for your system. Look for the pressure tank, pressure switch, and gauges. Find the circuit breaker or switch that turns off the power to the pump.
Turn on a faucet and watch the pressure gauge to see the system’s pressure vary. As it approaches 40 psi, you will hear a click when the pressure switch turns the pump on. With a submersible pump, you may hear a hum while the pump runs. When the pump is on, water flow into the tank will gradually increase the pressure to about 60 psi; then the pump will click off. It should take a minute or two for the pressure to increase from 40 to 60 psi.
If your system operates as described, now you know how a properly operating system responds when water is used.
The Helpful Turn-Off
It’s important to know how to turn off the system completely. To stop the water flow to your home, you must turn off both the house service valve and the electrical supply to the pump. At least two people in your household should know how to do this.
Trace your home’s piping back toward the pressure tank. The large valve in the line between the tank and the house piping is your house service valve.
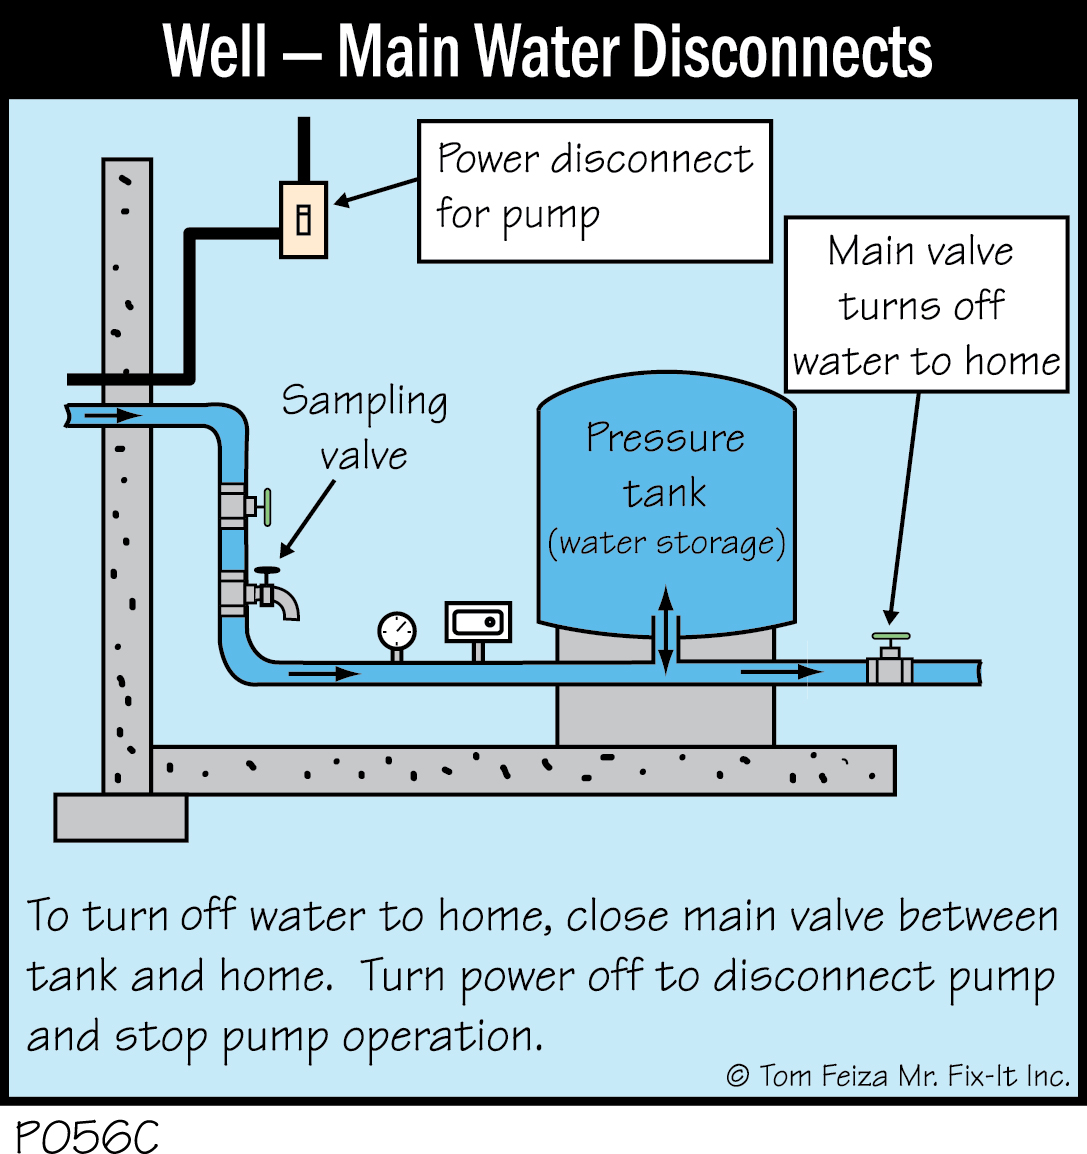
If you turn off only the power to the pump, all the water under pressure in the tank will still flow into the piping system. If you turn off only the valve, the pump and electrical system can still malfunction.
Spotting a Waterlogged Tank
The most common and damaging problem in this system is a waterlogged pressure tank. A tank is waterlogged (full of water) when there is no air cushion in the tank. Without an air cushion, there is no air pressure to push water out of the tank into the home’s piping. The pressure will vary quickly whenever a small amount of water is used.
This quick change in pressure causes the pump to start and stop almost every time you use water. As 1. soon at the pump starts, the pressure will go up very quickly. For instance, if you are running a yard sprinkler, the pump will constantly turn on and off, and you will notice the pressure change at the spray of the sprinkler. If the pump is allowed to continue turning on and off (short cycling), eventually it will be ruined.
You can identify a waterlogged tank by quick changes in pressure and the way the pump switches on almost every time water is used. You must correct this situation to prevent damage to the pump.
Correcting a Waterlogged Tank
If you need to correct a waterlogged tank but don’t fully understand your well system’s operation, call a service company. Watch their repair person service the tank. Ask lots of questions, and take notes so you can do it yourself next time.
The bladder-type tank should not lose its air cushion unless there is a bladder failure or a valve stem leak. If there is an air leak, you will need to recharge this bladder-type tank.
When an air-over-water tank requires replacement of the air cushion, follow these steps:
- Turn off the electrical power to the pump.
- Turn off the house service valve.
- Open the drain valve at the bottom of the tank and drain off all the water under pressure. Normally, a hose is connected to this valve, and water is routed to a drain.
- Using an air compressor or bicycle pump, add compressed air to the tank through its tire-stemtype fill valve.
- Continue adding air until all the water is out of the tank and air flows from the drain valve.
- Close the drain valve.
- Pressurize the tank to about 5 psi below the normal operating range of the system. (In our example of a pump with a range of 40 to 60 psi, this would mean a pressure of 35 psi.)
- Turn the electrical power to the pump back on and watch the pressure increase to the normal range as the pump fills the tank with water.
- Open the drain valve again to drain away any debris that may have loosened inside the pipes and tank when they were under low pressure. Close the valve.
- Slowly open the house service valve.
If your tank frequently becomes waterlogged, an air leak in the tank is probably the culprit. To check for this, make sure the tank has a full charge of air; then sponge a strong solution of soapy water on the tank and its parts. Check the air fill valve, fittings, and weld joints. Bubbles will indicate an air leak. Fittings and valves can be replaced or sealed to eliminate leaks. However, if the tank welds are leaking, you may wish to replace the unit with a modern bladder-type tank.
Other Problems
Many other problems can occur with well systems. Jet pumps can lose their prime. Pressure switches can fail. Fuses can blow. Pipes can freeze. Excessive air can be pumped into the system. As with any home system, the list of potential problems goes on and on, and most of the more serious problems should be solved by a professional.
However, a properly maintained system will work smoothly and provide years of trouble-free service. Ironically, that may eventually lead to trouble, for we take the system for granted and forget to watch for symptoms of problems. We may fail to perform simple maintenance or notice quick changes in pressure.
What, Me Worry?
Even so…don’t worry, be happy. Modern pumps and systems are almost trouble-free. Do your homework and understand your system. Consult a professional if you have any concerns or problems you don’t understand. Watch for that waterlogged tank—it can cost you a new pump. Consider replacing an old tank with a modern bladder-type tank if you don’t like routinely replacing the air cushion.
Watch for any changes in the water; changes in water clarity, color, and odor can all indicate problems. You should also have your water tested for bacteria at least semi-annually. Some wells require routine chlorination.
For detailed informational brochures on wells, water, and water treatment, contact your local municipal health department or plumbing inspector or your state’s department of natural resources. You can also obtain operational information from the companies that manufactured your well pump, tank, and pressure switch. Well service companies are another good source of information.
Must Know / Must Do Your Own Well
- Make sure that all adults in your home know how to turn off the main water valve and the electrical power to the well pump.
- If water pressure varies as you draw a small amount of water, this indicates a pressure tank problem: the pump is “short cycling.” Add air to the pressure tank, or call for service.
- Have your water tested routinely— perhaps once per year.
Water Heaters
A water heater is simply that—a device to heat water. It consists of a storage tank with a gas, electric or oil heat source. If your home has an oil-fired hydronic boiler, there may be a coil in the boiler that heats water. Sometimes hot water is referred to as domestic hot water or potable water.
Water heaters work year after year with very little maintenance, so it is easy to ignore them. Yet routine maintenance checks should be performed on electric, gas and oil water heaters.
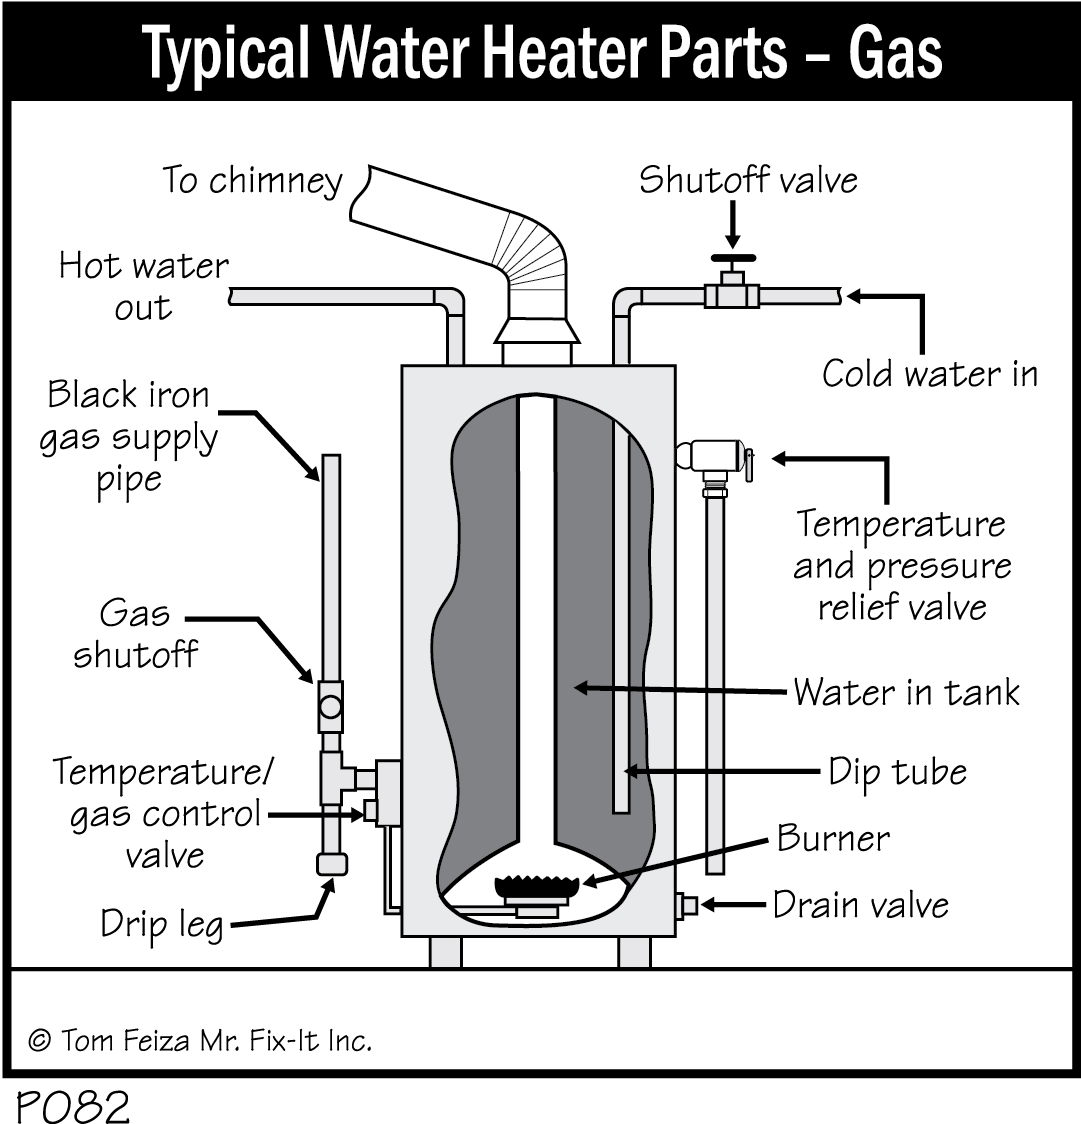
The water heater has a temperature dial. Keep it at a low or middle setting, and check your water temperature at the faucet. It should be about 120 degrees to prevent scalding.
The temperature dial controls a thermostat in the water tank. When the water cools, the burner or electrical heating element is switched on. When the water reaches the specified temperature, the heating unit shuts off. The water heater’s tank stores hot water, giving you a reservoir to draw from.
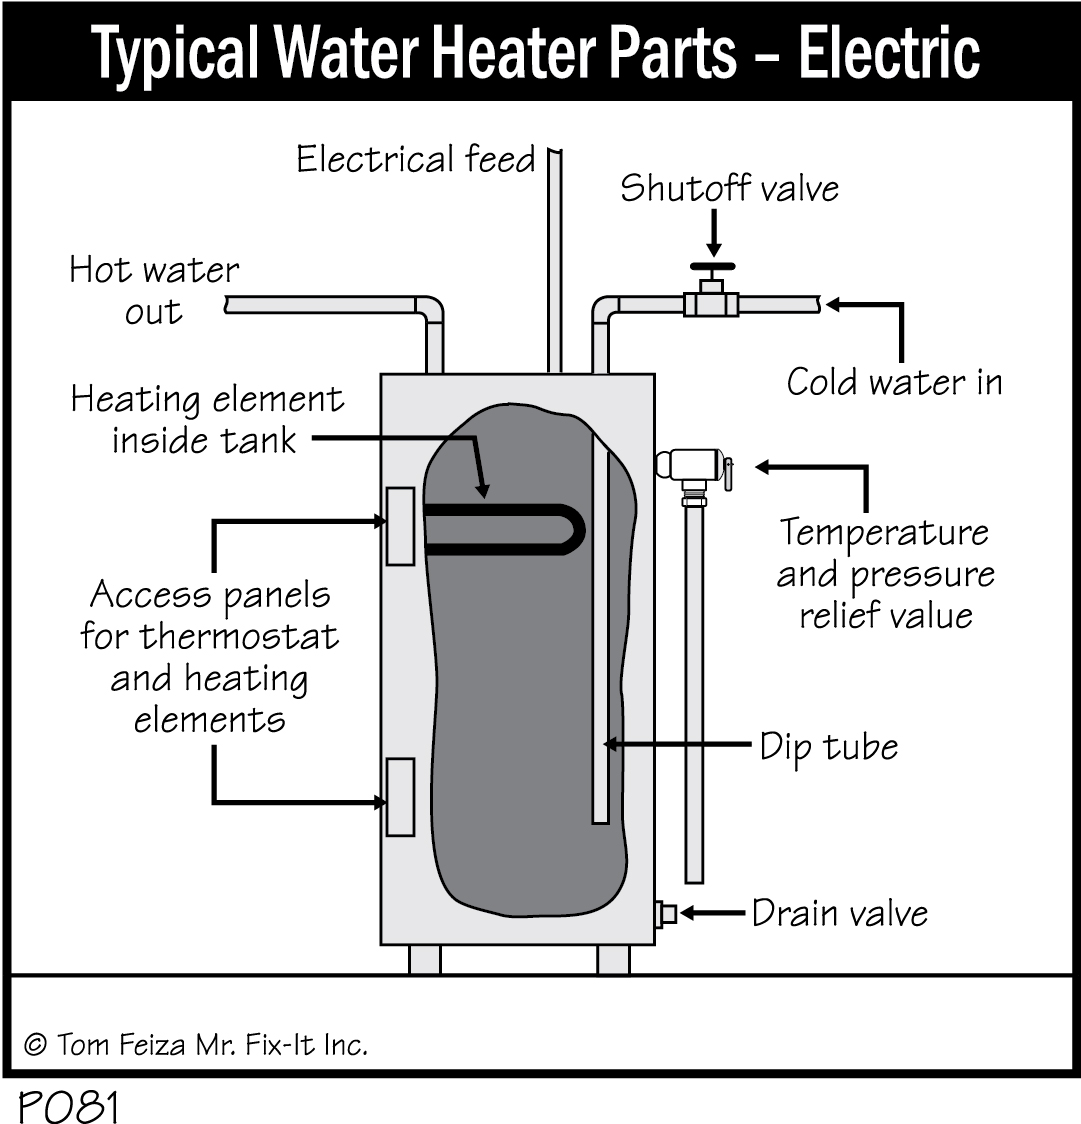
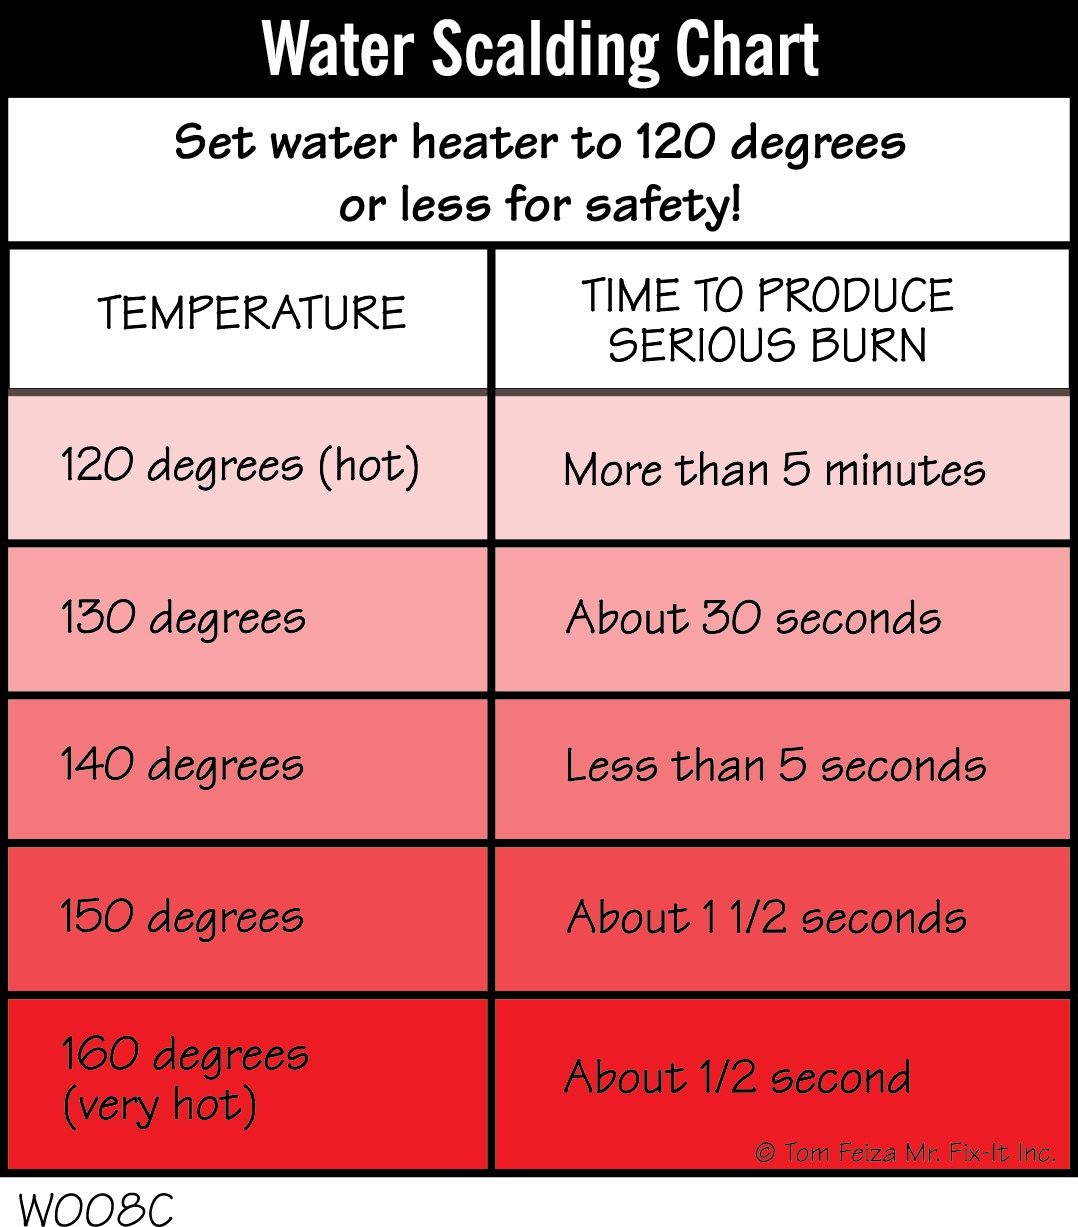
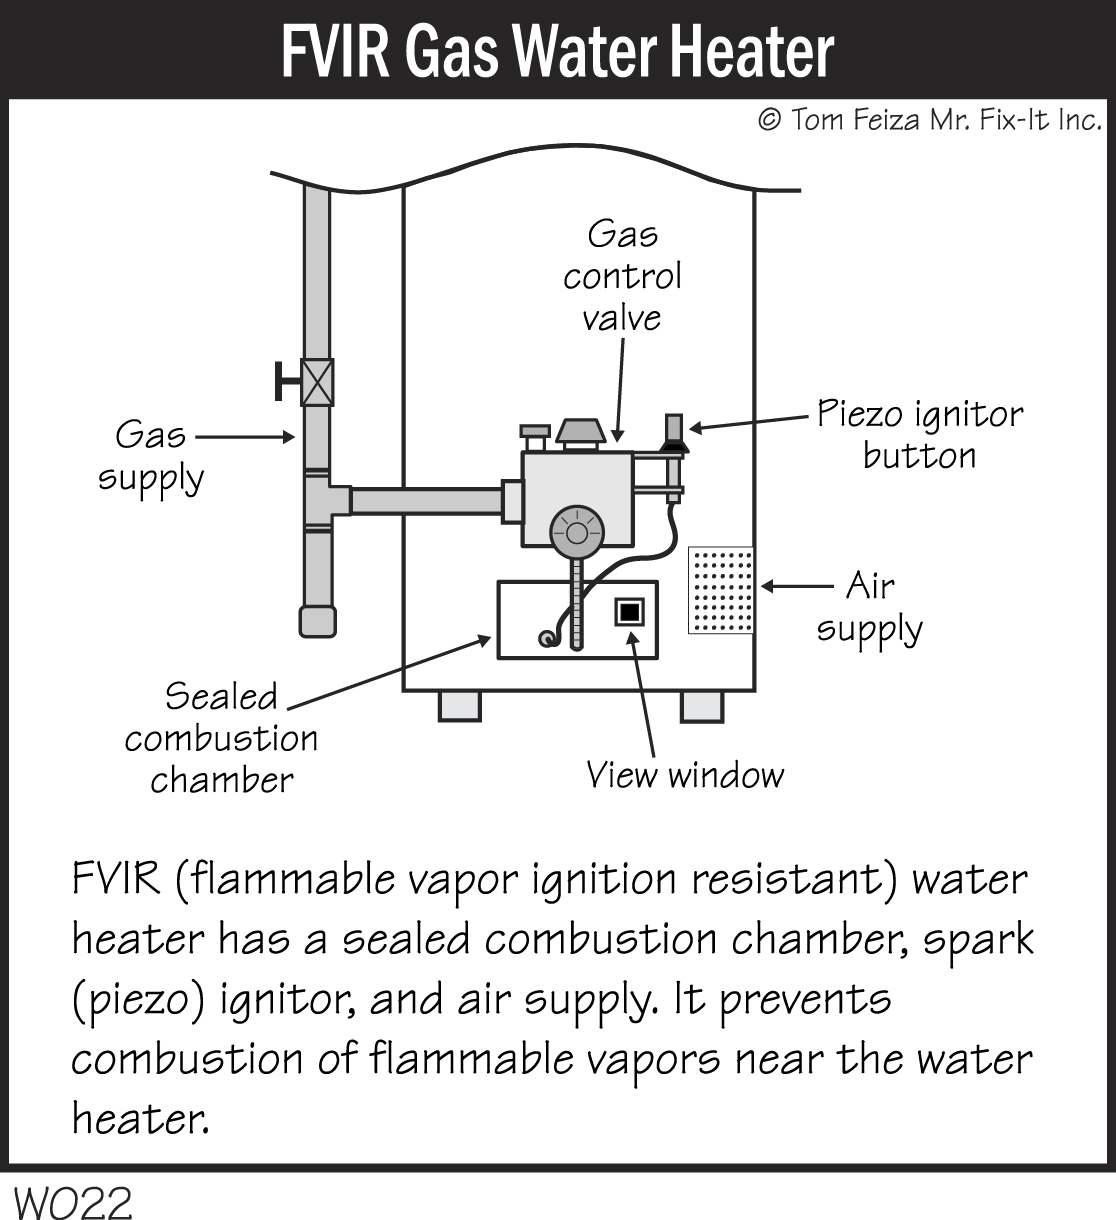
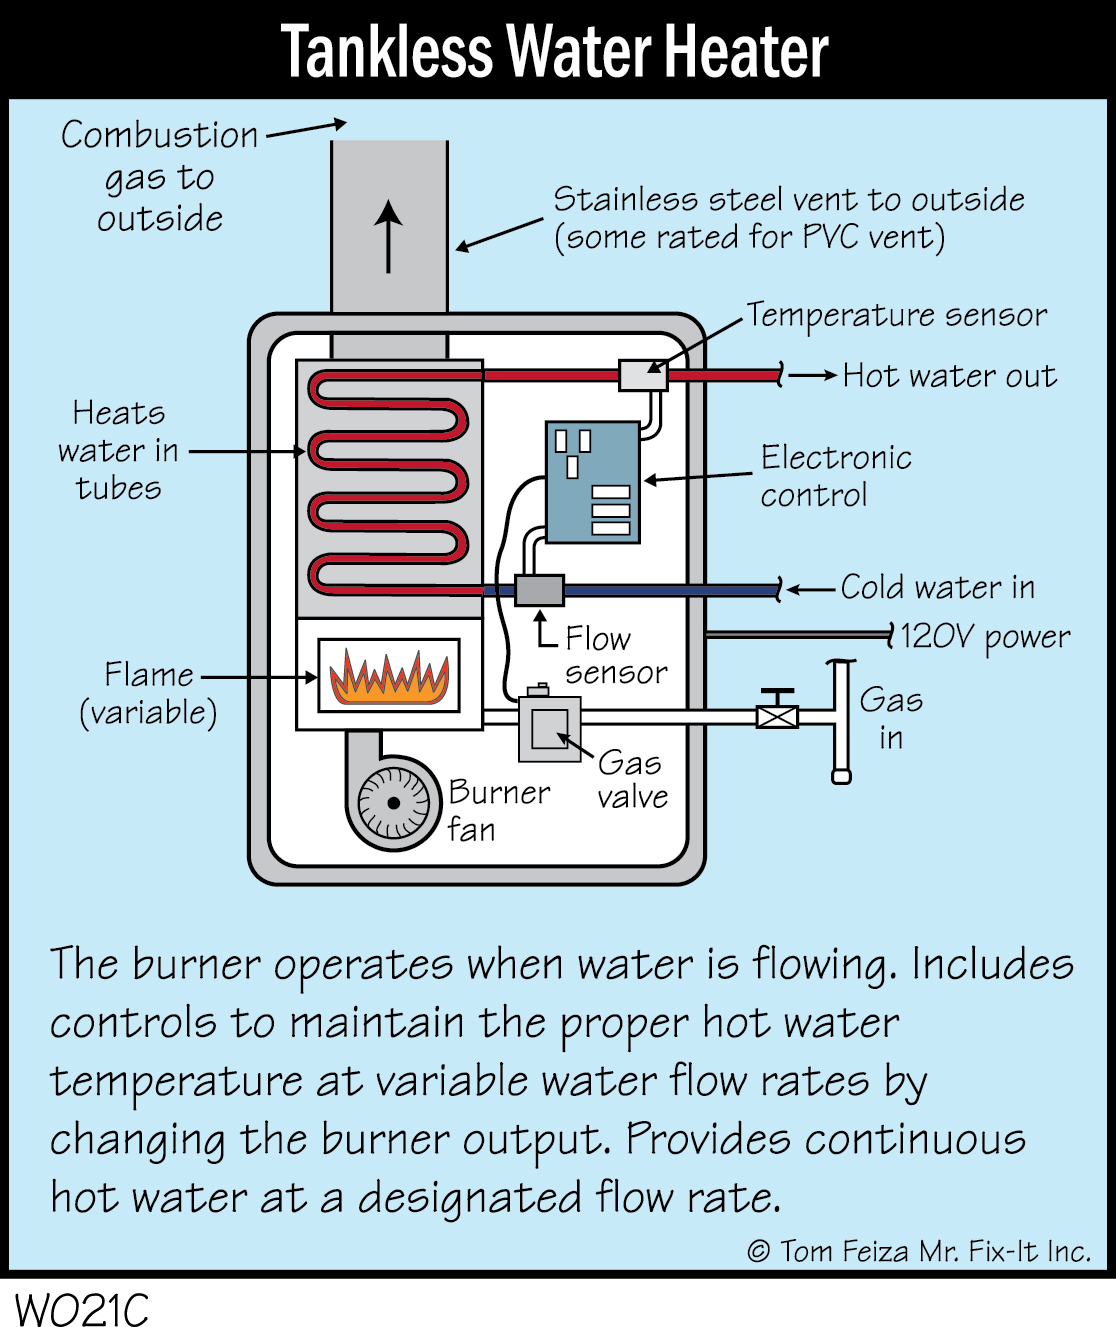
Federal requirements mandate that new gas water heaters must be flammable vapor ignition resistant (FVIR). Some homes have tankless or instantaneous water heaters without a storage tank.
Routinely check your water heater for leaks. A leak is a sign of an impending failure, and you should replace the unit as soon as possible.
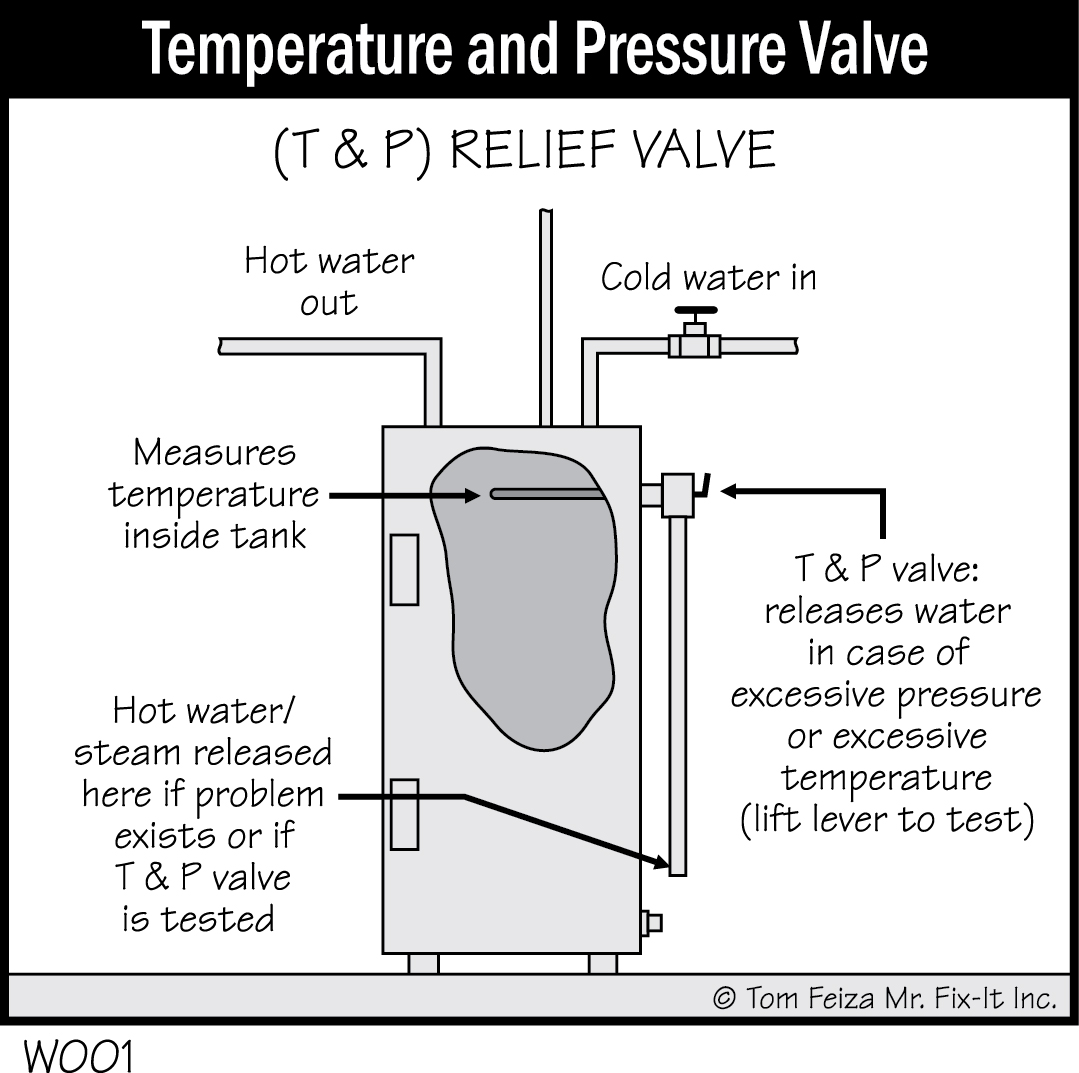
Also, routinely check the temperature and pressure (T and P) relief valve. This valve, which has a small lever, will be located on the top or side of the heater tank; the relief pipe should extend from the valve to within 6” of the floor. If water leaks from the relief valve, the valve should be replaced, because a leak may plug the valve with scale and debris. A plugged valve may fail to open if the tank overheats—a dangerous situation.
Manufacturers of T and P valves recommend testing the valve periodically by lifting the lever and allowing water to flow from the valve. They recommend this as a safety measure so you will know whether the valve will work if needed. But there’s a risk that the valve won’t close properly and will keep leaking, and then it will need to be replaced. When you do test the relief valve, do it when you can buy a replacement or get quick service from a plumber.
Manufacturers also recommend that you periodically drain water from the valve at the base of the water heater. This is a good procedure to follow if there is sediment in your water supply—but, again, few people follow this procedure, because their water systems have little sediment. If you do drain the tank, use a hose to direct water to a drain. Be careful—the water will be hot. If you haven’t used the drain valve in several years, it probably won’t close properly because of sediment buildup. If the valve leaks, you must replace it or cap it with a hose cap.
For a gas water heater, routinely inspect the metal flue pipe to the chimney. It should be free of rust, and it must be securely fastened to the water heater and the chimney. Also, have a contractor routinely inspect and clean the burner. A burner covered with rust indicates that the unit is not drafting well; the internal flue pipe is rusty, and the unit could be producing carbon monoxide. Every time you have your gas furnace tested and tuned, ask the service technician to test the gas water heater and check the flue gas for carbon monoxide.
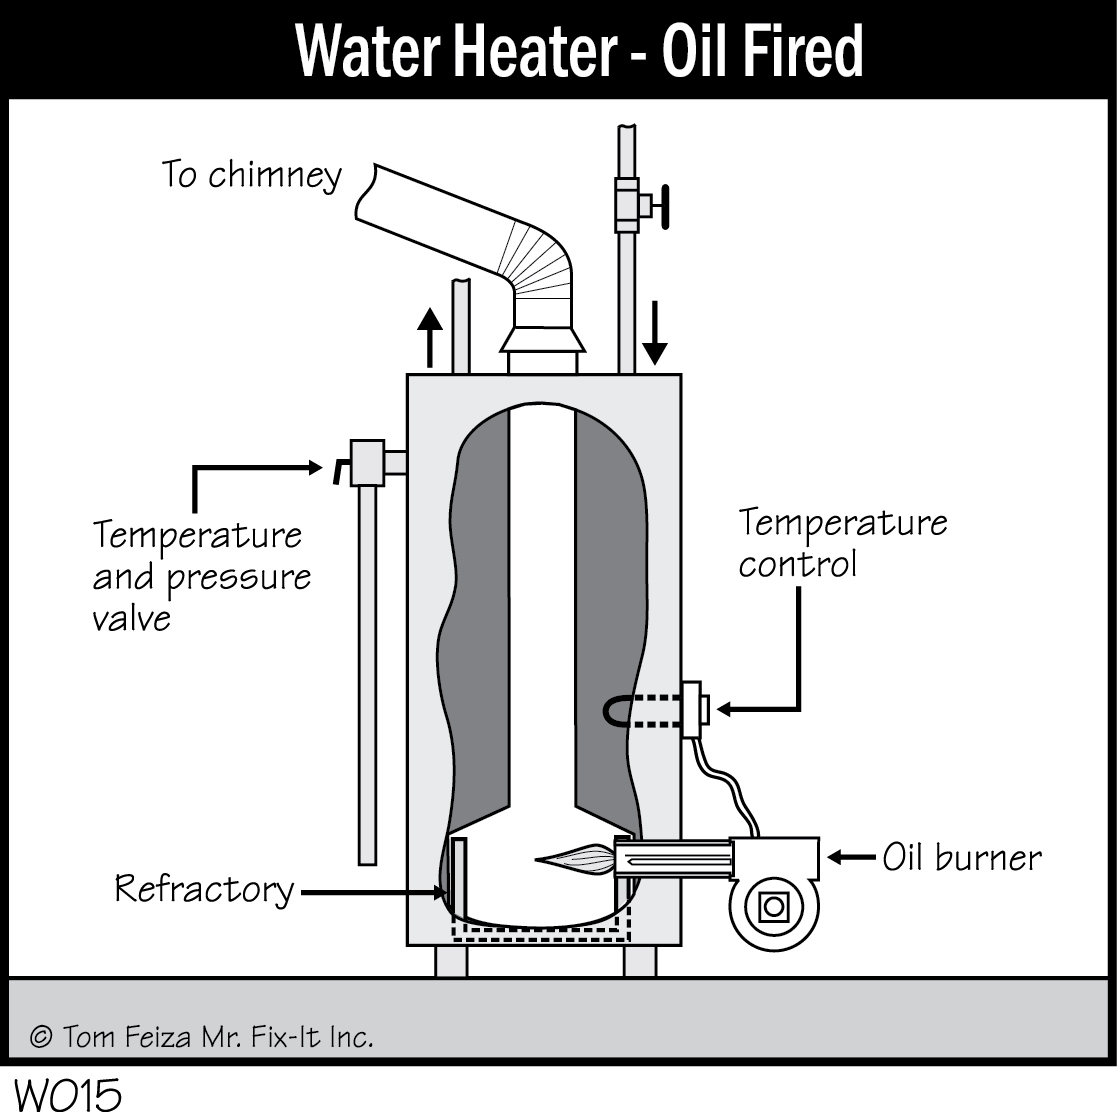
For an oil-fired water heater, follow maintenance procedures (including yearly service by a professional) recommended in the section on the oil burner furnace. For more info on gas and propane-fired heaters, see the end of this chapter.
Must Know / Must Do – Water Heater
- Know how to operate the hot water shutoff valve.
- Know how to turn off the gas, oil or electrical power.
- Inspect the flue of a gas water heater yearly.
- Routinely check the water heater for leaks.
- Have an oil-fired water heater serviced yearly.
- Make sure the temperature and pressure valve is not leaking.
- Check the water temperature at the faucet; set the water heater temperature to about 120 degrees F.
- Whenever you have your furnace serviced, ask the technician to check the water heater, too.
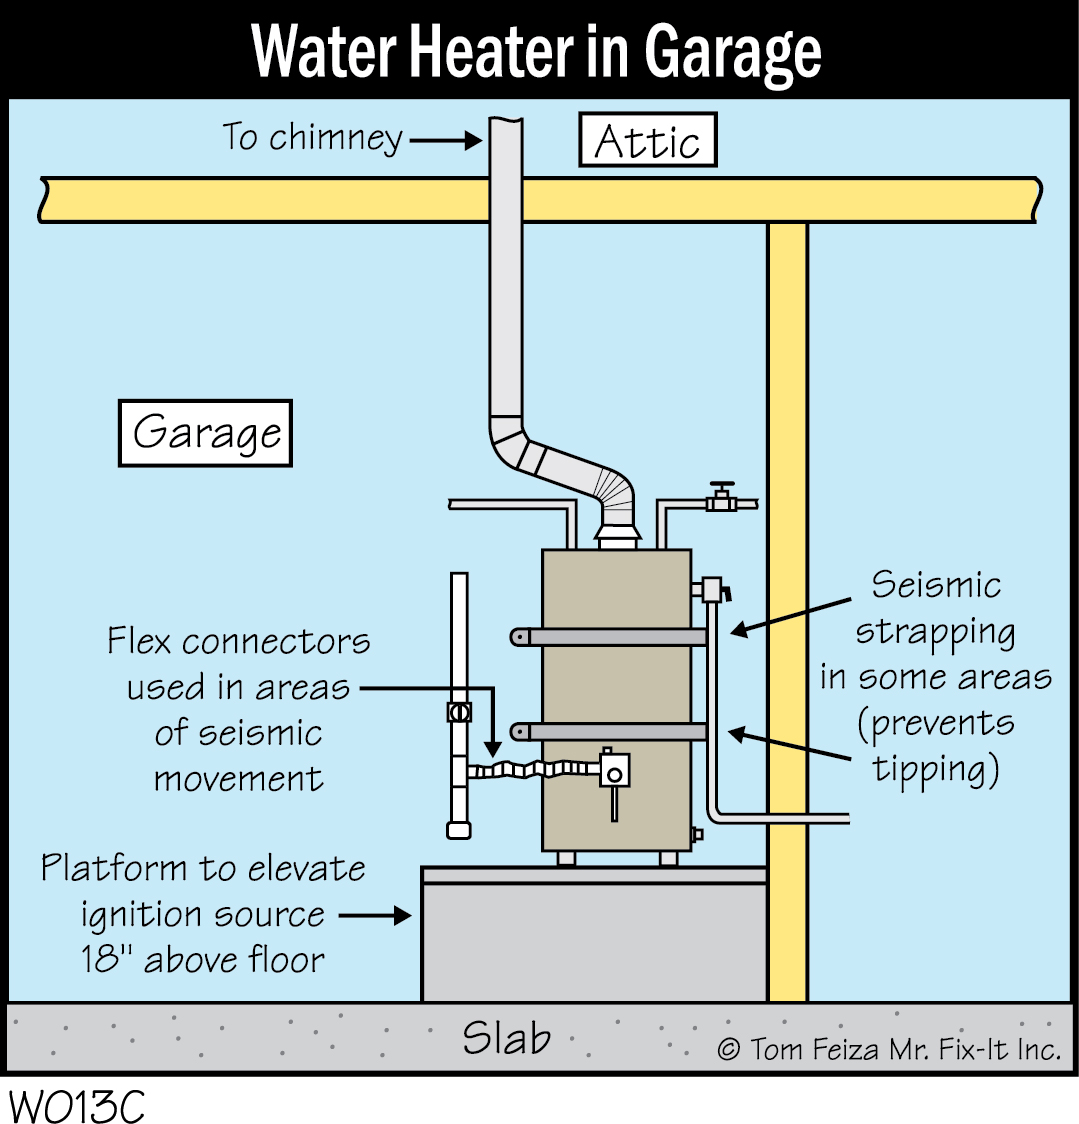
The following problems should be corrected by a professional: difficulties with the T and P valve; lack of hot water; failed electrical elements; and problems with the anode, dip tube, thermocouple, or pilot light.
Piping and Valves
Operating your home also requires a basic understanding of plumbing valves and piping. You may need to turn off the water in an emergency. You may need to shut off water to one sink or tub while it’s being serviced.
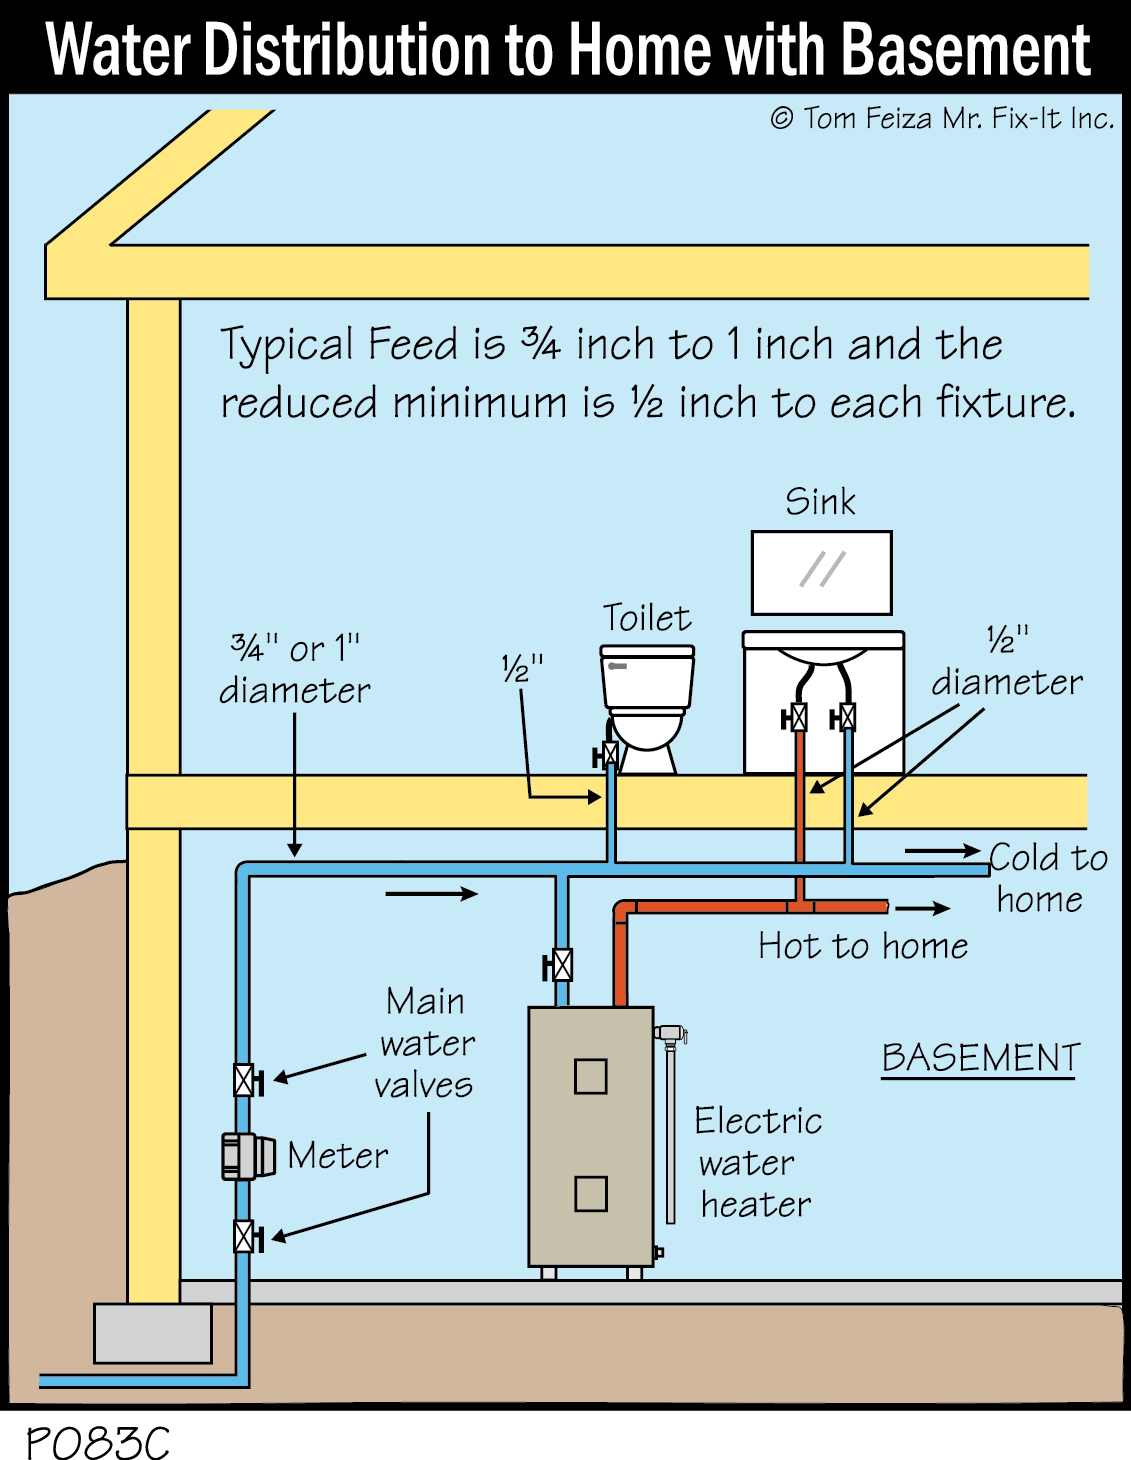
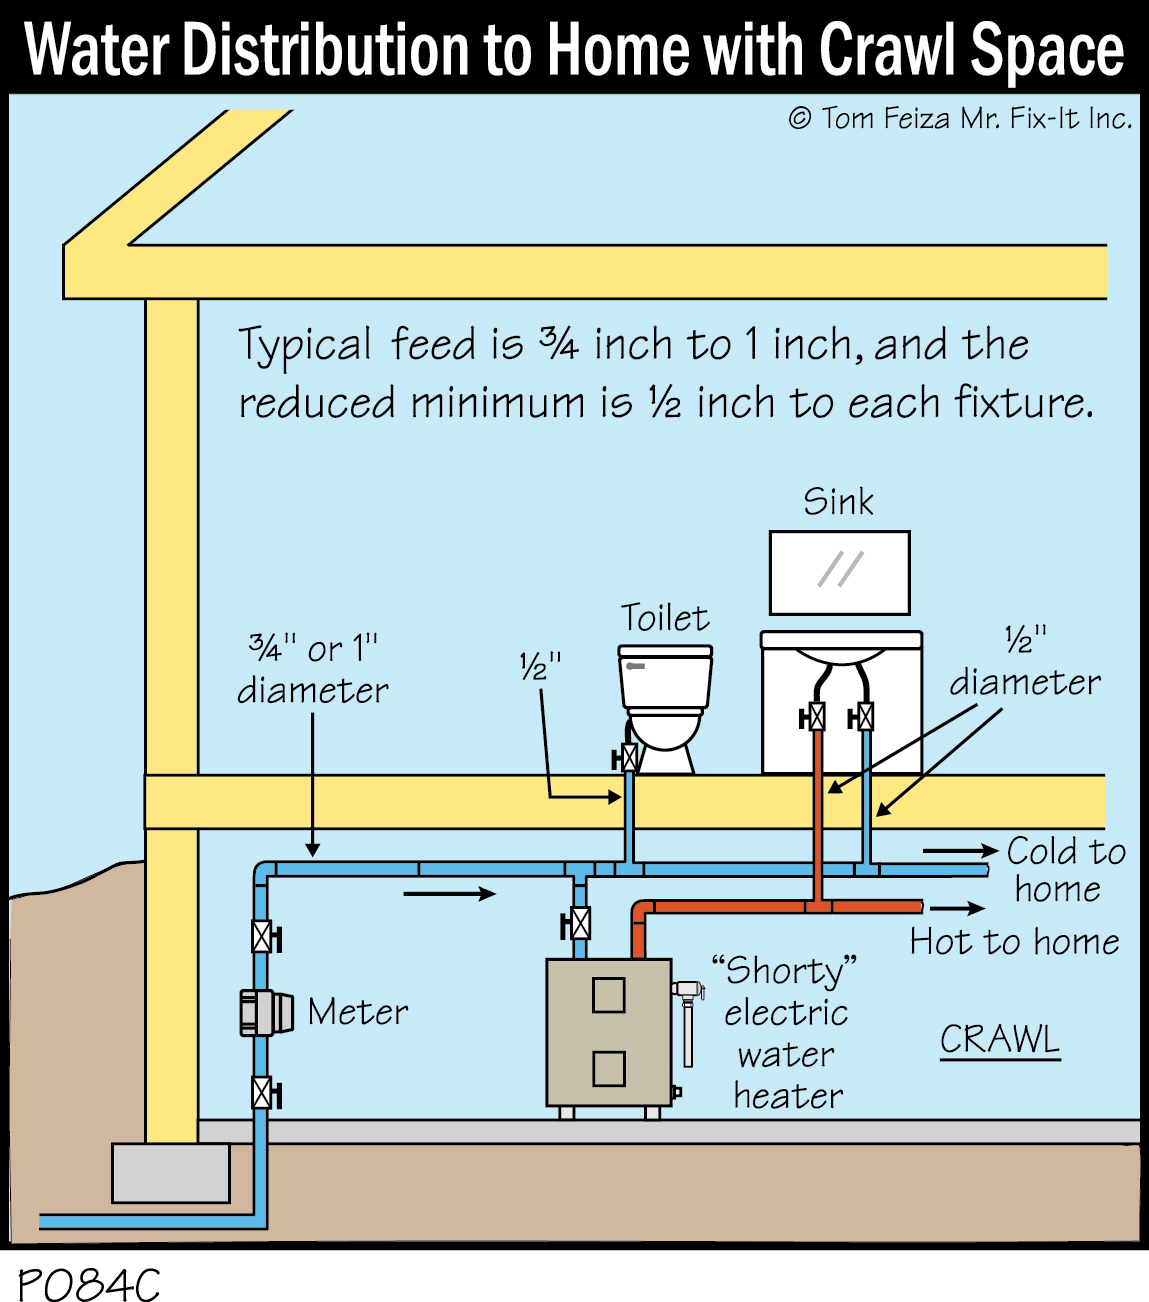
Pipes route water from the main feed to individual fixtures. Piping can be galvanized steel, copper or plastic. Each type of piping has elbows, tees, couplings and reducers to connect lengths of pipe and route them through walls and framing. Take a look at your system. You will notice that it starts with 3/4” or 1” pipes and reduces to pipes of smaller diameters as fewer fixtures are served.
Valves control the flow of water and enable you to disconnect parts of the system. You will find a combination of valves. Take a good look at your plumbing system to identify valves, determine what they control, and learn how they operate. It is a great idea to place a small tag on each valve identifying what it controls.
Piping – Distribution
Let’s trace the water flow from the municipal supply in the street or from your private well system. Water enters your home at the municipal main pipe or through the underground pipe connected to your private well system. You should locate the main valve and tag it for future use. Everyone in your home should know where this valve is located and how to operate it.
For homes with basements, the feed pipe enters through the basement floor or wall. The main feed will then have several valves at the meter in the basement or at the well storage tank. From there the water is fed to the water heater, and the system has two distinct feeds into the home—hot and cold water. If the water is hard and needs treatment, a piping system may also distribute softened water to the water heater and other fixtures. Typically, soft water is not provided to the kitchen sink and exterior hose connections.
In homes with crawl spaces, the main feed pipe enters through the floor or a side wall. The meter and main valves may be in the crawl space, in a closet, in the utility room, or outside. Distribution piping is usually routed through the crawl space and up the fixtures. If you are lucky, you will find a shutoff valve at each fixture or appliance.
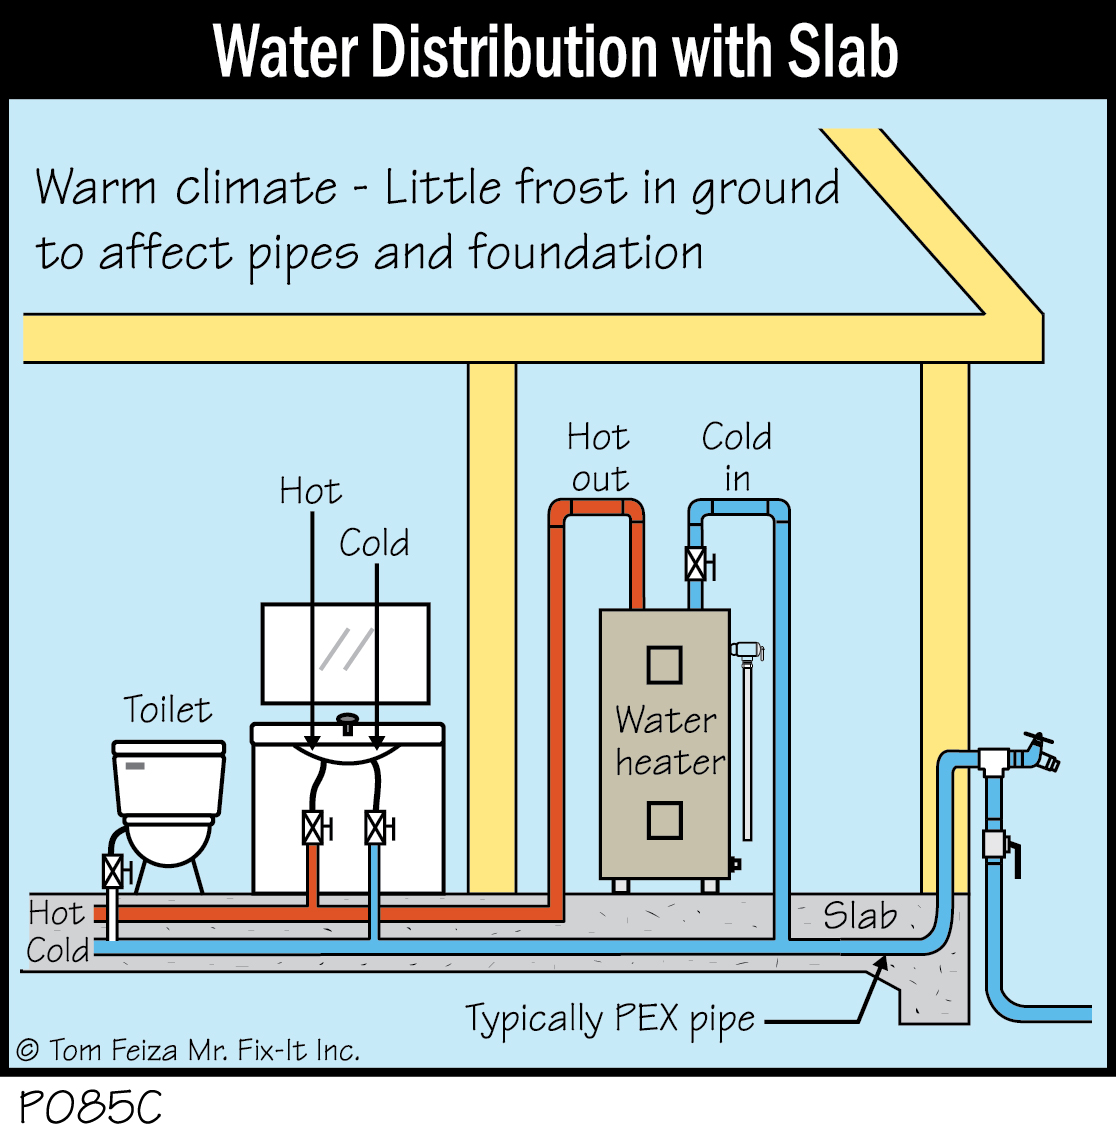
In homes built on a concrete slab, modern construction usually places the piping in the slab. The pipes are laid out, and then concrete is poured around the piping. Some homes built on a slab will have pipes run in the attic instead, and repairs or retrofit piping may also be run in the walls or the attic.
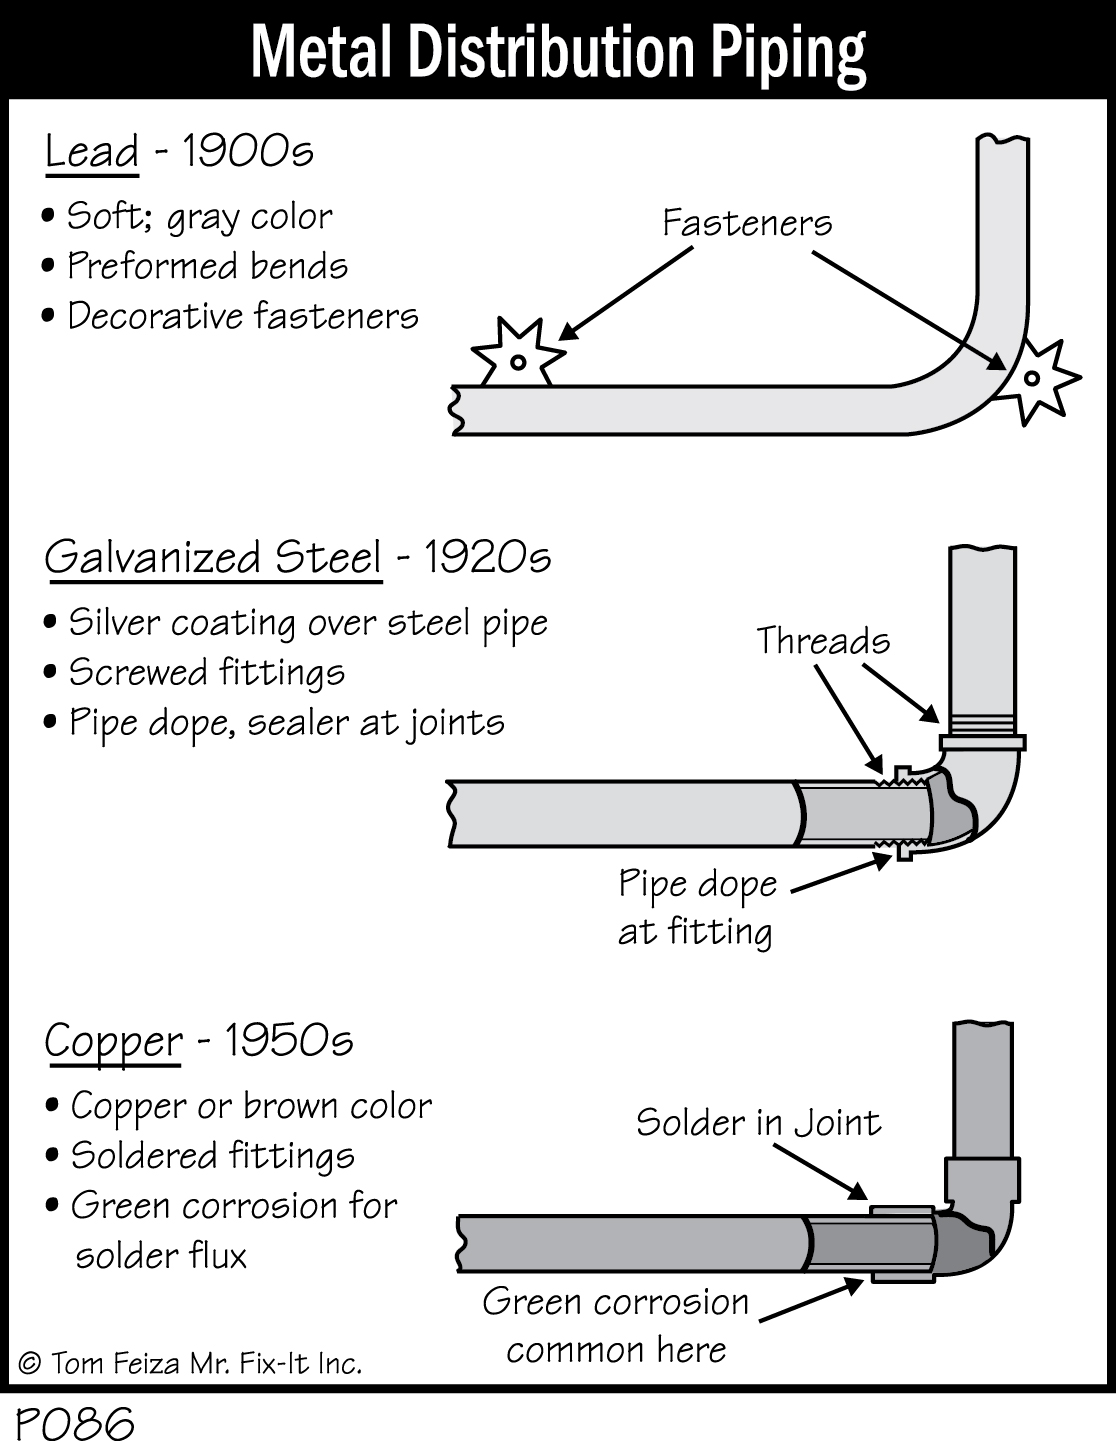
Material used for water distribution piping have changed over the years. In the early 1900s, lead piping was used. About 1910, this changed to galvanized steel, and around 1950 it changed to copper. The changes were made as better materials became available and companies looked for ways to reduce labor on installation.
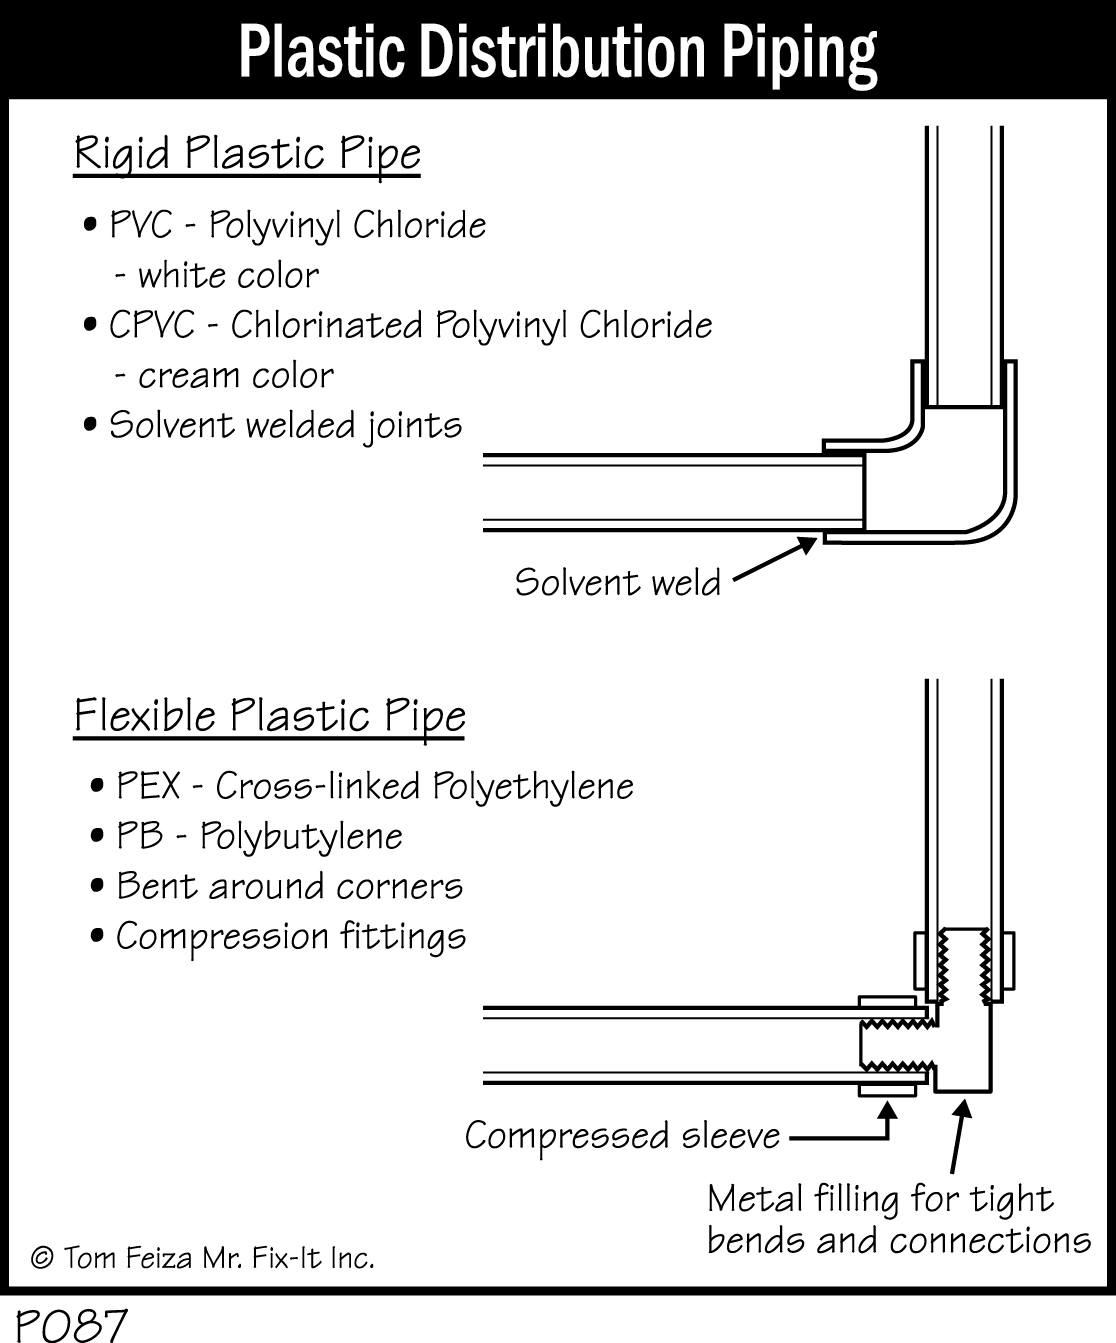
Since about 1970, various plastic piping systems have been used. Some plastic piping systems have plastic-welded fittings and are installed much like metal pipe by starting with a large feed and reducing the pipe size toward the end of the run.
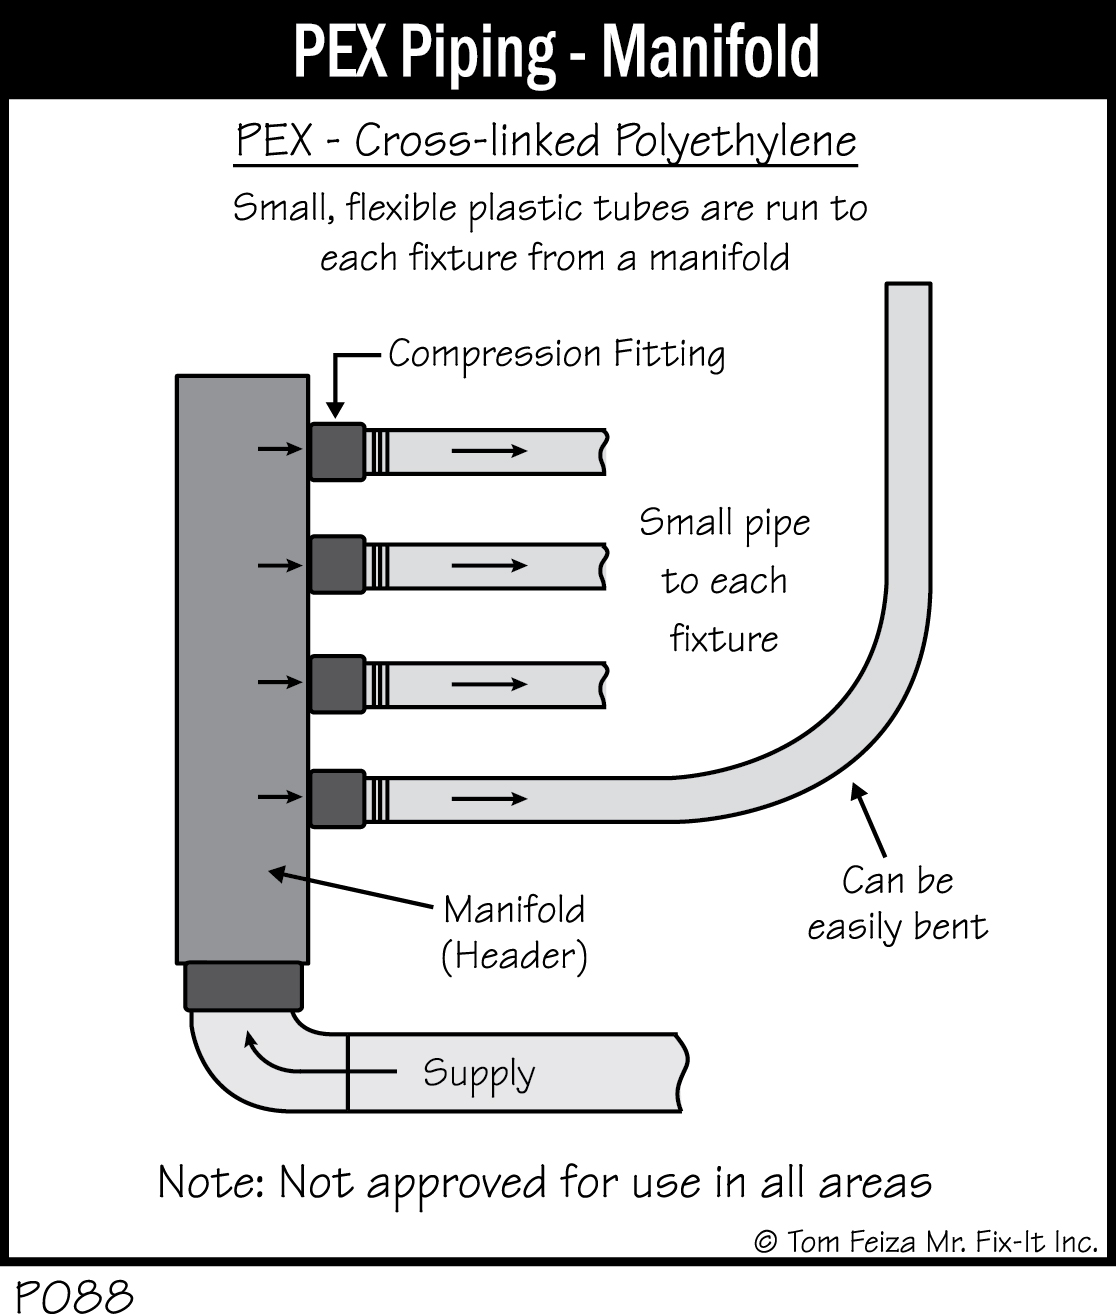
PEX is a unique piping system. It is installed with a large main feed pipe to a header (manifold). Small tubes feed each fixture. The piping is flexible and can be bent around some corners without fittings. Tight corners require fittings. Often, copper pipe is used for connections through walls and at fixtures. Fittings are compression type, installed by special tools.
Ball Valve
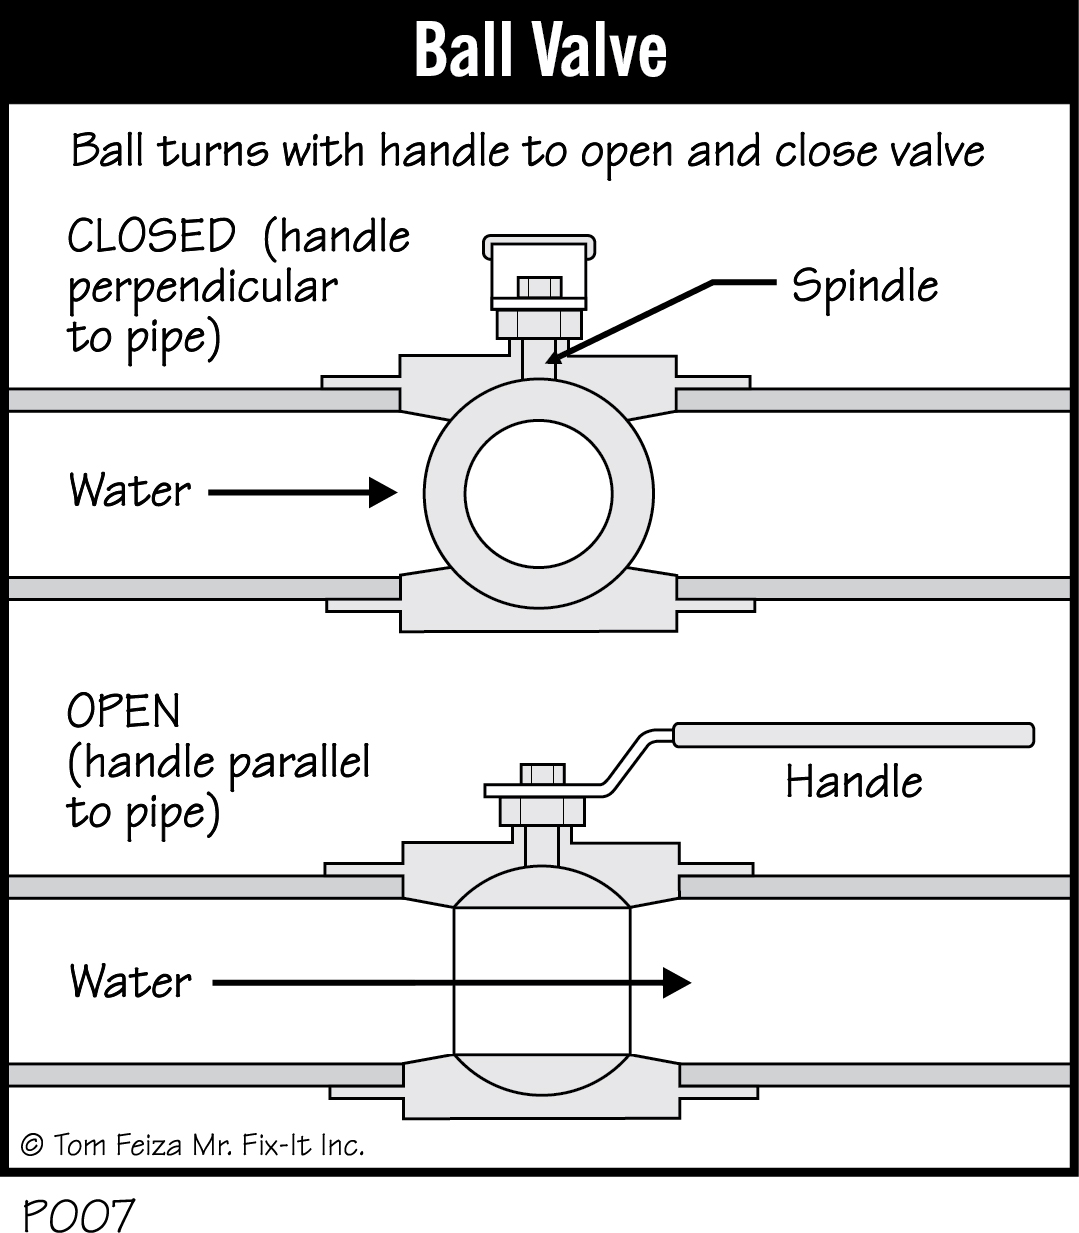
Ball valves are used where full flow is required. This valve is unique in that it turns fully on and fully off with a 90-degree turn of a short lever. When the lever is parallel to the pipe, the water is on; when the lever is perpendicular, the water is off. Ball valves are often used at the main feed line and the water heater.
Gate Valve
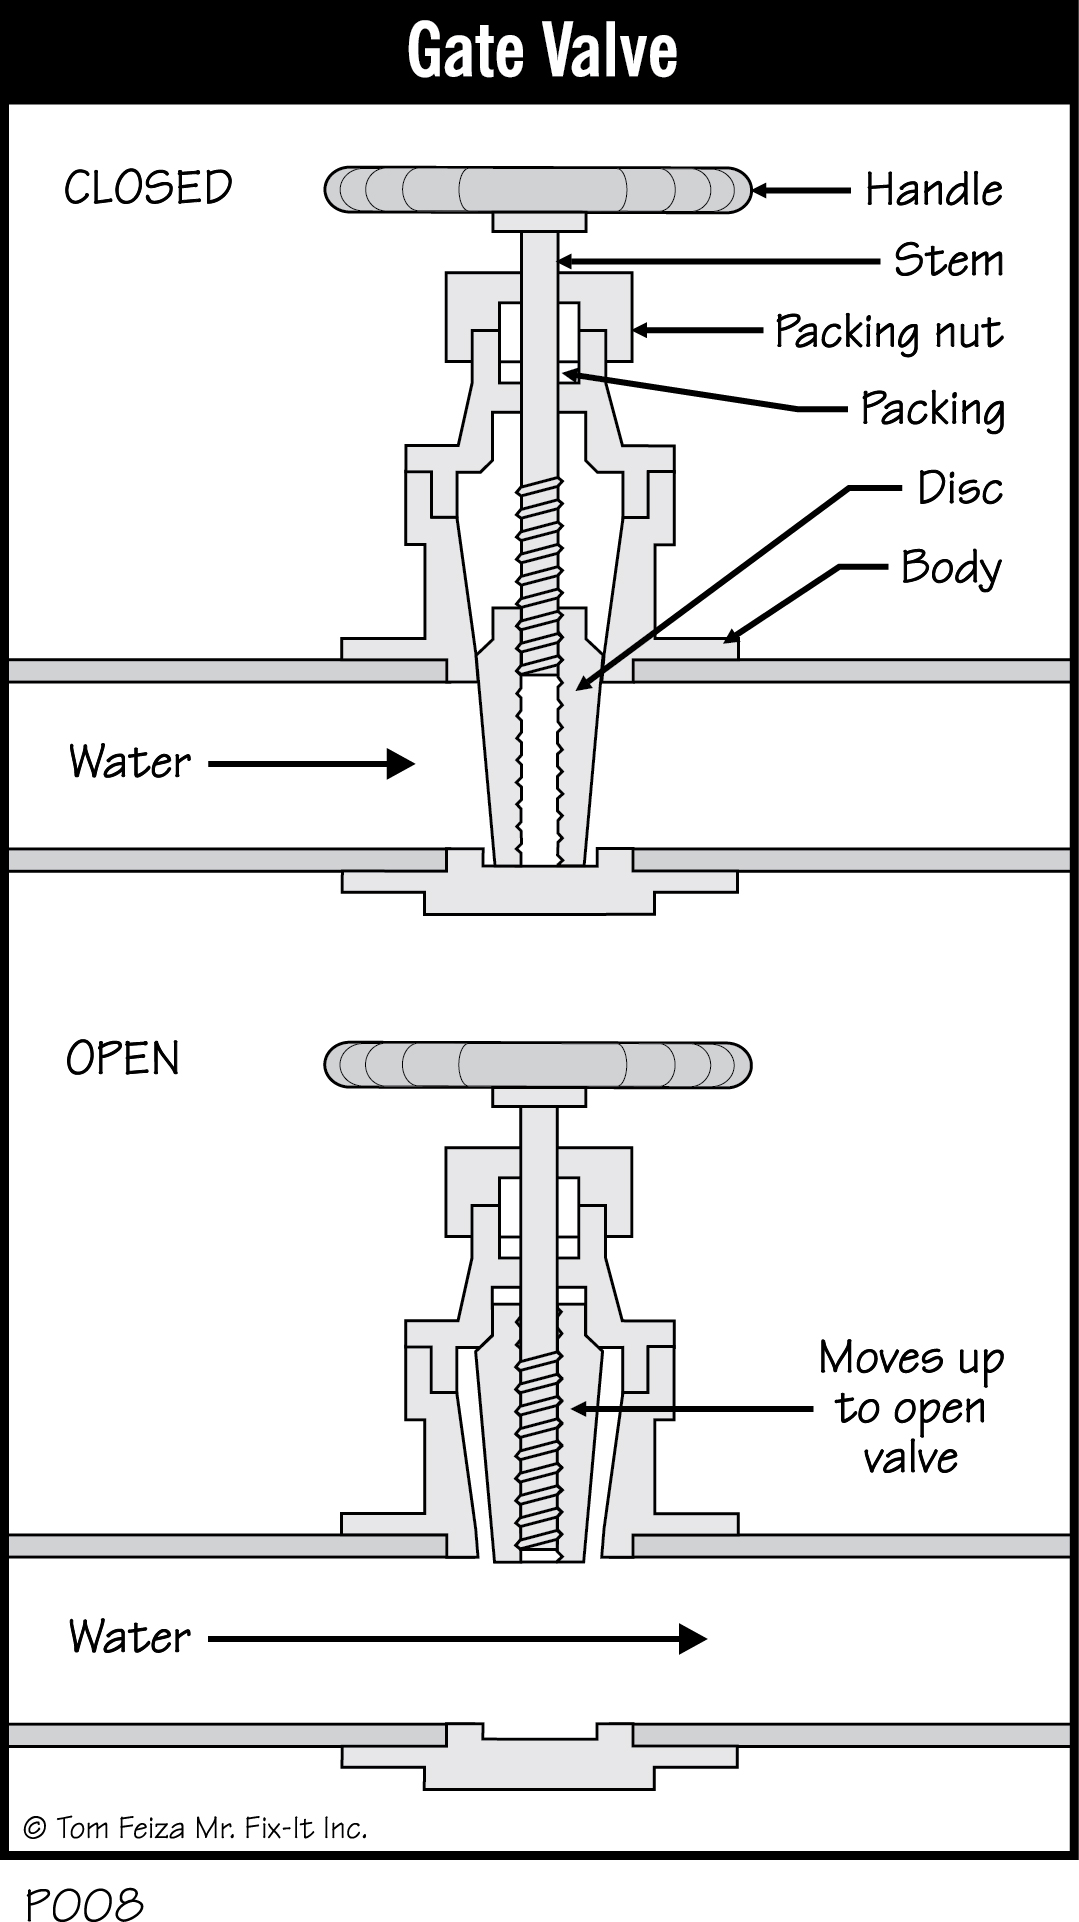
As you turn the handle, a “gate” inside the valve closes, controlling water flow. A gate valve is designed to be completely open or closed. It is often used at the main feed line.
Globe Valve
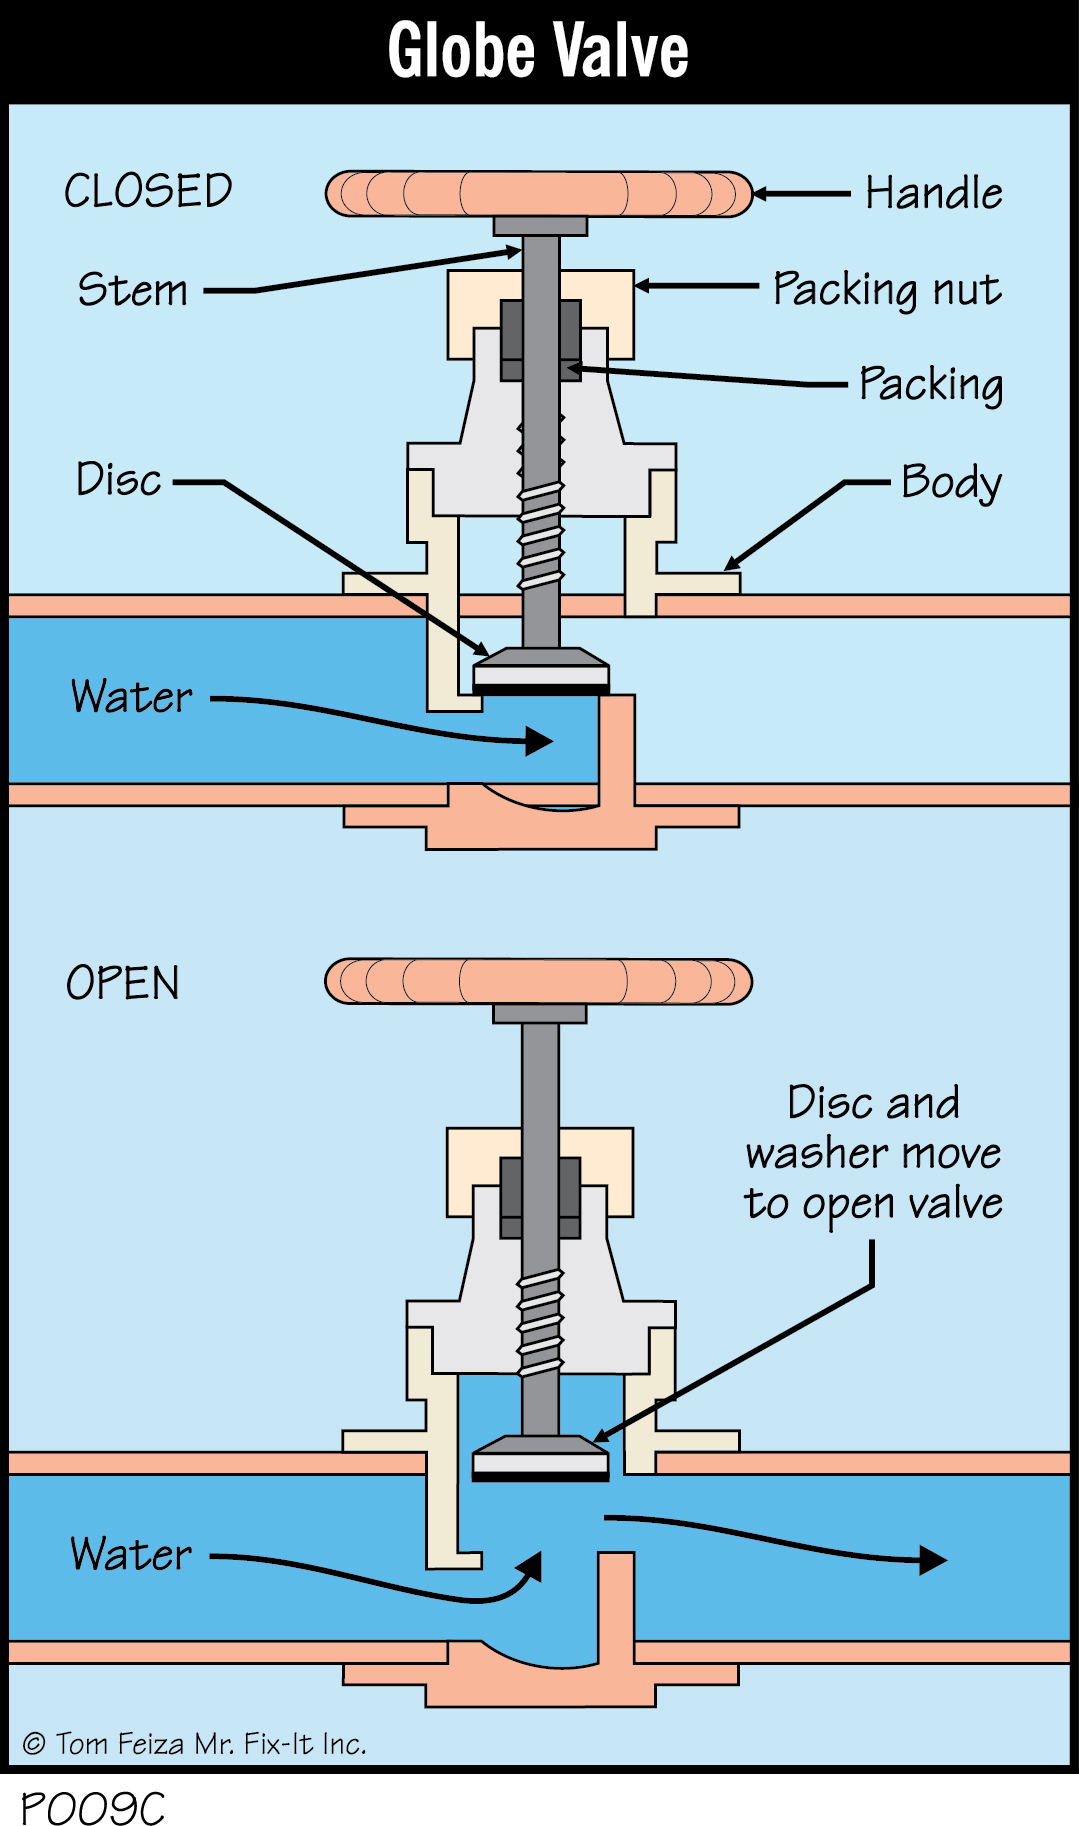
A globe valve uses a washer and a set. It can be throttled to control water volume, but generally it is not used in the main shutoff.
Saddle Valve
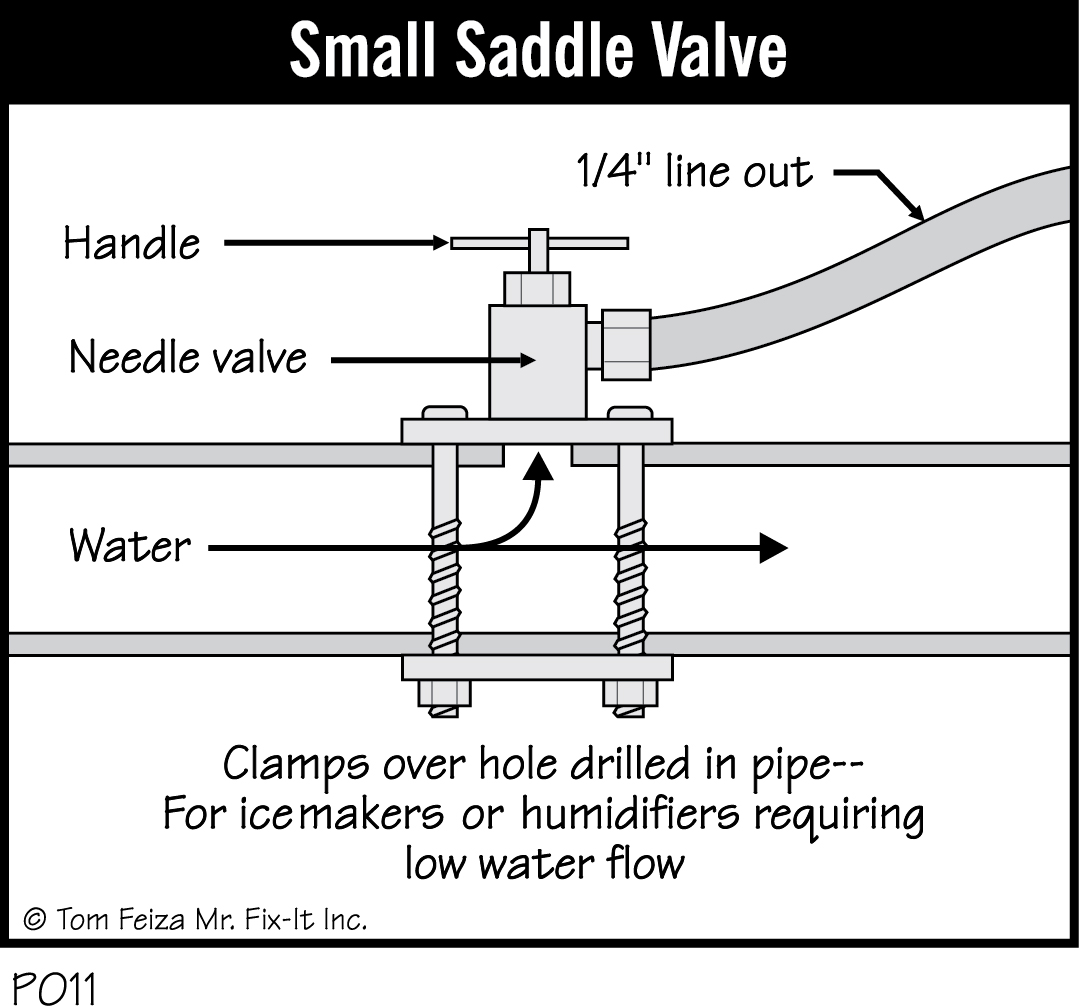
This is a small valve mounted on the side of a pipe like a saddle mounts on a horse. Saddle valves are frequently found on the water supply line for icemakers and humidifiers. They provide only a low flow of water and are prone to leaks.
Hose Bib
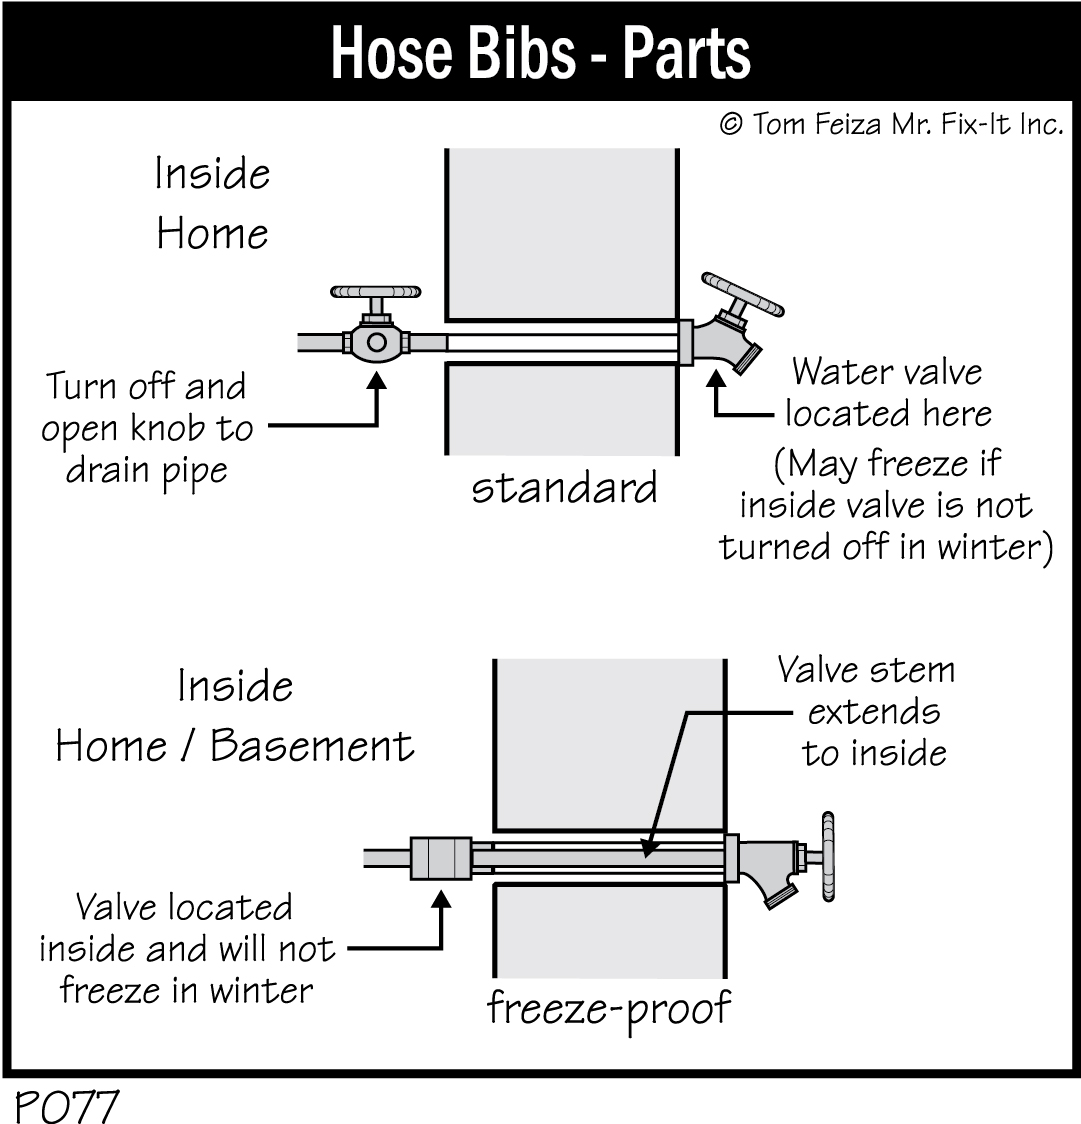
A hose bib is an exterior hose connection valve. You may also find a hose bib at a utility sink. The hose bib has a threaded end to accept a garden hose. More information about hose bibs appears later in this chapter.
Water Softener
If your home has hard water (minerals in the water), you’ll probably want to use a water softener. Hard water can corrode piping and fixtures and cause a buildup of deposits. It leaves spots on dishes cleaned in the dishwasher, makes surfaces hard to clean, and interferes with detergents in the clothes washer and shampoos you use on your hair.
A water softener removes the offending minerals, calcium and magnesium and adds a small amount of sodium. A softener can also remove small concentrations of iron.
There are two basic types of salt brine water softeners. One has two separate tanks: a salt brine tank and a resin tank. Salt pellets are placed in the brine tank and soaked in water, creating salt brine. The salt brine is flushed through the resin on a routine basis, based on a time clock or usage meter. Salt ions attach to the resin. As hard water flows through the resin tank, hard water elements such as magnesium and calcium precipitate onto the resin surface. In the process, a small amount of salt is added to the water.
The second type of salt brine water softener has the resin tank located inside the brine tank. The system operates as described above. The only difference is that from the outside, the softener looks like it has only one tank. If you open the cover, you will see the second tank.
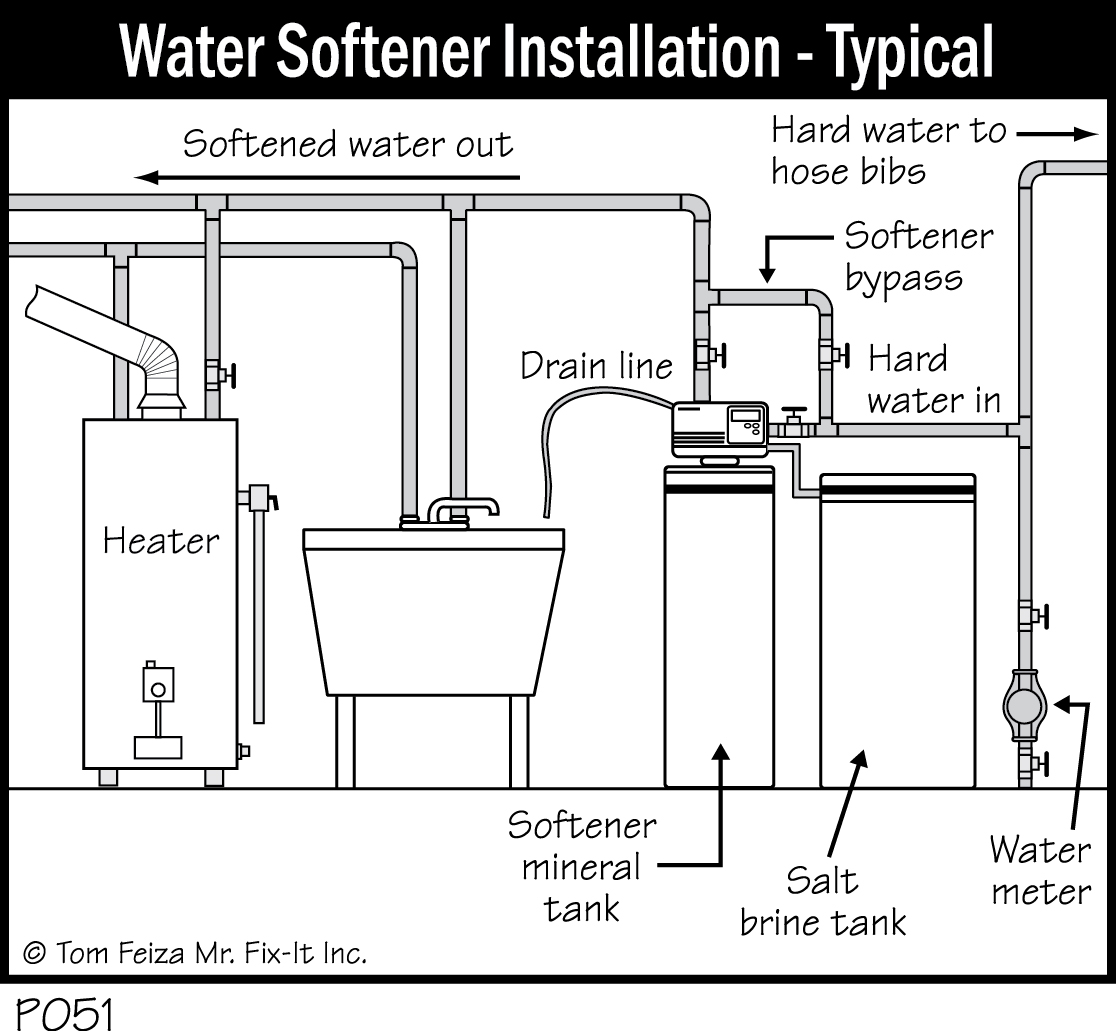
The softener is often located near the water main. Normally, it is connected to hot water and bathroom fixtures. It is not routinely connected to tap water in the kitchen because of the slight amount of sodium being added to the water. Also, the softener is not routinely connected to exterior hose piping because there is no need to soften exterior water.
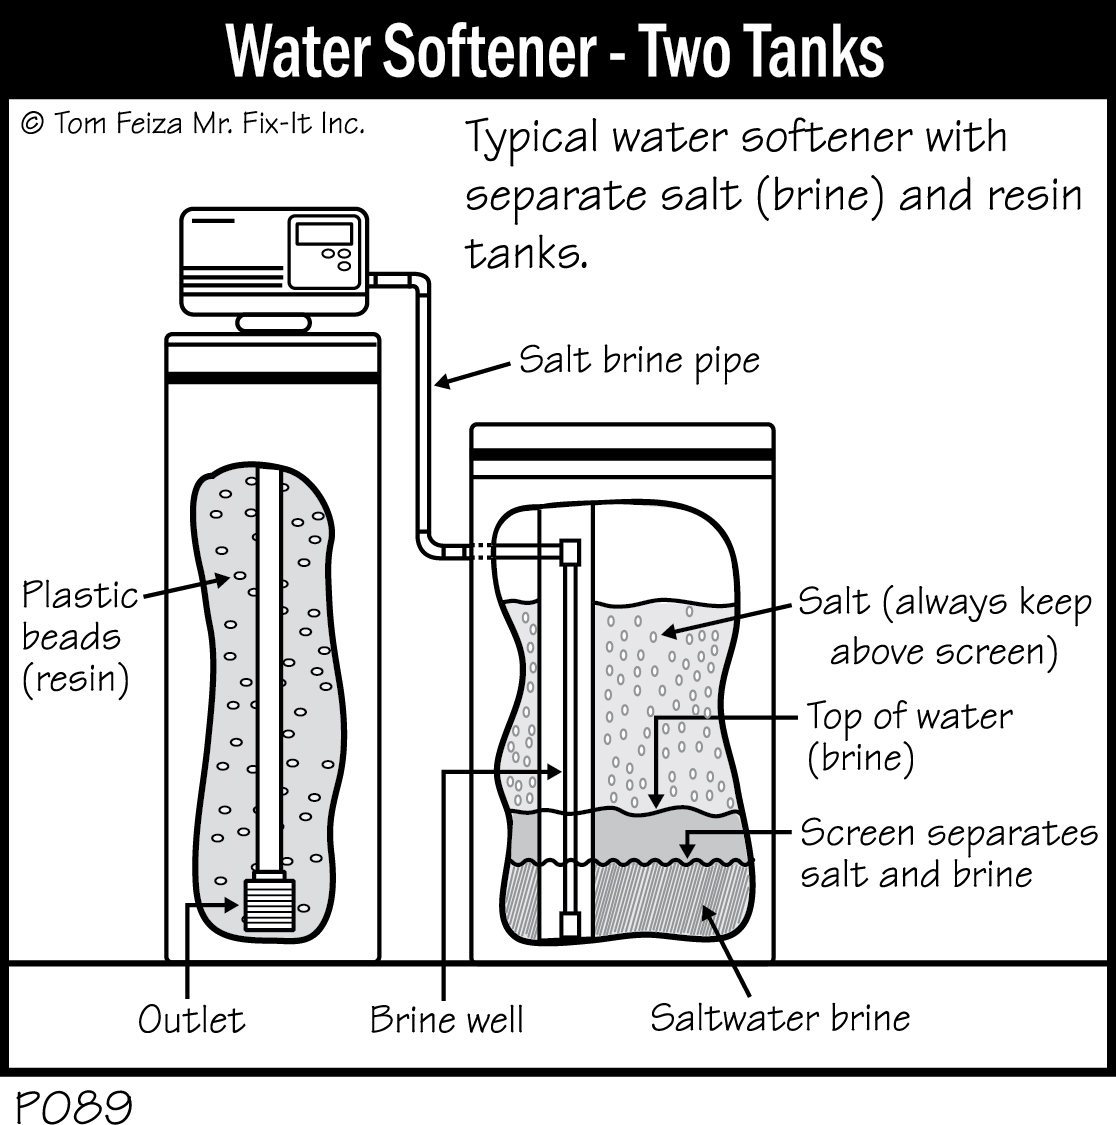
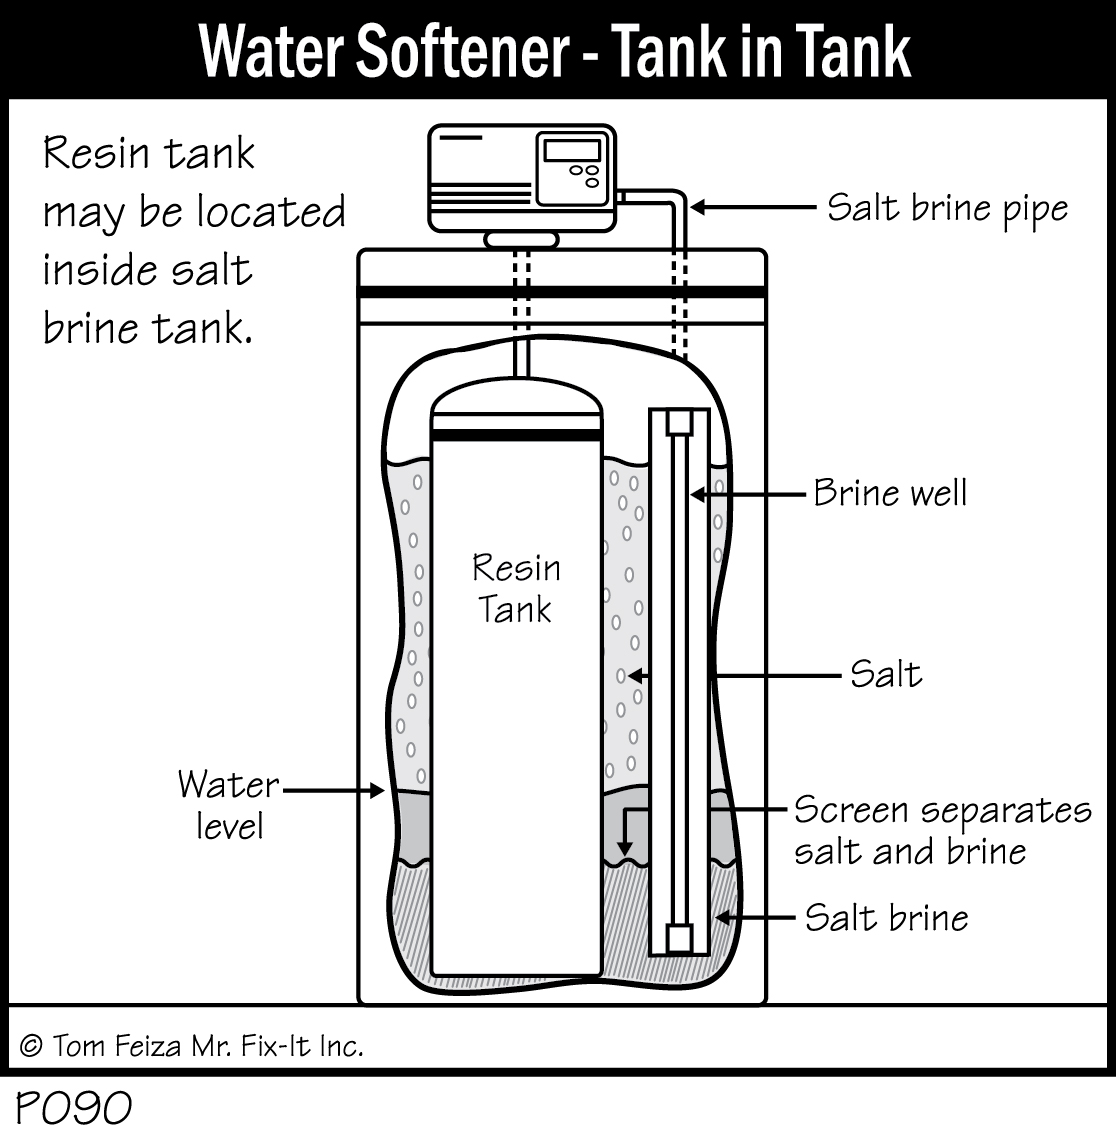
A professional should test water for hardness and estimate the amount of water usage, then set up the softener. Some of the better models of softener will base their cycle on the amount of water used. Others cycle on a timer device.
To maintain a water softener, you must keep a supply of salt in the salt brine tank. Use salt that has been processed into pellets, or whatever salt is recommended by the manufacturer. Do not use plain rock salt; it contains small amounts of impurities that will ruin the system over time.
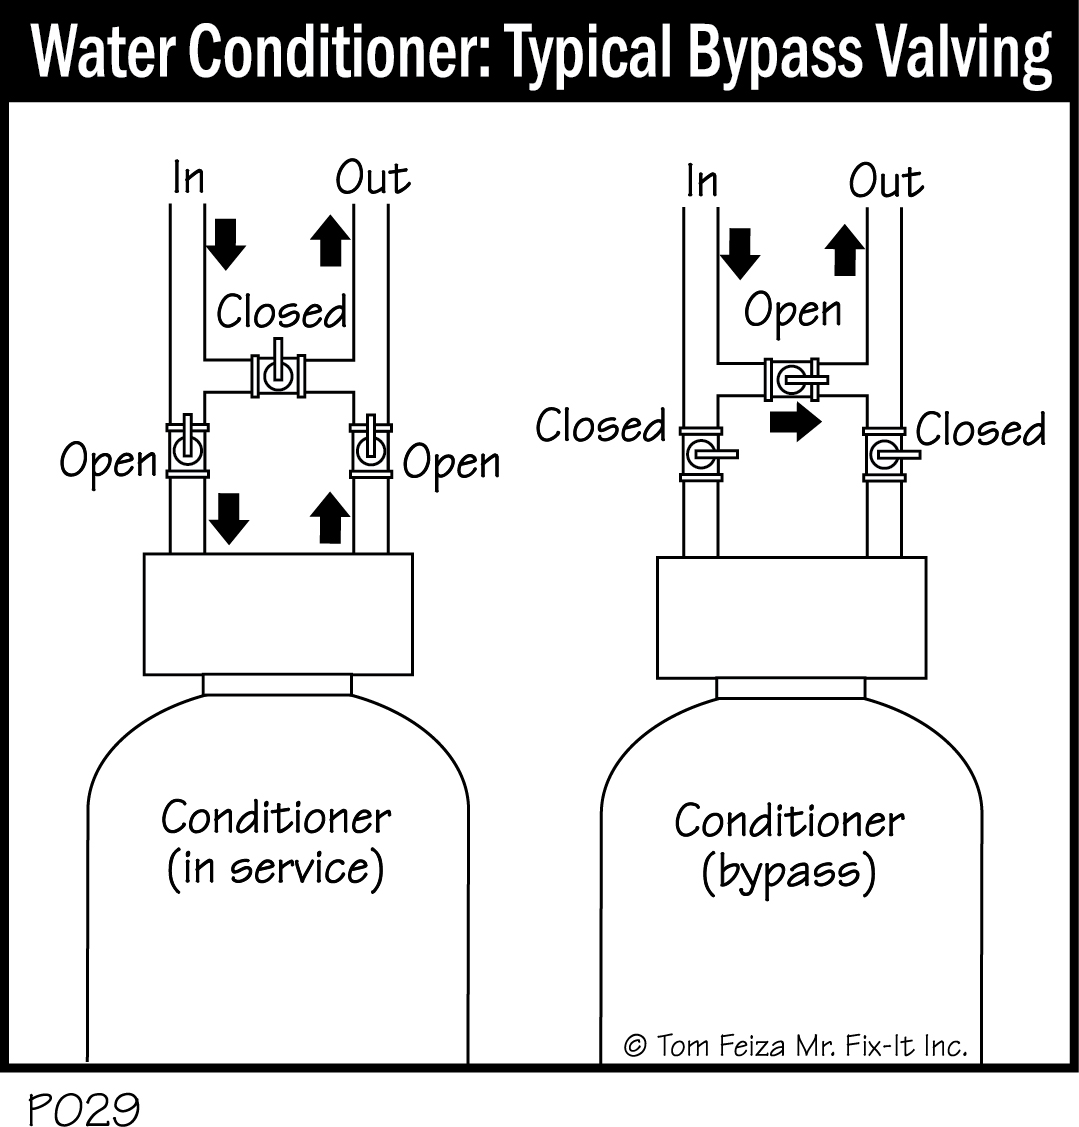
Water treatment systems are almost always installed with a method to “bypass” the system for maintenance and repairs. The bypass involves three valves that are opened or closed to route the water through the system or to bypass the system.
Must Know / Must Do Water Softener:
- Use the proper salt, and keep some salt in the brine tank at all times.
- Watch for leaks.
- If spots appear on dishes and the water doesn’t feel “slippery,” your softener is not working. Check the salt supply first.
- If the unit cycles on a timer, make sure it’s set properly for the number of people in your home. Review the manufacturer’s instructions.
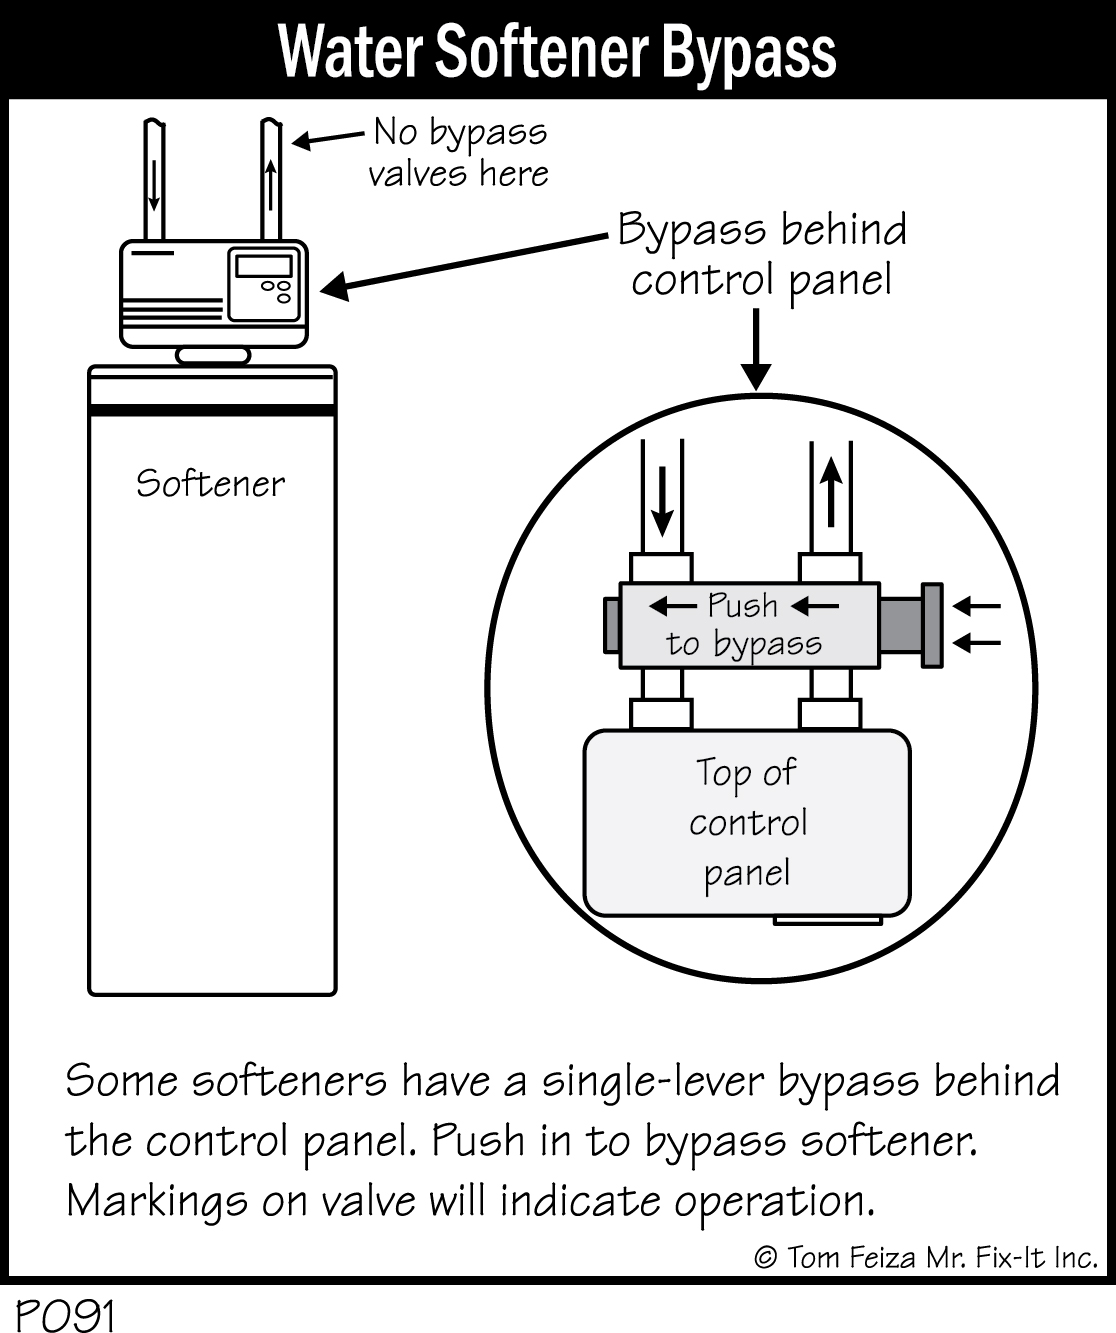
Several types of water softeners have a bypass hidden behind the control panel on top of the softener. Sliding a control lever operates this type of bypass. The lever switches both the hard and soft lines and provides a passageway for water to bypass the softener. These valves are marked with the correct directions for operation, but to find them you must look behind the softener control panel.
Other Water Treatment Options
If your home has water problems beyond basic hard water, consult a professional. Treatments for problem water include special iron filters, sediment filters, and reverse osmosis.
Iron Removal
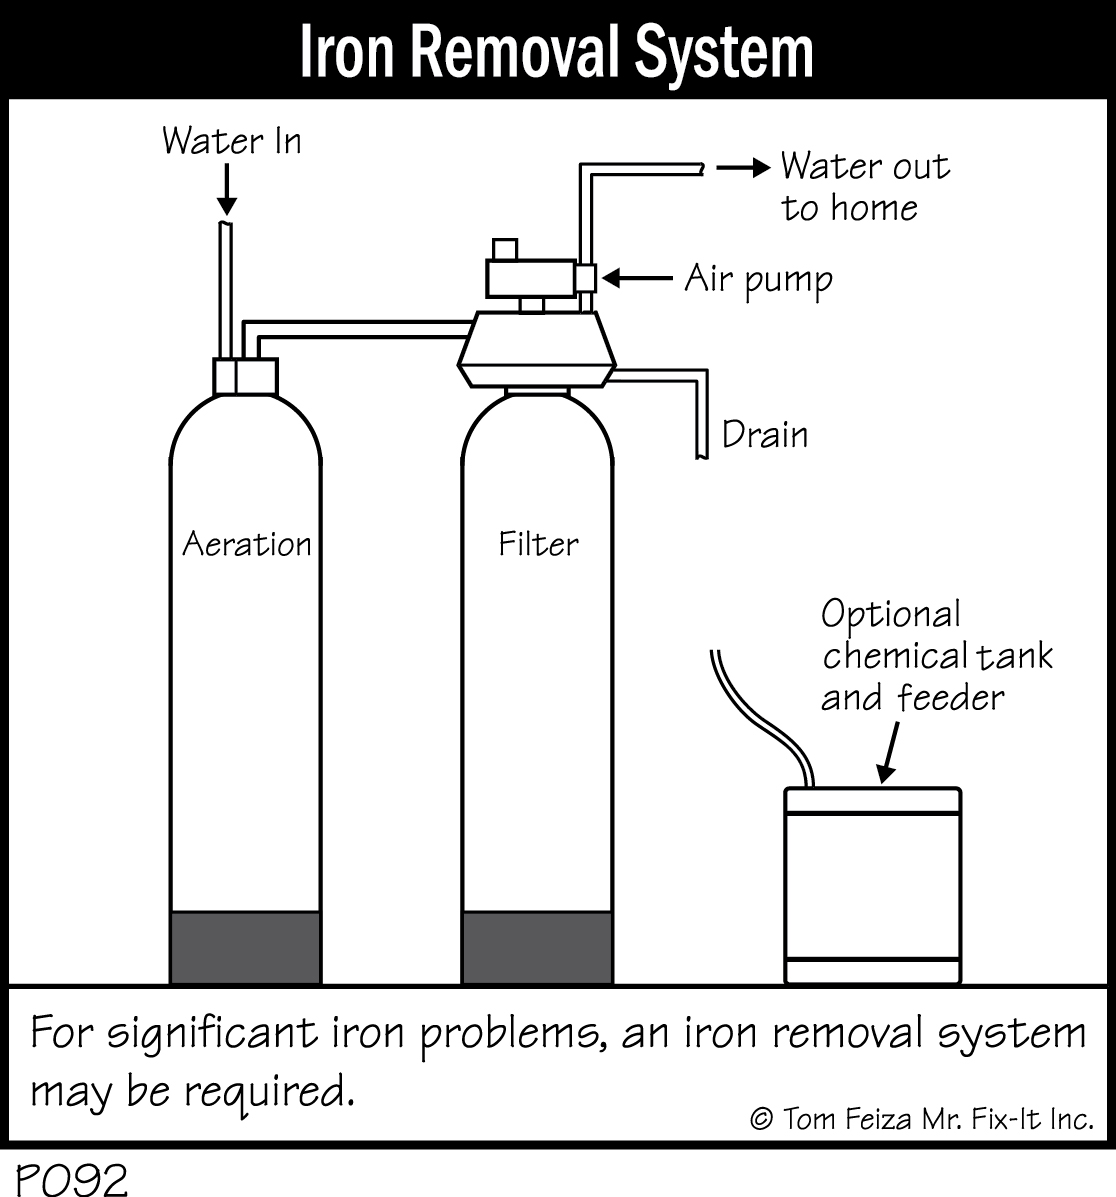
Iron creates a difficult problem with many private water systems. Often a simple filter or softener will not remove large quantities of iron. Special treat systems are available; they are expensive but very effective. They use two treatment tanks, an air pump, and sometimes, additional chemical treatment. These systems should be installed and maintained by a professional.
Water Filter
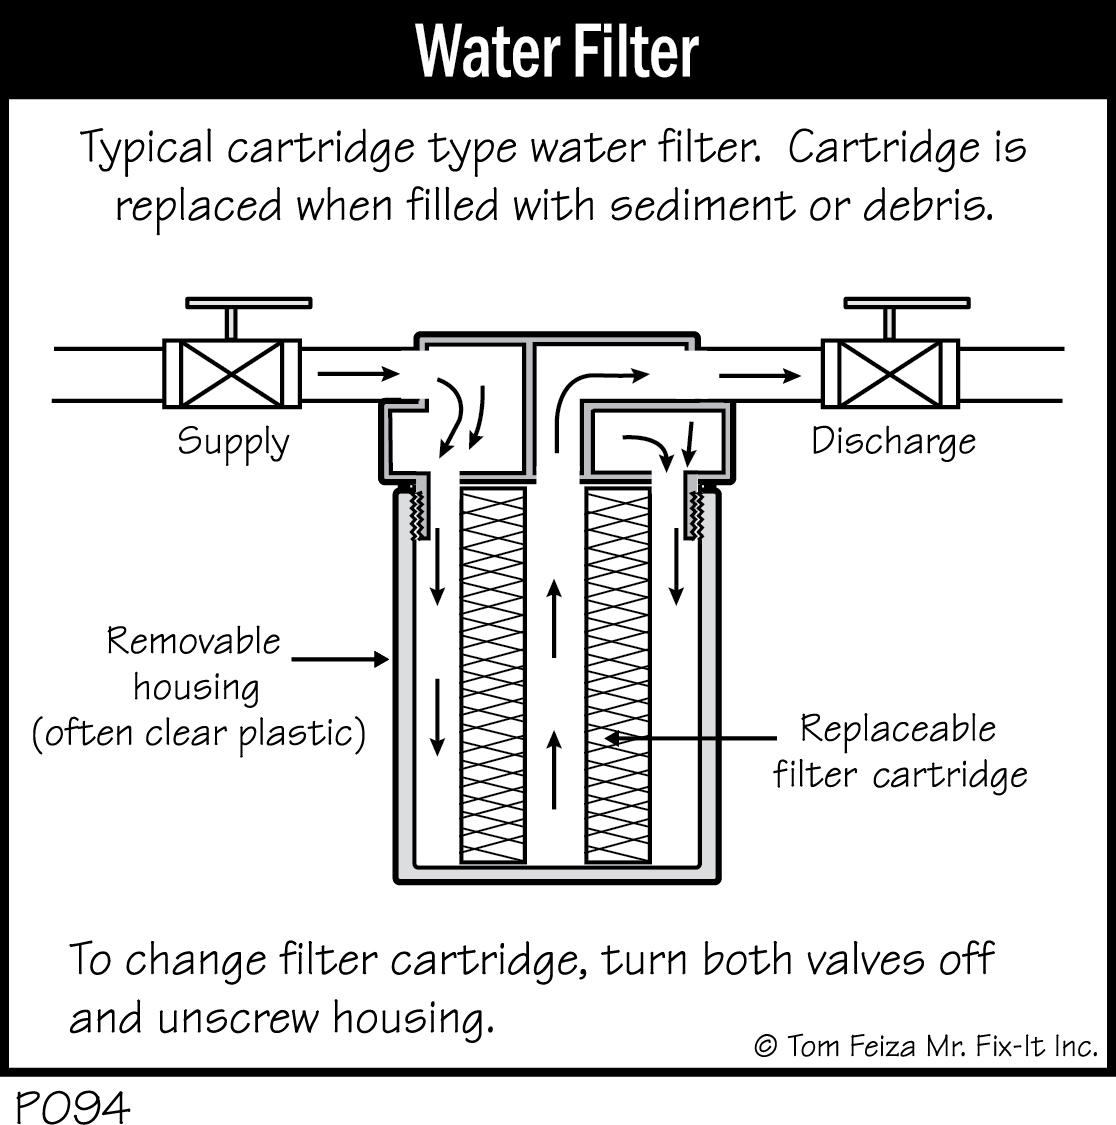
Some water contains a small amount of sediment or particles that can be removed with a simple cartridge filter. Similar to the oil filter in your car, it passes water through a filtering element and removes particles. When the filter becomes plugged, the cartridge must be removed and replaced. Often, the housing is made of clear plastic so you can see the condition of the filter.
Reverse Osmosis
A reverse osmosis water treatment system is a very fine and specialized filter that may be used to treat drinking water and perhaps the water used to create ice cubes in your refrigerator’s icemaker. These specialized filters remove most of the particulate matter in water. Often they utilize a small storage tank because the water is processed at a relatively slow rate. Some systems use a chemical treatment, while others use electronic monitoring. This system needs to be provided and installed by a professional.
The system may be located in the basement, in the crawl space, or below the sink. Water may be routed to a small dispenser at the kitchen sink with a small plastic tube. A small tube and supply may also be provided to the icemaker in the refrigerator.
Garbage Disposal
A garbage disposal is a simple device that grinds food and washes it down the sewer system. I suggest that you use the disposal sparingly, placing larger quantities of food waste in the garbage or in a compost pile. Remember that any waste you put down the sewer system must be treated in a municipal sewage treatment facility or in your own private septic system.
Most experts suggest that you do not install a garbage disposal if you have your own septic or mound system. Introducing excess food waste can cause premature failure of the system. If you do use a garbage disposal, have the system pumped more often.
The key to using a disposal is to run the water before you add waste. Run a strong flow of cold water, turn on the unit, then slowly feed waste into it. Keep running water for several seconds after grinding stops to make sure all waste is flushed away. Never fill the unit and then turn it on—you will have a big, big mess of clogged pipes.
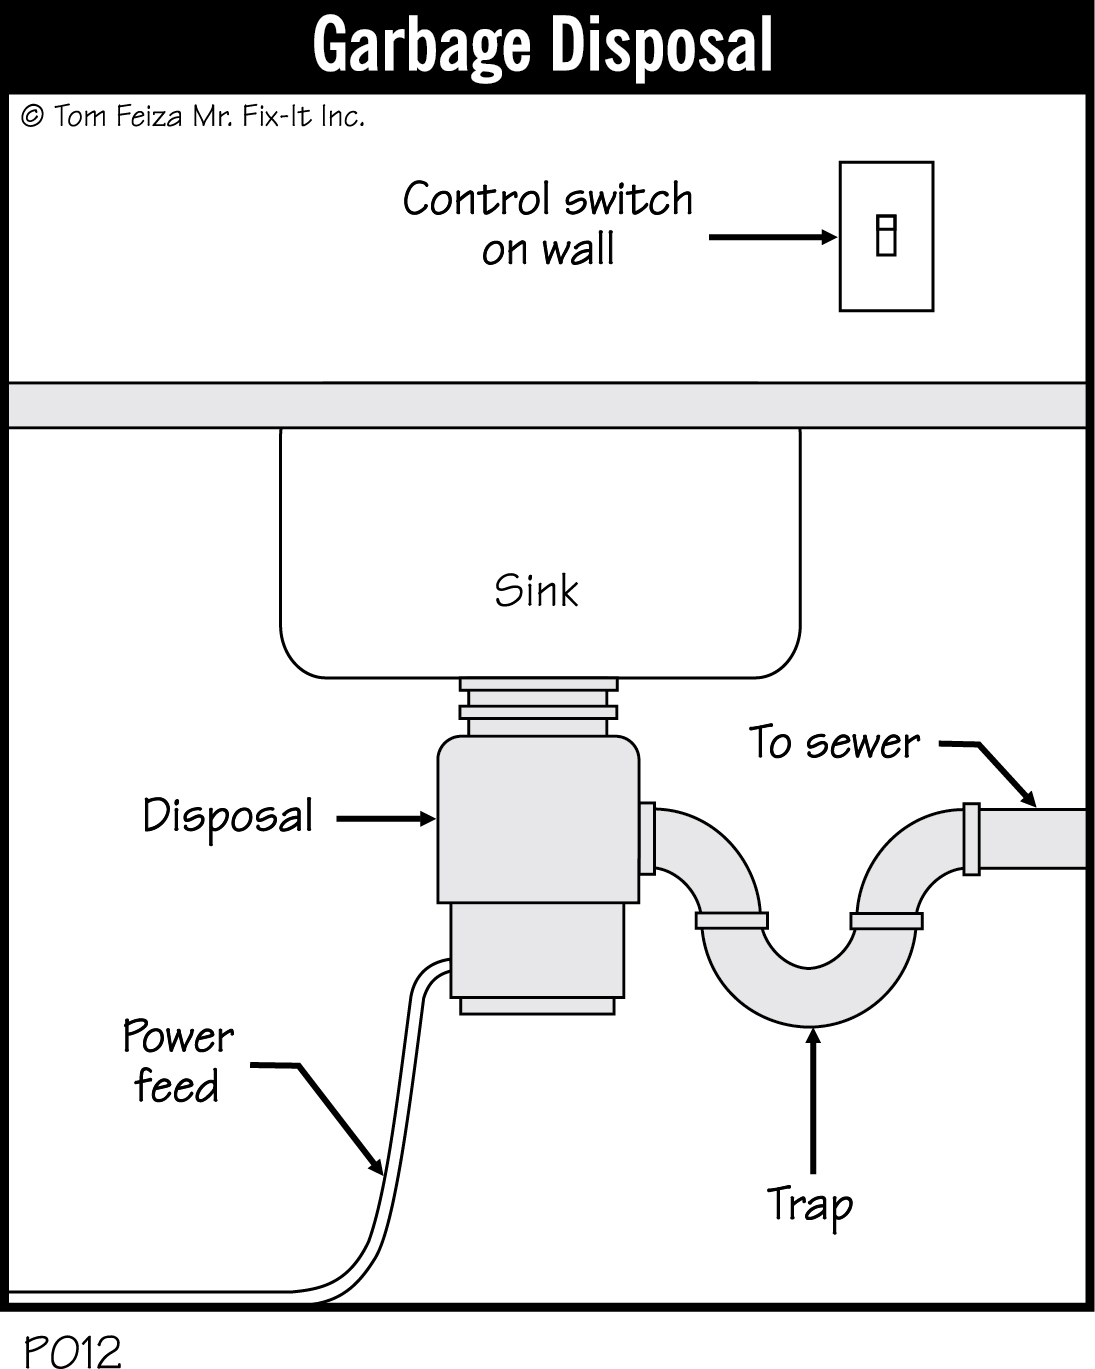
When a loud noise comes from the unit while operating, it usually means that a metal object like a spoon is caught in it. Turn the unit off and remove the object with tongs. Never put your hand in the disposal.
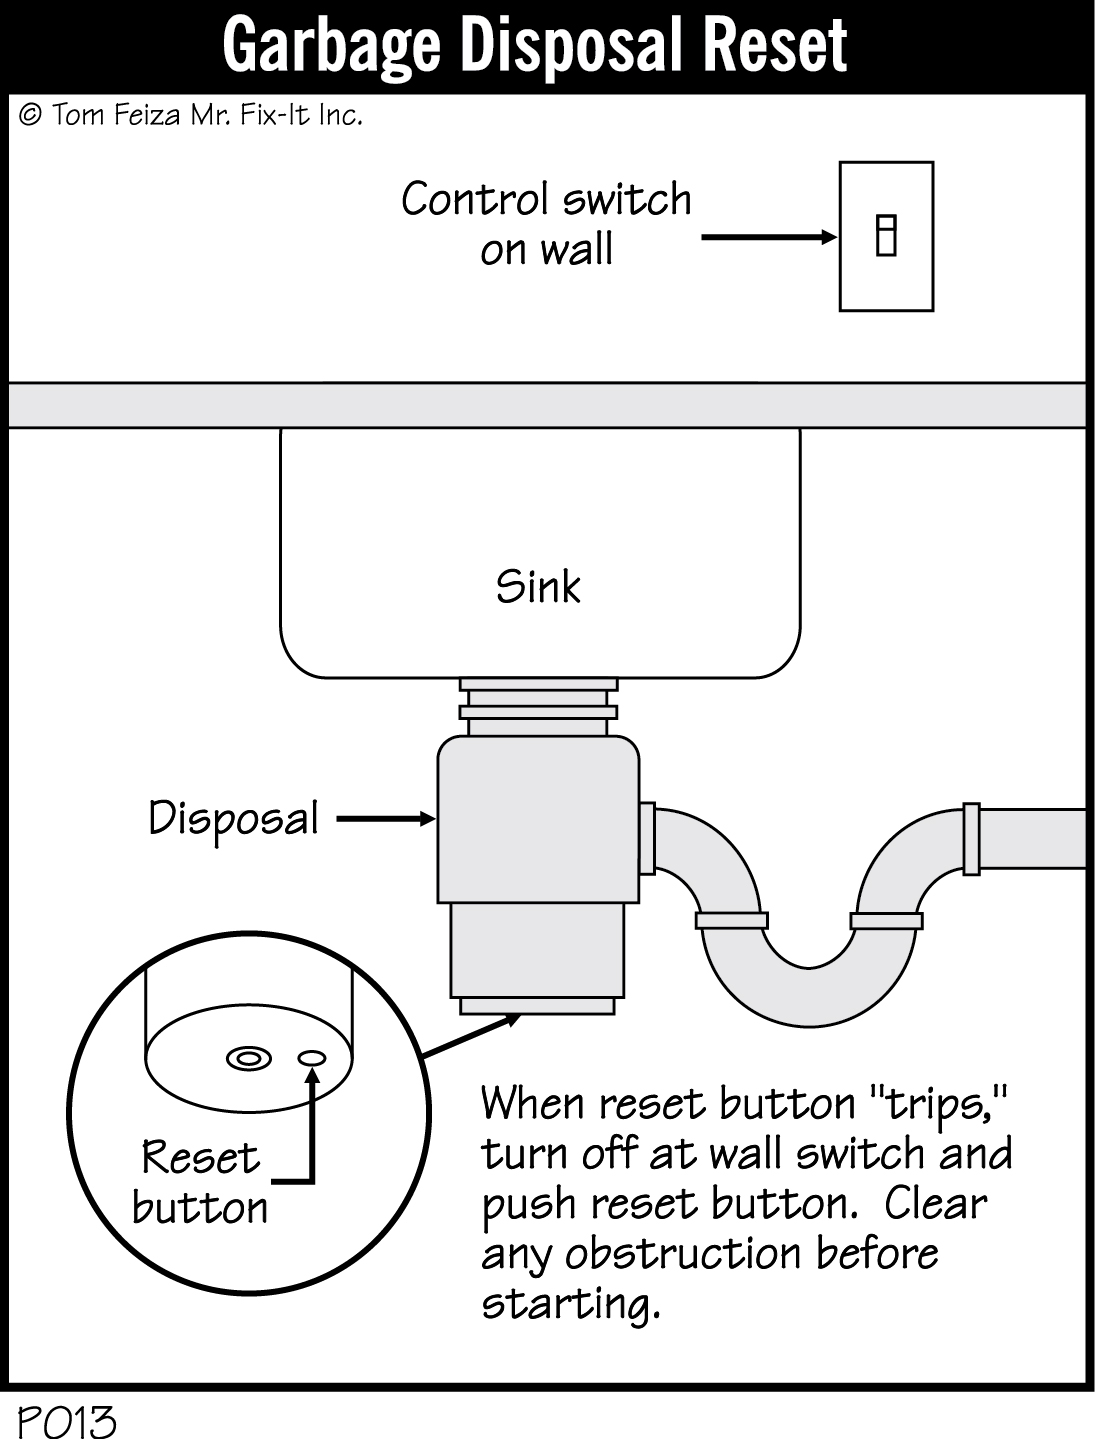
If you switch the disposal on and nothing happens (not even a hum), the thermal overload may have tripped. Under the sink, check the body of the unit for a small red or black button that may be marked “reset” or “overload.” Turn off power to the disposal by flicking the “light switch” above the kitchen counter and then push in this button. Now try the unit again. If it just hums without running, it is stuck and needs to be cleared.
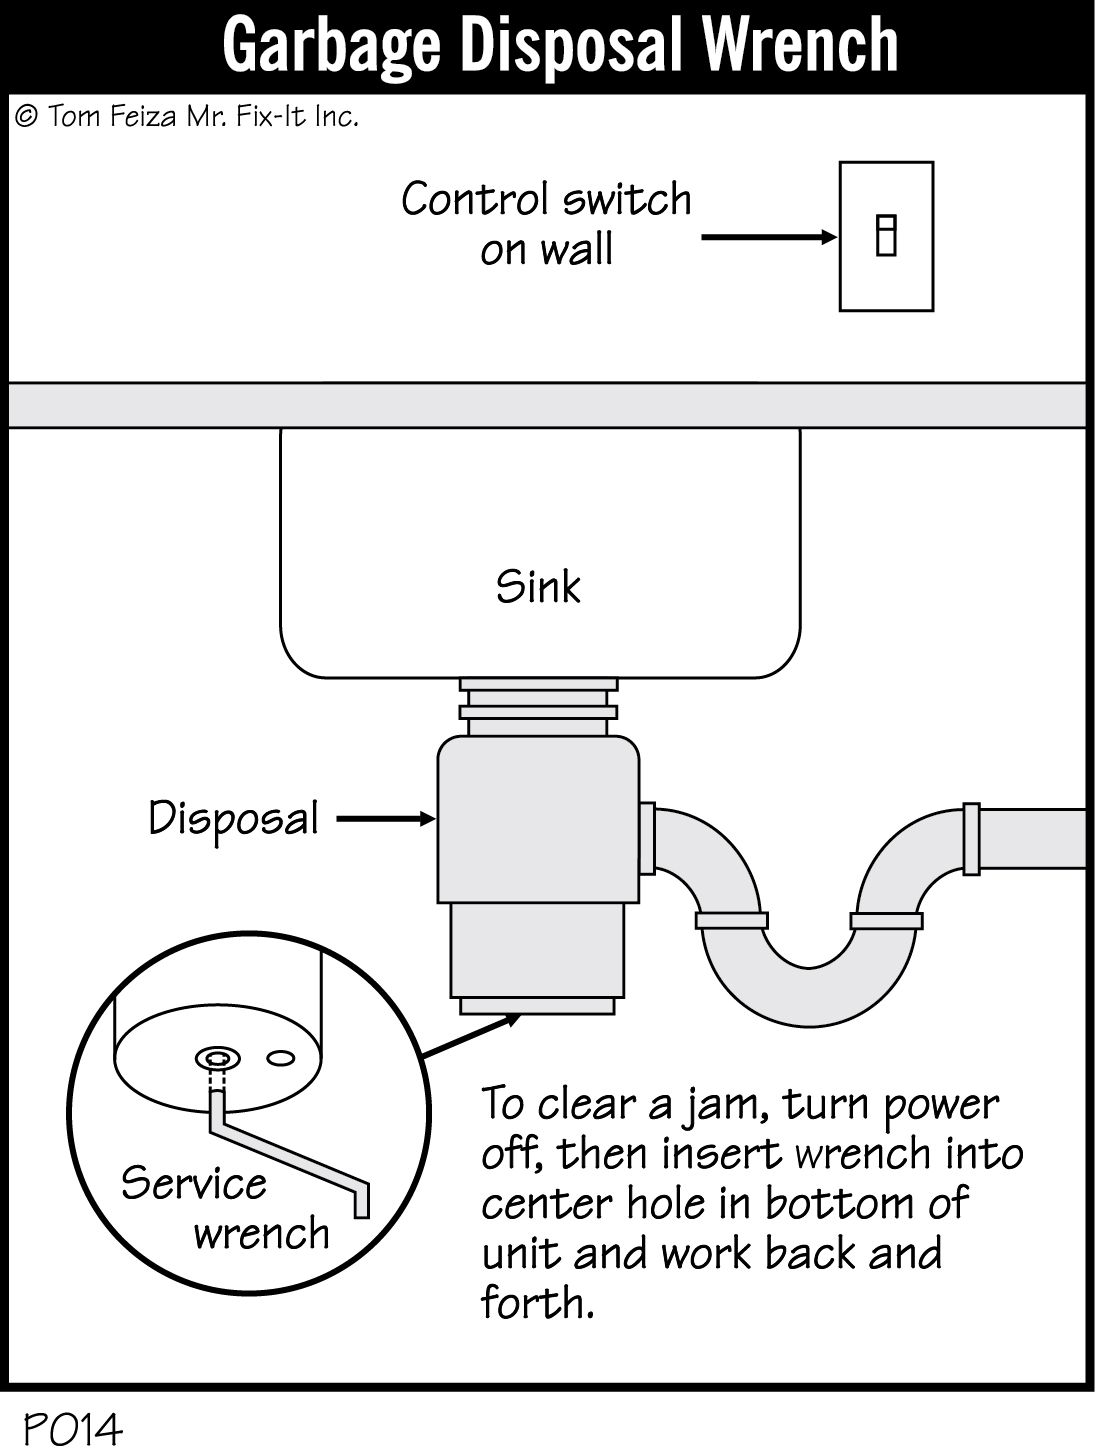
To clear the unit, turn off the power again. Look inside the unit for foreign objects, and if you see any, remove them with tongs. Next, look under the sink for a small six-sided wrench (usually stored in a plastic pouch near the disposal). Insert the bent end of this tool into a recessed hole at the center bottom of the disposal. Turn the wrench several revolutions in both directions until the shaft spins freely. Remove the wrench, turn the power back on, and try the unit again.
Must Know / Must Do – Garbage Disposal
- Always run a strong flow of cold water and start the disposal before you feed any waste into it.
- Never put your hand in the disposal.
- Know how to use the reset button and service wrench.
Hose Bibs (Exterior Hose Faucets)
A hose bib is an exterior faucet. There are several types.
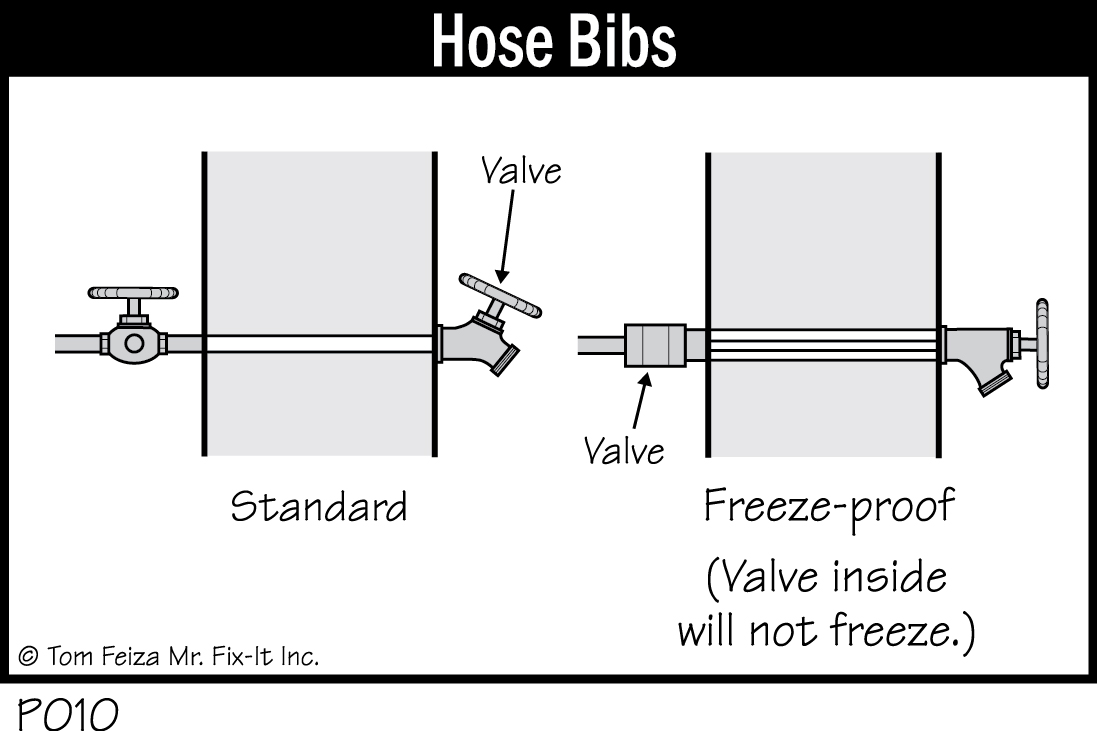
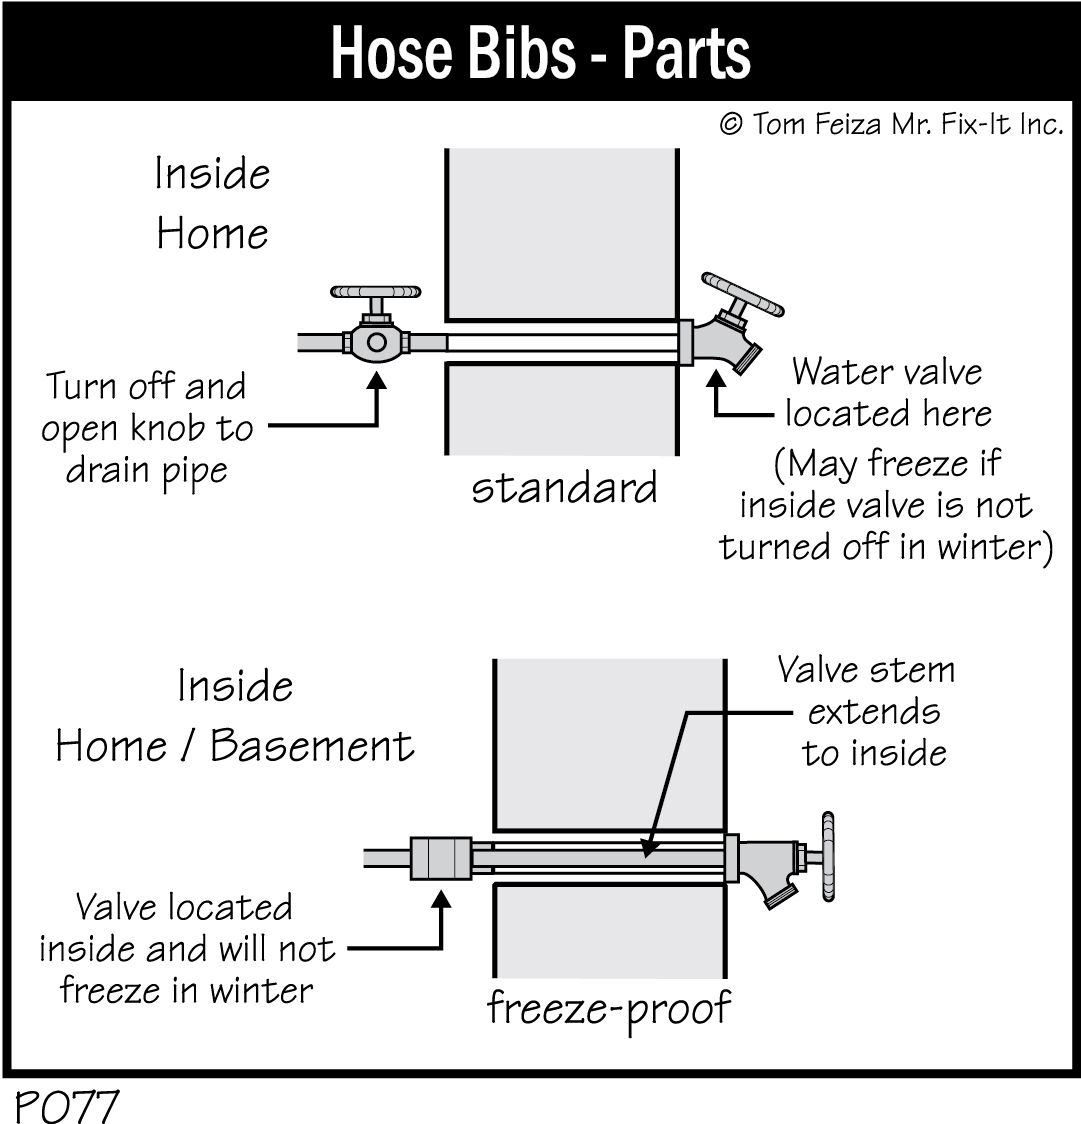
In a cold climate, the hose bib valve may extend up to 12” into the house. When you turn off this type of hose bib, you are actually turning off a valve inside your home…but (and this is important), it may not drain properly and could freeze during cold weather if there is a hose connected to it. To prevent this problem, some older installations provide an additional shutoff valve in the basement. Properly turning off water in the winter requires that you (1) turn off the inside valve, (2) open the outside valve, and (3) open the small drain knob (if there is one) on the inside valve to drain off the pipe.
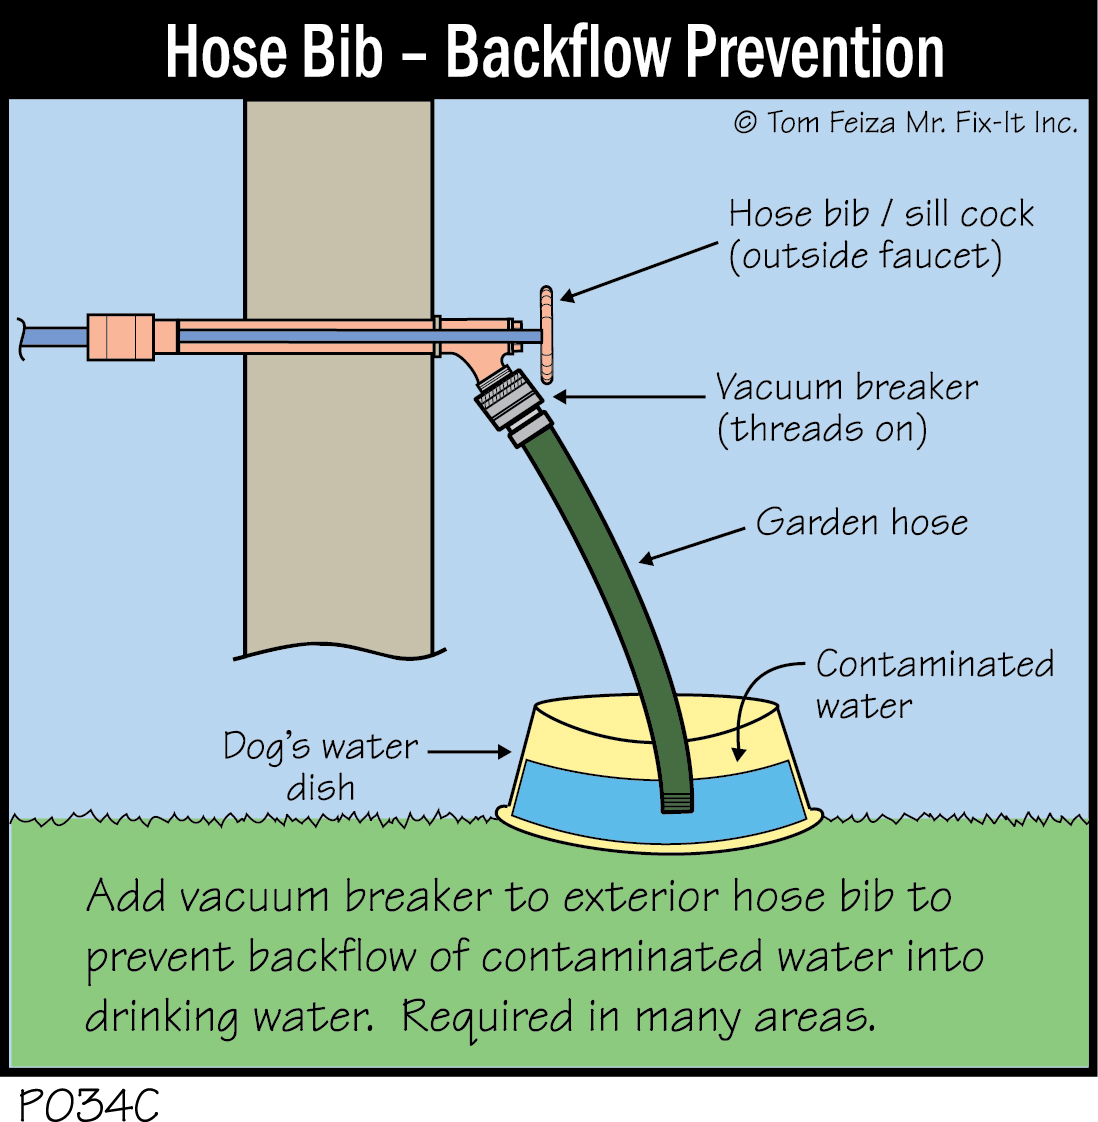
A newer home may have a backflow preventer on the outside hose bib. This could trap water in the pipe and cause a freeze-up. To release water from the pipe, you must either push the little button in the center of the backflow preventer to release the pressure, or open the small knurled knob at the inside shutoff valve to drain water from the pipe.
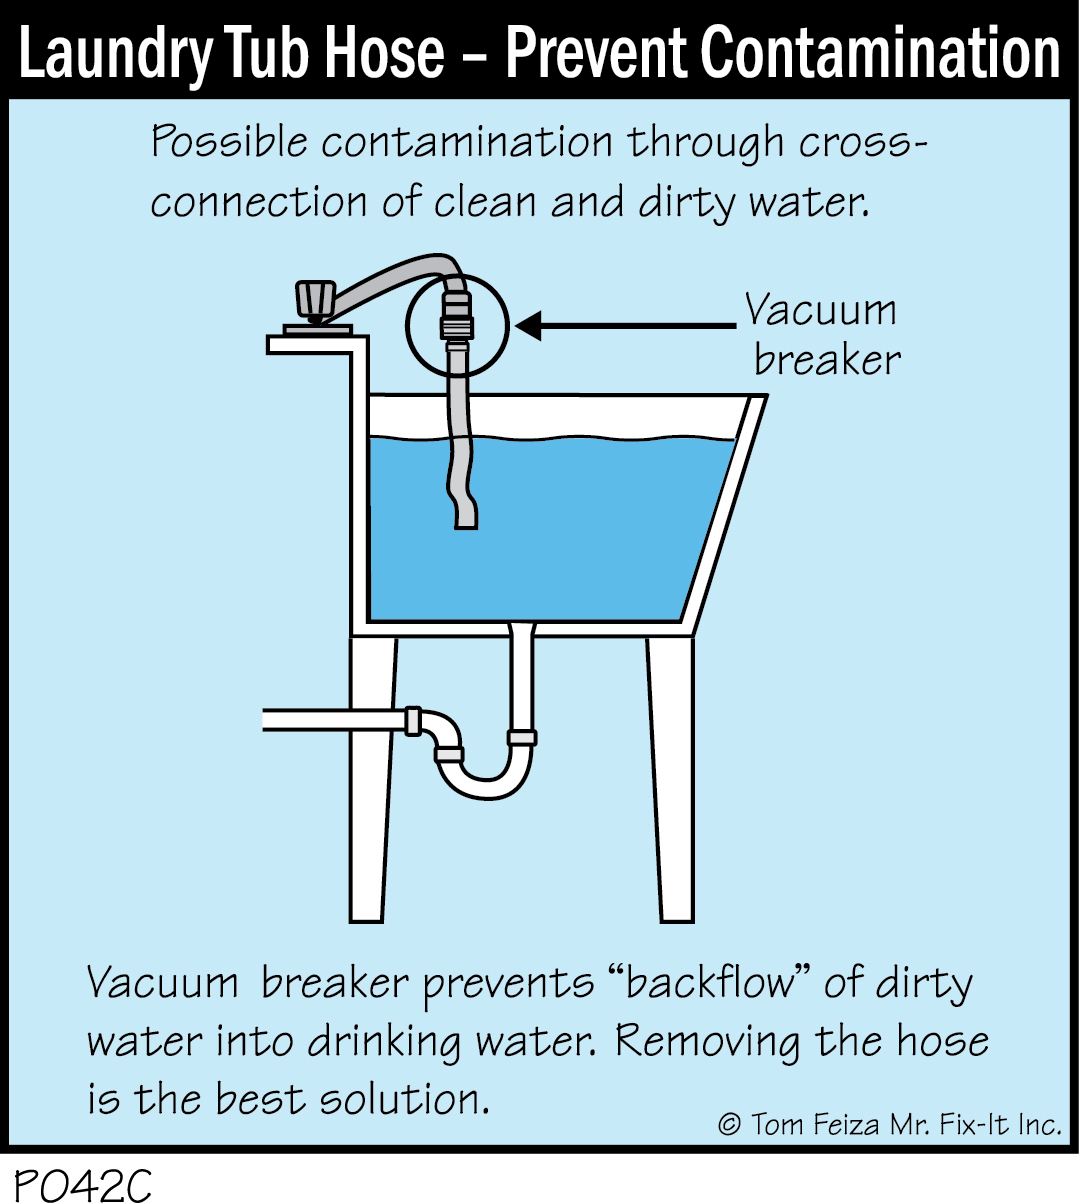
Every hose bib should have a backflow preventer or an anti-siphon device to keep contaminated water from the hose out of your drinking water system. To find out if such a device is required in your area, check with your water utility, plumbing inspector, or health department.
Must Know, Must Do – Hose Bibs
- Keep all backflow devices in good working order.
- In colder climates, before winter begins, turn off the water supply to all exterior pipes and hose connections, and drain the pipes properly.
Water Hammer Arresters
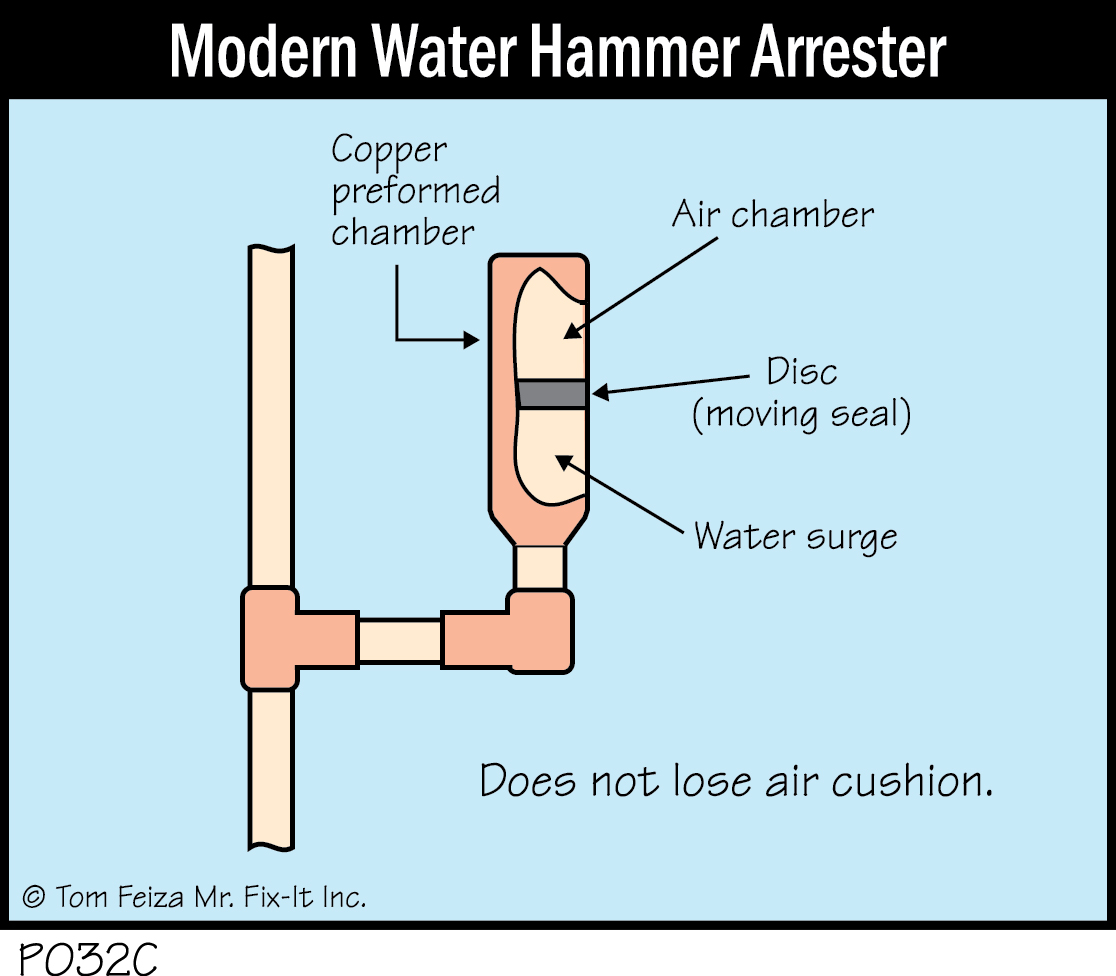
Modern plumbing systems have water hammer arresters (anti-water-hammer devices) that prevent water pipes from pounding when water is quickly turned off. Basically, these are air chambers that can be compressed by moving water.
When halted quickly—for example, by an electrically-operated valve in a washing machine—water has lots of energy to dissipate. If the water can bounce against an air cushion, pipes won’t pound. (For you electrical/electronic designers: this is equivalent to a capacitor in an electrical circuit.)
In older homes, anti-hammer devices are located near the main valve. In newer homes they are located near the washing machine, dishwasher, laundry tubs, and perhaps near the water main. They look like a short length of piping with a cap on the end. In a newer home, an anti-hammer device may be a small, specially designed chamber about 1” around and 4” long.
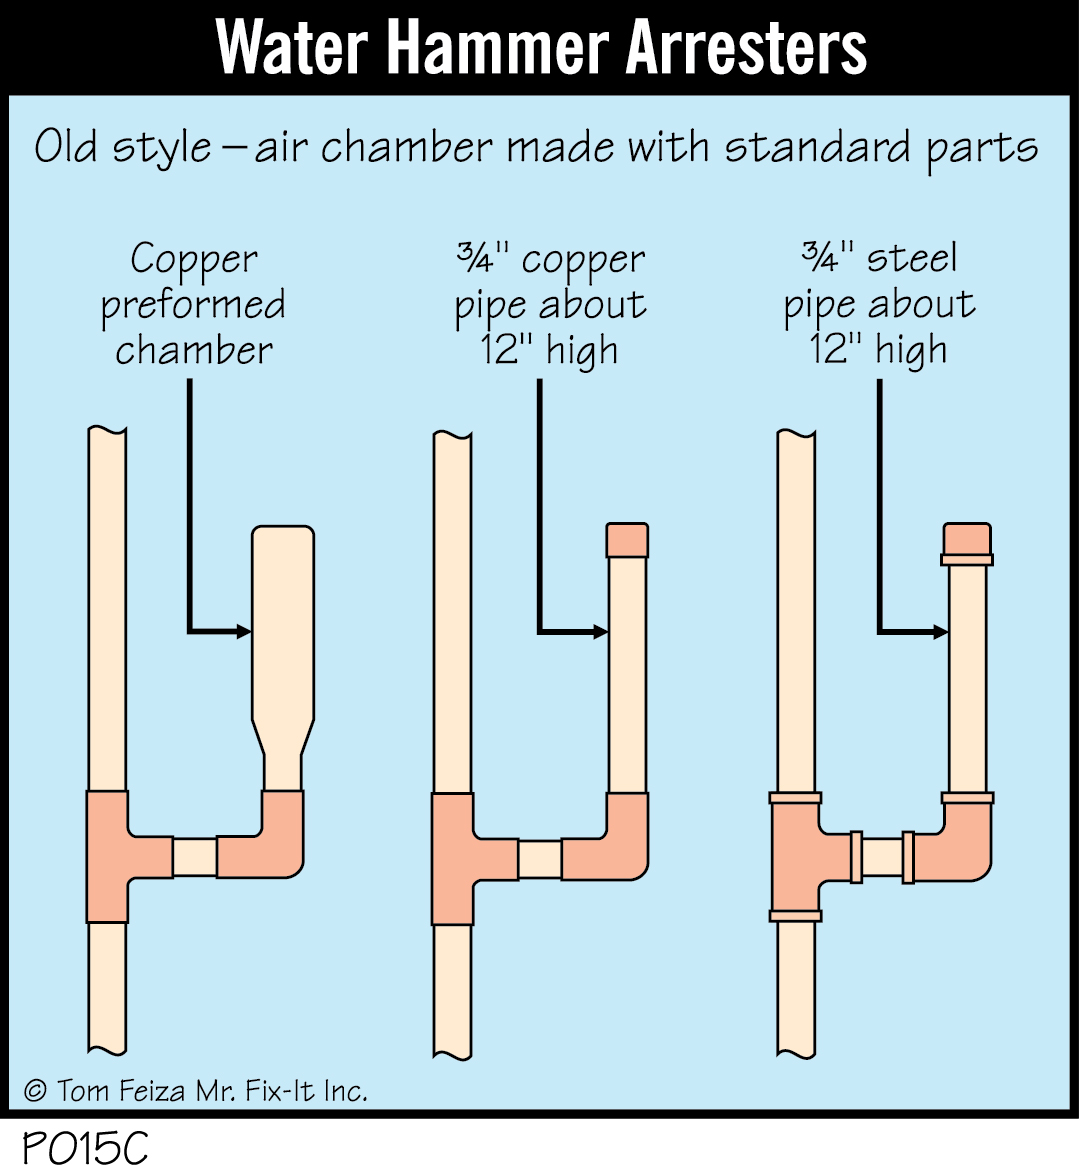
If your pipes pound or bang when the water shuts off, add water hammer arresters or check any existing arresters. Old-style arresters may have filled with water and need to be drained. Before you try this, though, be sure the main valve is in good working order. If it leaks, is hard to turn, or has excessive corrosion, call a plumber. Also, be aware that in older homes with steel piping, turning off the water may loosen sediment inside the pipes; you may see rust and debris in the water. And since this technique introduces air into the system, an air/water mix may shoot out of the faucets when you turn them on again.
To drain the system and restore air to the arresters, turn off the water main, shutting off all water to your home. Then open all faucets and allow all water to drain from them. Next, slowly open the main valve part way and close the faucets one by one as the water runs steadily. After all faucets are closed, fully open the main valve.
Must Know / Must Do Water Hammer Arresters:
- If pipes pound or bang when the water shuts off, check water hammer arresters.
- Consider draining the system to restore air in the chambers of water hammer arresters.
- If the main valve is hard to operate, don’t drain the system; call a plumber instead.
Drainage, Waste and Vent System
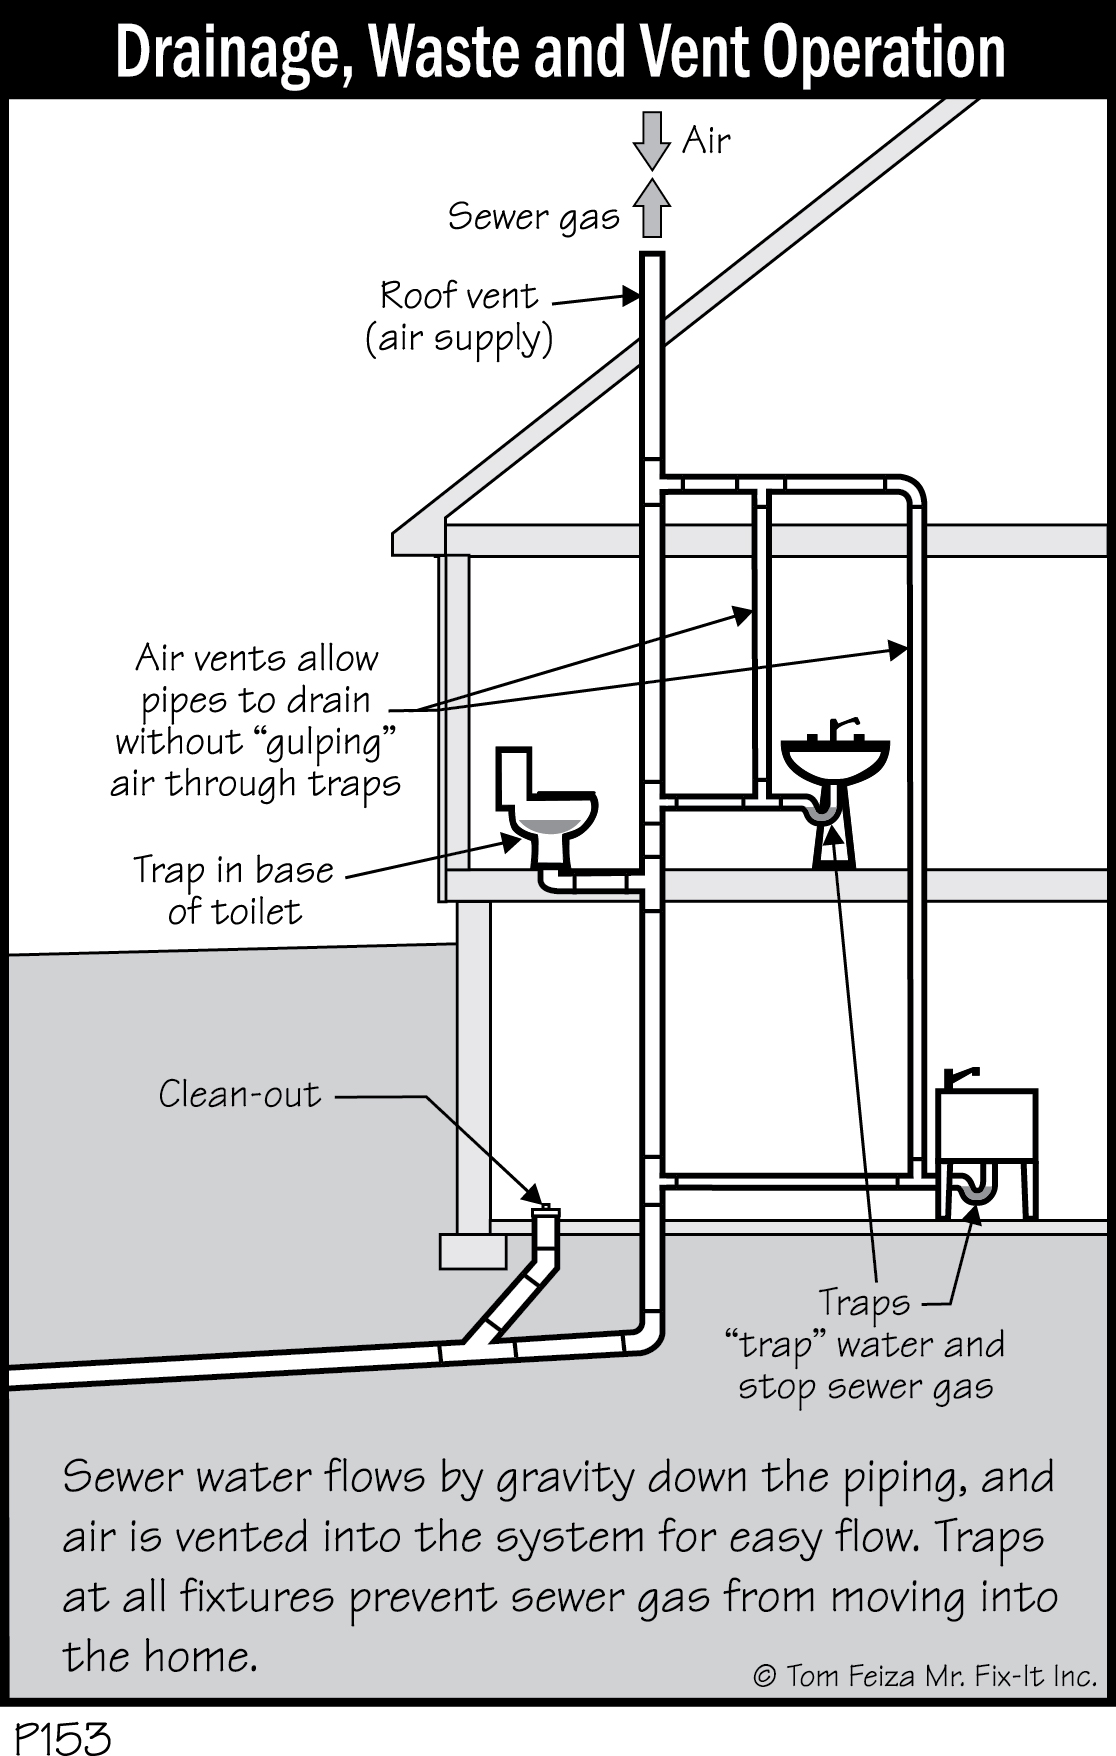
After water is used in your home, it exits through a drainage, waste and vent (DWV) system. Large pipes allow wastewater to flow by gravity from your home to a municipal sewer or private septic system. A series of traps and vents allow wastewater to flow freely while preventing sewer gas from entering your home.
Older systems are constructed of cast iron and galvanized steel piping. Newer systems are made of plastic. Copper was used for some systems built about 1970.
The sketch shows common components of a DWV system, which uses pipes that are larger than those in the water-supply plumbing system. The pipes range from 1-1/2” to 4”, with the larger pipes installed where the system exits your home. Horizontal pipes are angled to allow for proper waste flow.
The vent portion of the system starts with the vent pipe or stack routed through the roof. This open pipe allows air to enter the system so all pipes can drain properly. Think of the drainage system as a big straw. If you fill a straw with water, cover the top end with your finger and pick it up, water will not drain from the straw. When you release your finger and allow air to “vent” the straw, water drains quickly.
S Trap Not Allowed
In older systems or systems installed by an amateur, you may see a sink drained with an “S” trap. This type of trap has an S-shaped pipe below the sink, and instead of draining into the wall, it drains into the floor. Since there is no vent and no air supply, the trap will drain with a long slurp as air is drawn through it. The trap seal also may be lost.
Air Admittance Valve
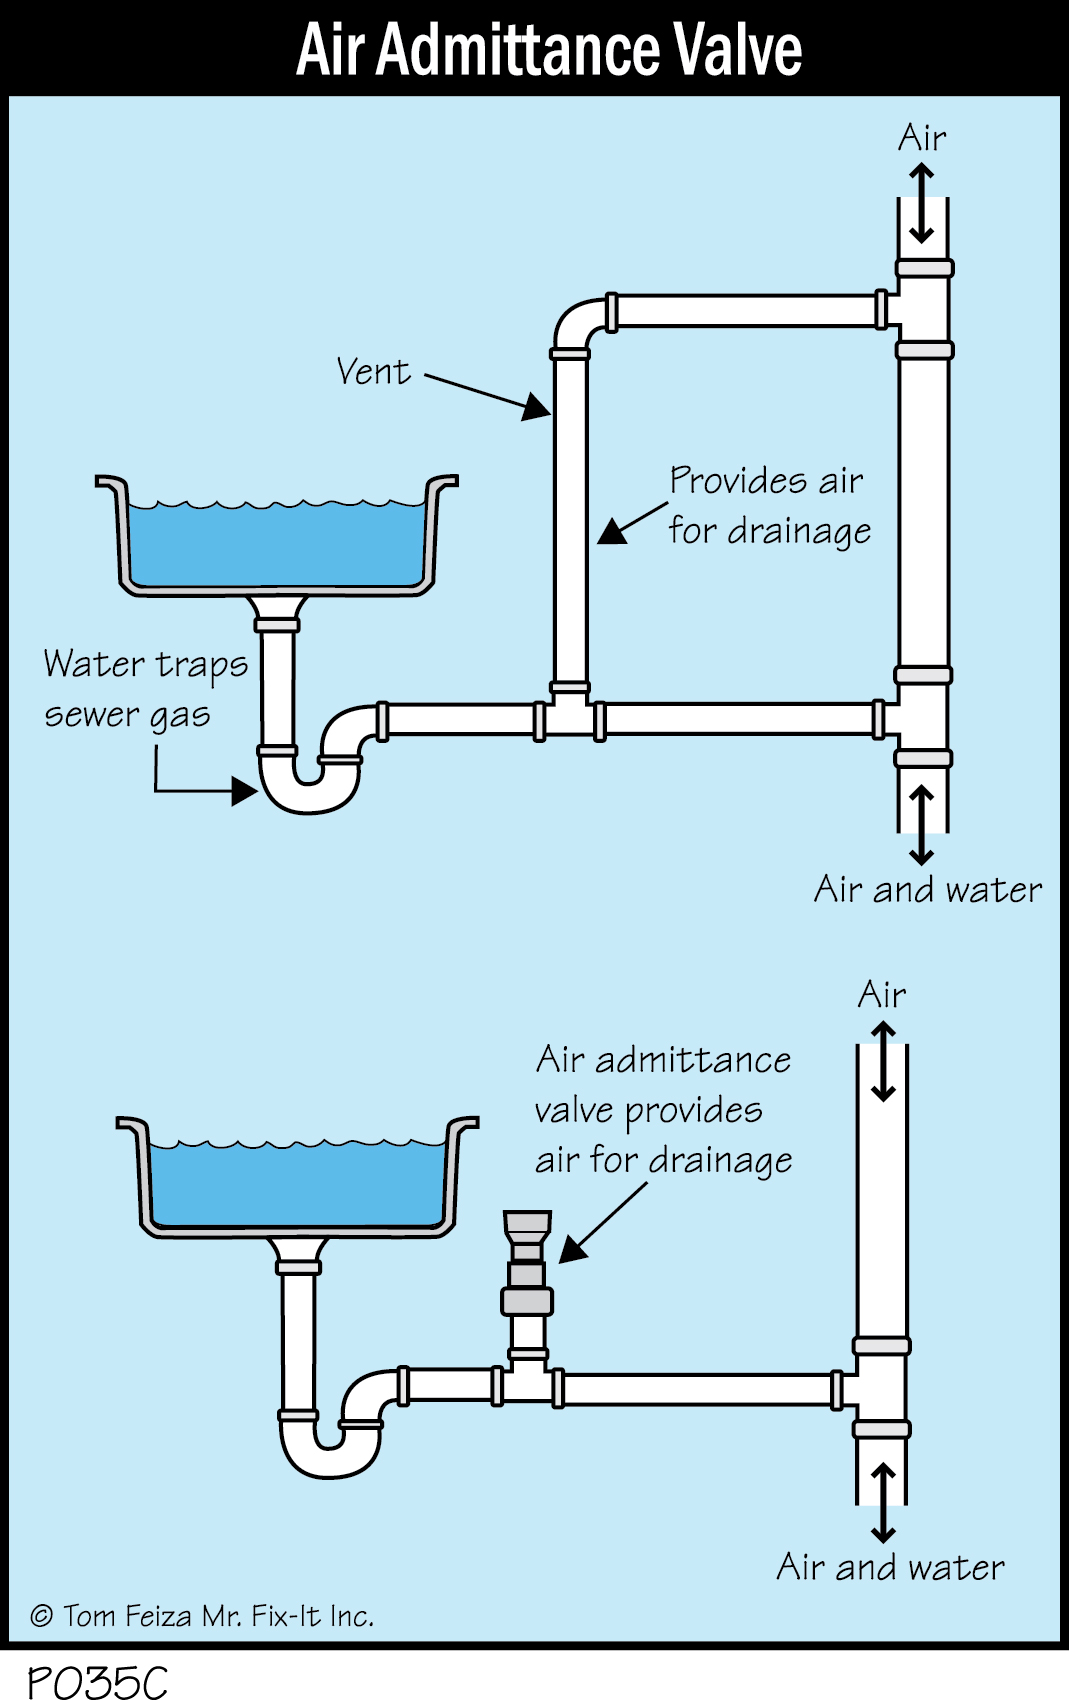
In systems installed since about 2000, when plumbing codes changed, a new device called an air admittance valve may be added to the drain line. This valve allows air to enter the drainage system but does not allow sewer gas to escape. The device will be located in the horizontal run from a sink in place of a plumbed vent. It must be visible and accessible for maintenance. This valve may not be allowed on certain fixtures and may be prohibited in some communities.
Plumbing Vent of Island Sink
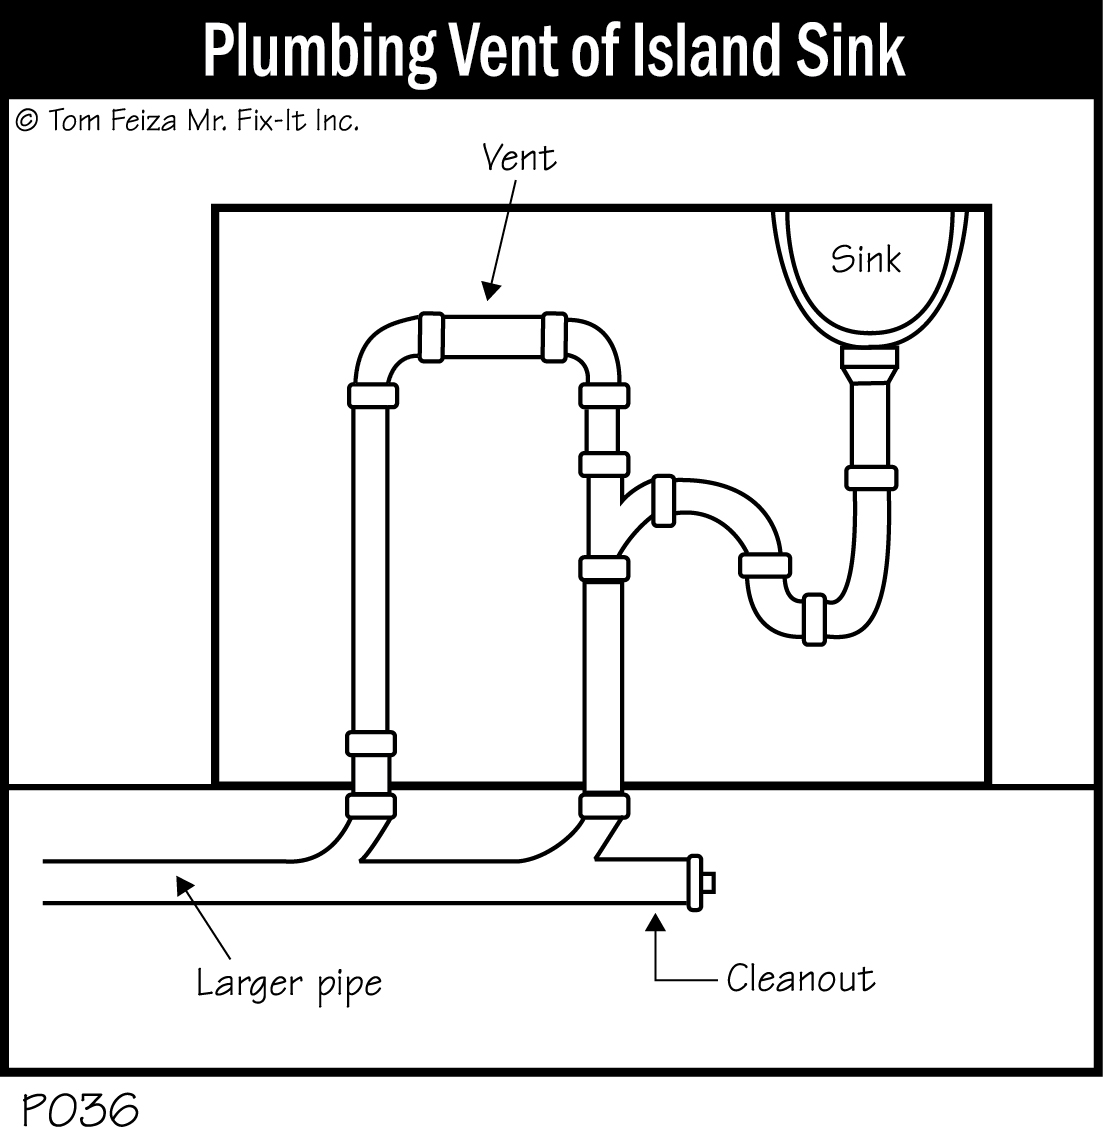
Island sinks present a special problem for running a typical vent pipe up a wall and into the attic, because there is no wall available. Island sinks have either a special vent arrangement with a vent loop under the sink or an air admittance valve if it is allowed.
All piping and fixtures must be vented. If problems occur with the venting system, drains will “glug, glug” and empty slowly.
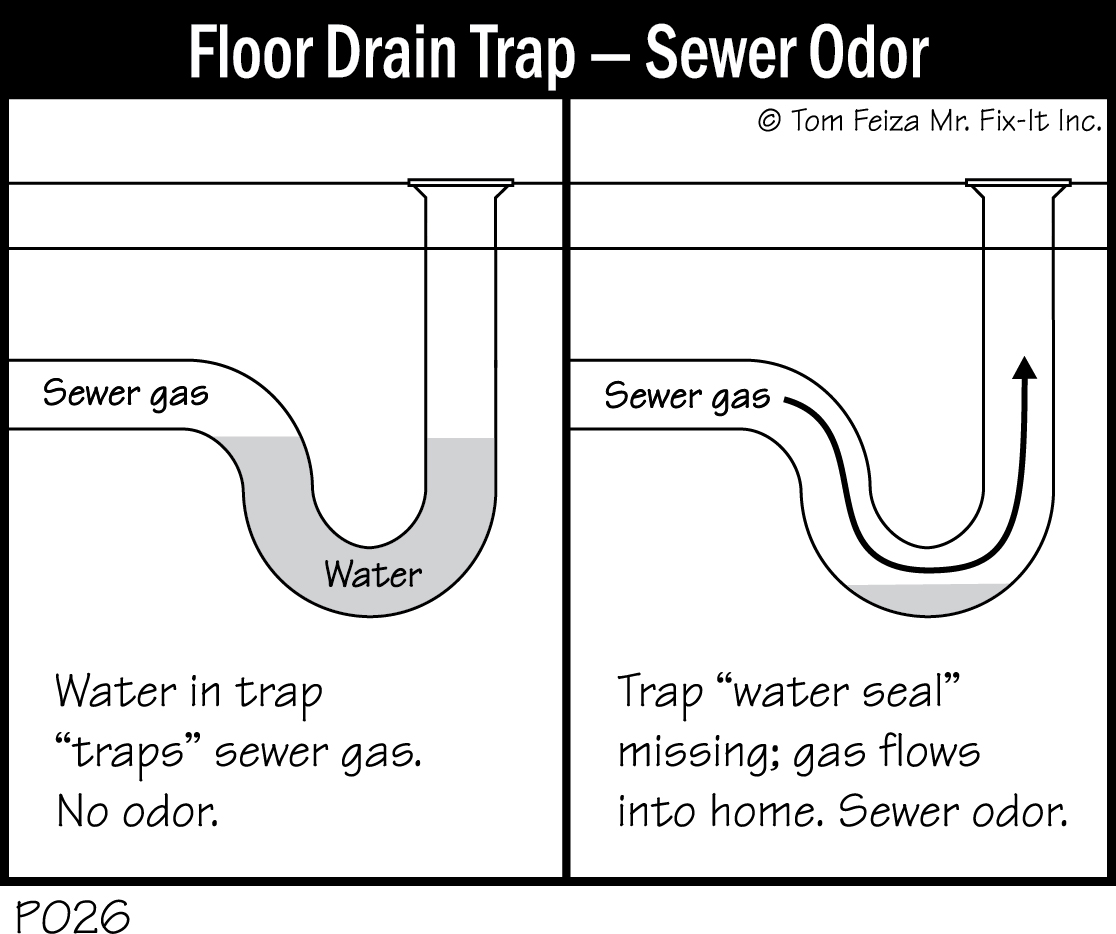
Each fixture has a trap—a P-shaped device below a sink (or built into the base of a toilet) that remains full of water. “Trapping” water creates a seal that prevents sewer gas from entering through the drain. If a trap dries up, you will notice a sewage smell.
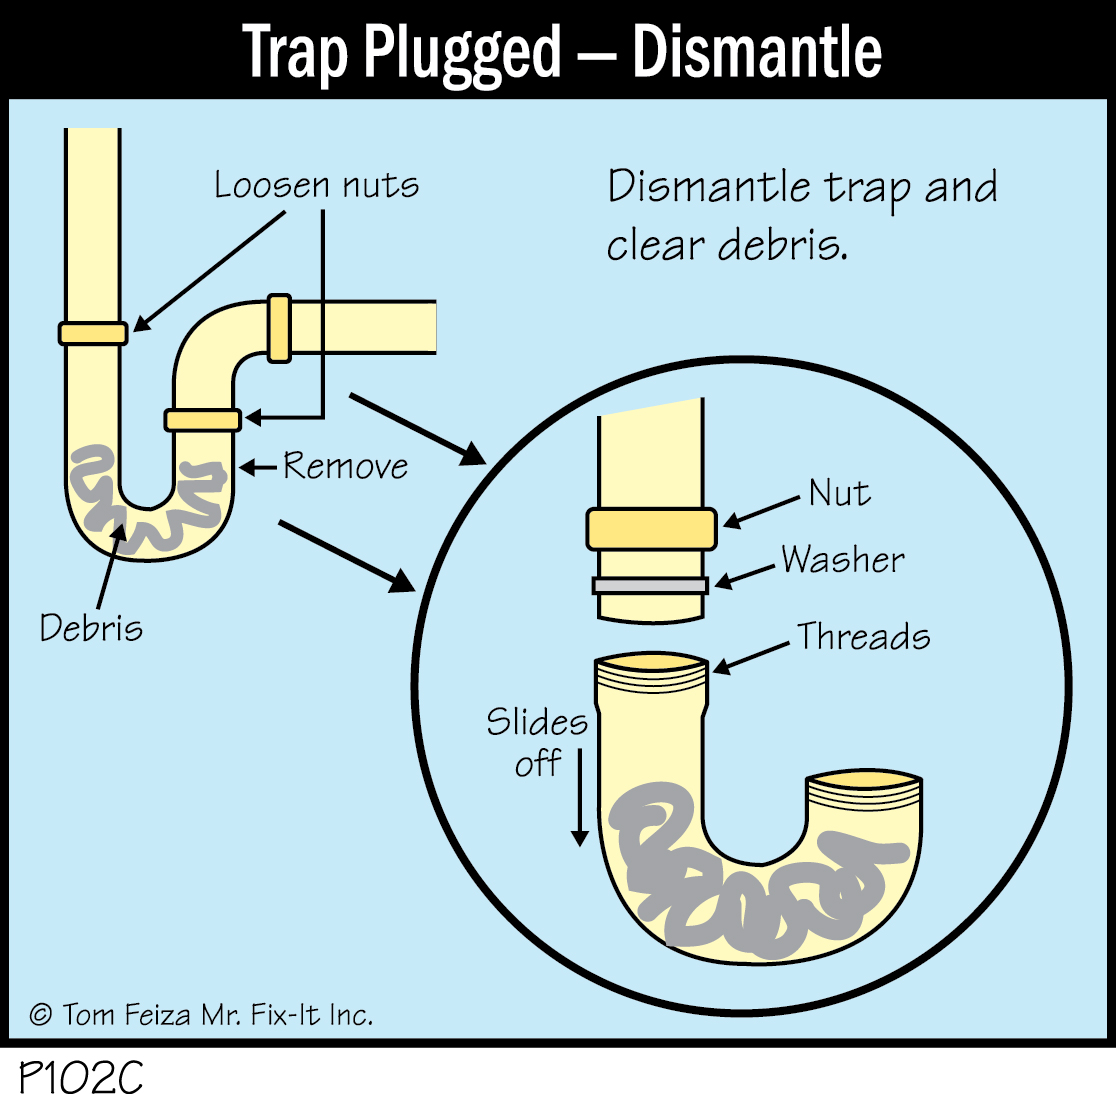
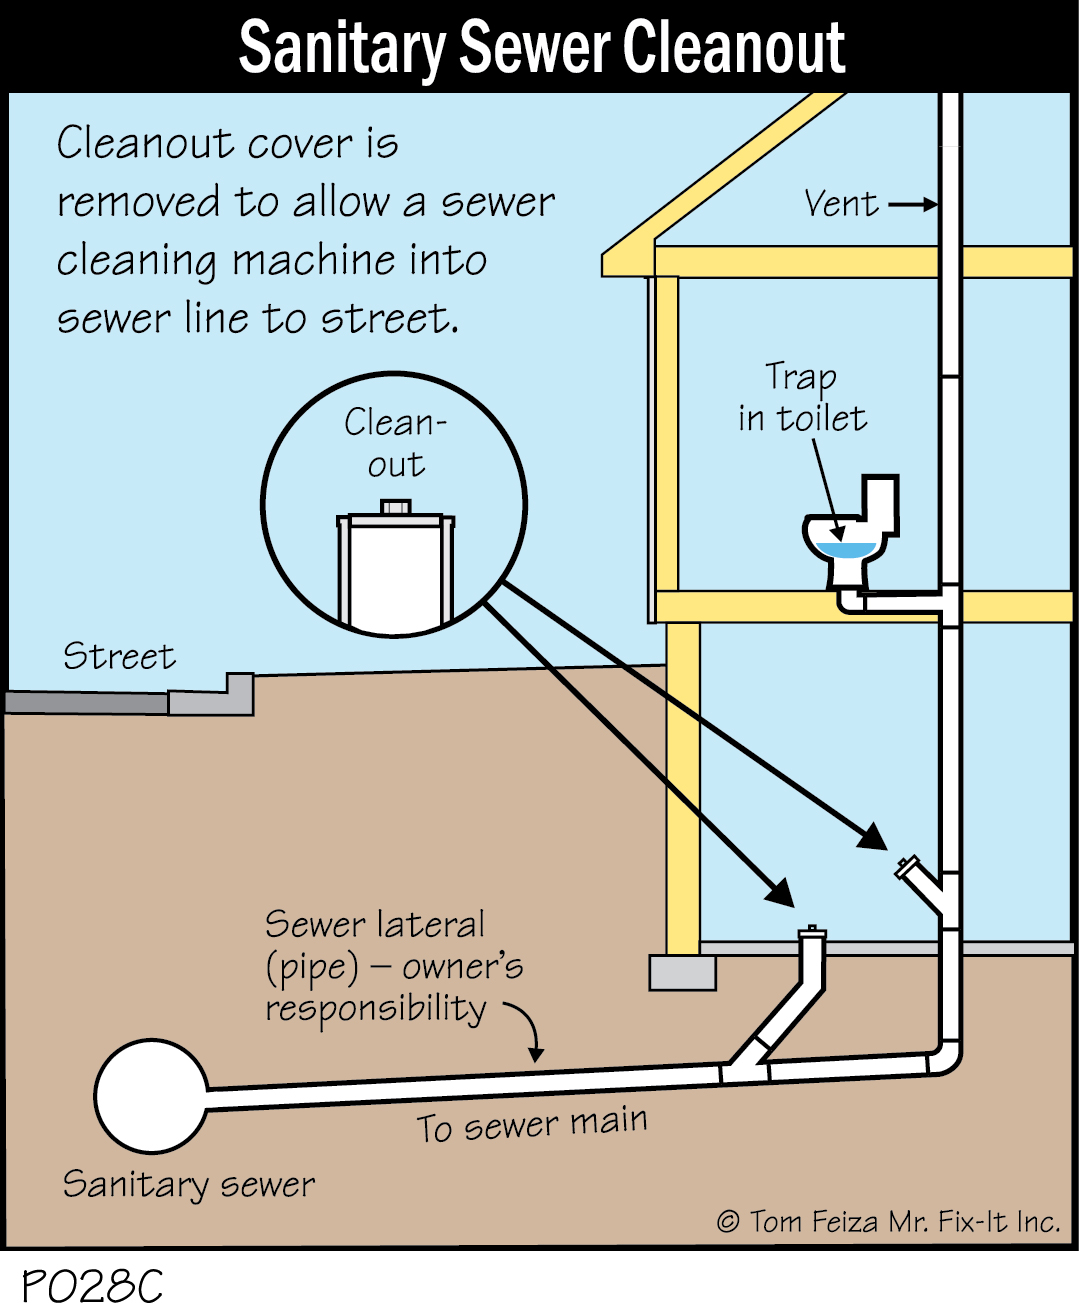
Traps are designed to be dismantled to remove blockages or retrieve lost objects. Drain piping has covers (“clean-outs”) that can be removed to help clean out clogged pipes. The main system cleanout will be located in the basement floor or where the main pipe exits your home.
If you have a septic system, this cleanout will be outside, about 4 feet below the soil. With slab construction, the cleanout will be in the slab or outside.
If the sewer drainage system is subject to backups from the municipal connection, the municipality may allow the installation of a sanitary sewer check valve. Typically this valve is located below the basement floor or wherever the main sewer line exits the structure. The valve is located in a box with a cover so the check valve can be maintained. Maintenance involves visual inspection of the operation, as well as clearing of any debris that would prevent the valve from closing.
Must Know / Must Do Drainage, Waste and Vent System:
- If you notice a sewage smell, check for a dry trap.
- If a sink or other fixture backs up, there’s a blockage in the trap.
- If your whole system backs up or wastewater backs up out of the lowest fixture, this indicates a problem with the main drainage line. Call a plumber.
- Any leaks from the waste system are potentially dangerous and should be repaired as soon as possible.
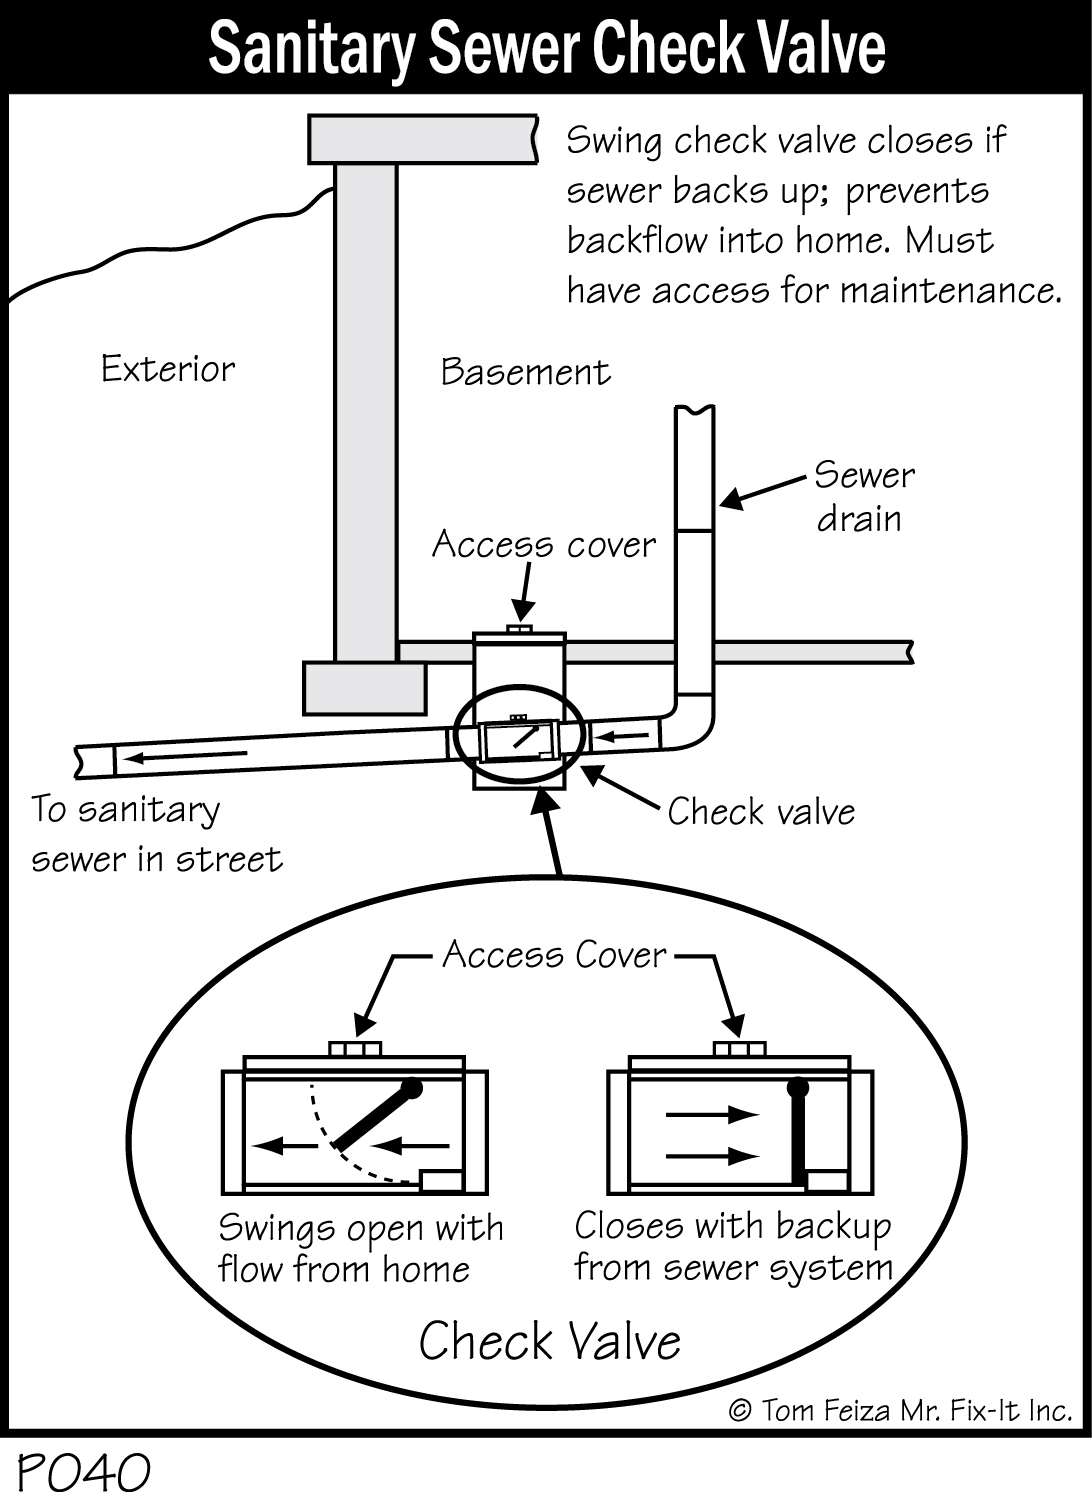
Under normal conditions, the valve swings open to allow sewage to flow out of your home. When there is no flow, or if a backup occurs in the sewage system, the swing check valve drops closed, preventing sewage from backing up into your home.
Sewer and Septic Systems
After wastewater leaves your home, it must be treated and cleaned before it is released into the environment. In a municipal sewage system, wastewater is routed to a treatment facility. If you live in the country, your home will have its own private treatment system—a septic or mound system.
Sewer System
Municipal sewer systems collect sanitary waste (sewer water) through pipes below the street. Wastewater flows through a series of pipes that increase in size as they approach the treatment facility. Pipes can be 6 feet or more in diameter.
In many systems, all sewage flows by gravity until pumping stations “lift” (pump) it into the treatment facility. Once treated, the water is released to rivers and streams.
Septic System
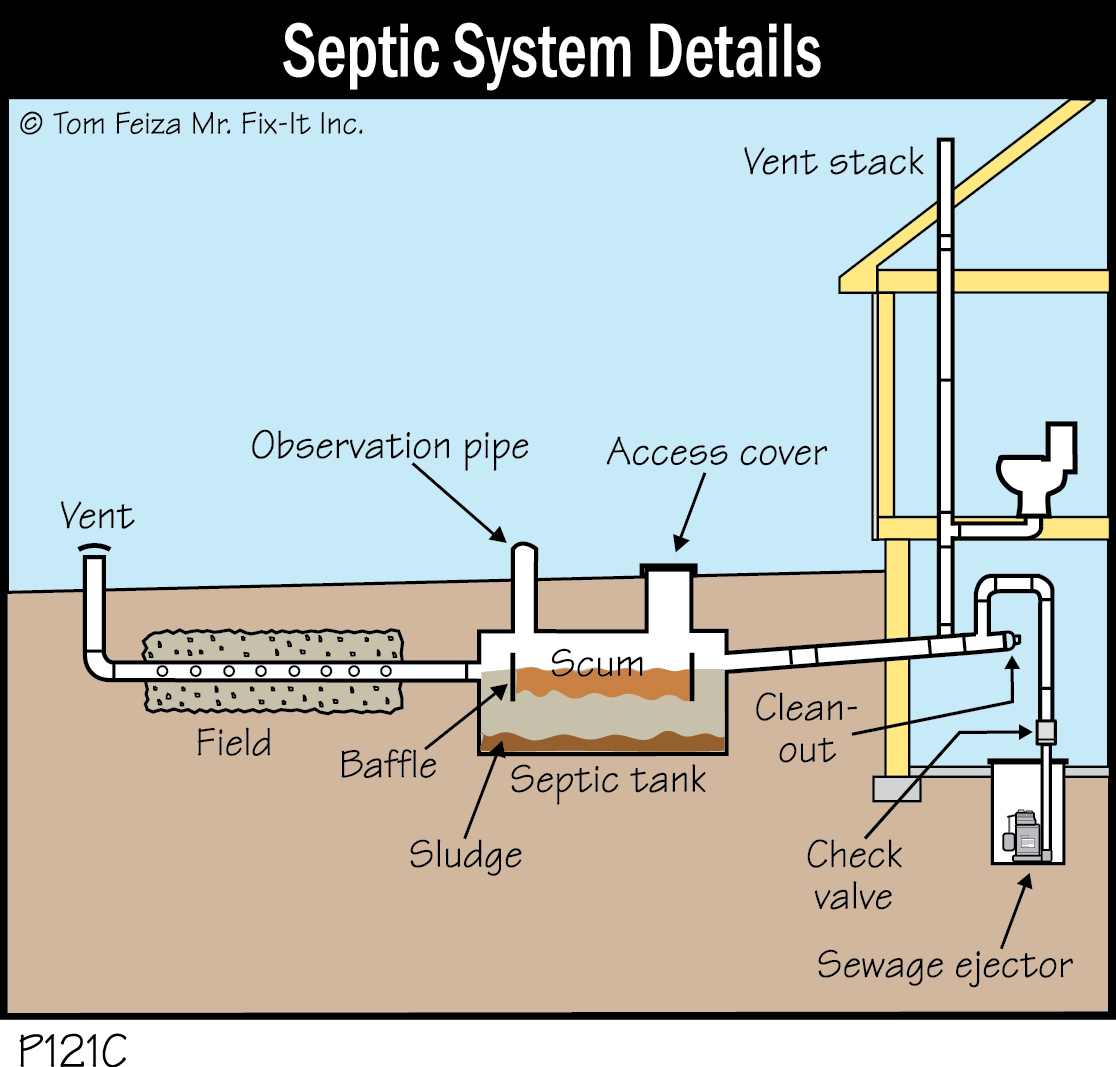
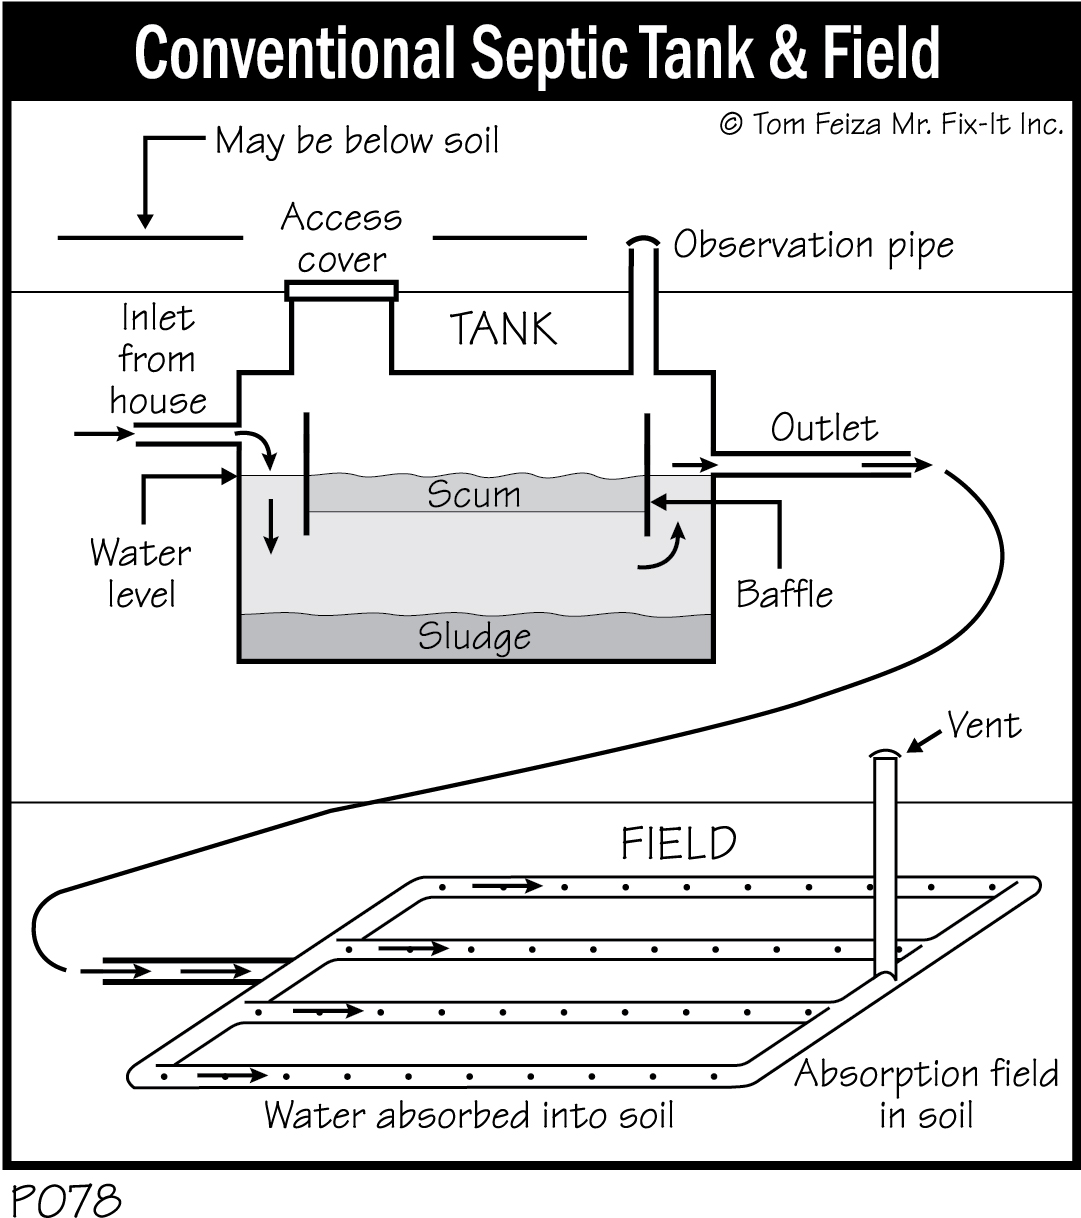
In rural areas without a municipal sewage treatment facility, residential sewage is treated in a septic system—a large underground tank and absorption field. Bacteria in the tank break down sewage solids. This treated sewage becomes sludge that settles at the bottom of the tank. Grease, fat and soap scum rise to the top of the tank, where they are trapped by baffles.
As wastewater enters the tank, processed water is released to a drain field or absorption field consisting of a series of perforated pipes that release the water into soil. The soil then filters the wastewater; soil microorganisms decompose many contaminants in the wastewater.
Although the septic system works automatically through the actions of bacteria, microorganisms, tank and piping, you must arrange for a professional to pump and inspect the tank.
Generally, a family of four should have the tank pumped and inspected every 2 years, but this varies with the type and size of the system and with local conditions. A professional septic service company can determine when your system should be pumped. Pumping the tank involves removing the sludge and scum before an excess builds up.
Must Know / Must Do Septic System:
- Understand how your system works.
- Have the system pumped and serviced routinely.
- Do not put contaminants in the system.
- Learn ways to conserve water.
You also must limit the amount of water that enters the system. Use fixtures (toilets, showerheads) that limit water use. Repair all plumbing leaks promptly. Don’t connect the sump pump discharge to the septic system—the sump handles clear rainwater that doesn’t need treatment. Divert surface water away from the septic drainage field so it can work properly.
Never put grease, fat, coffee grounds, paper towels, food waste, sanitary napkins, or disposable diapers down the drains—they will clog the system. Also, do not put toxic substances like solvents, oils, paints, disinfectants, or pesticides down the drains.
Most experts agree that “sweeteners” or septic system “starters” are not useful.
For more information, consult local health officials, the local plumbing inspector, or your nearest department of natural resources.
Mound System
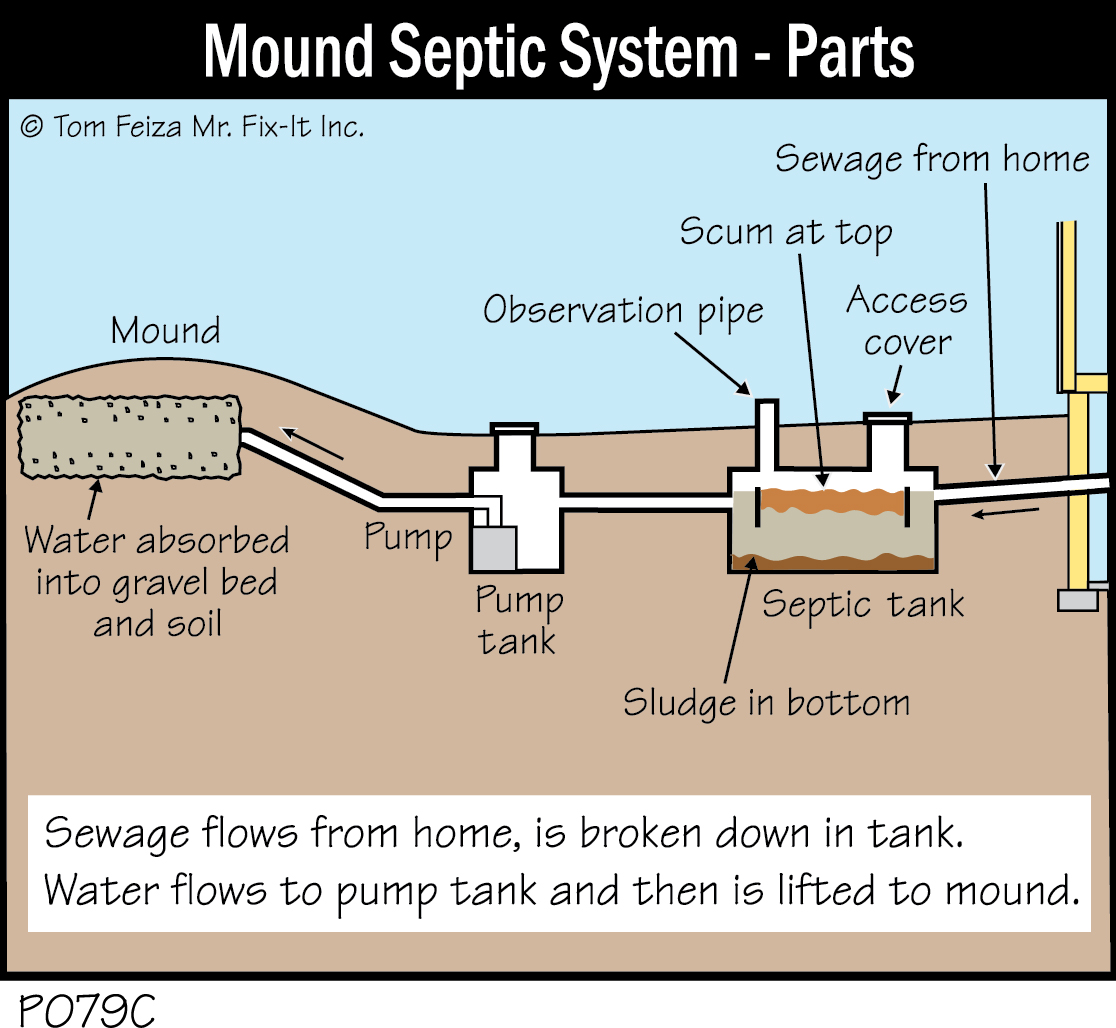
Mound systems are installed in rural areas where the soil can’t accept water from a standard septic system. A mound system usually has a second holding tank/pump tank. After sewage is processed in the septic tank, water flows into the pump tank, which lifts the water to the top of the mound.
The mound is specially constructed of gravel and soil that’s mounded above the surrounding surface. The mound functions the same as the absorption field in a conventional septic system, and the requirements for maintenance are the same as those described above for a septic system.
You should understand the operation of the pump/second holding tank. Also, there may be an alarm that goes off if the pump is not working. If the alarm sounds, contact professional help.
Sewage Ejector
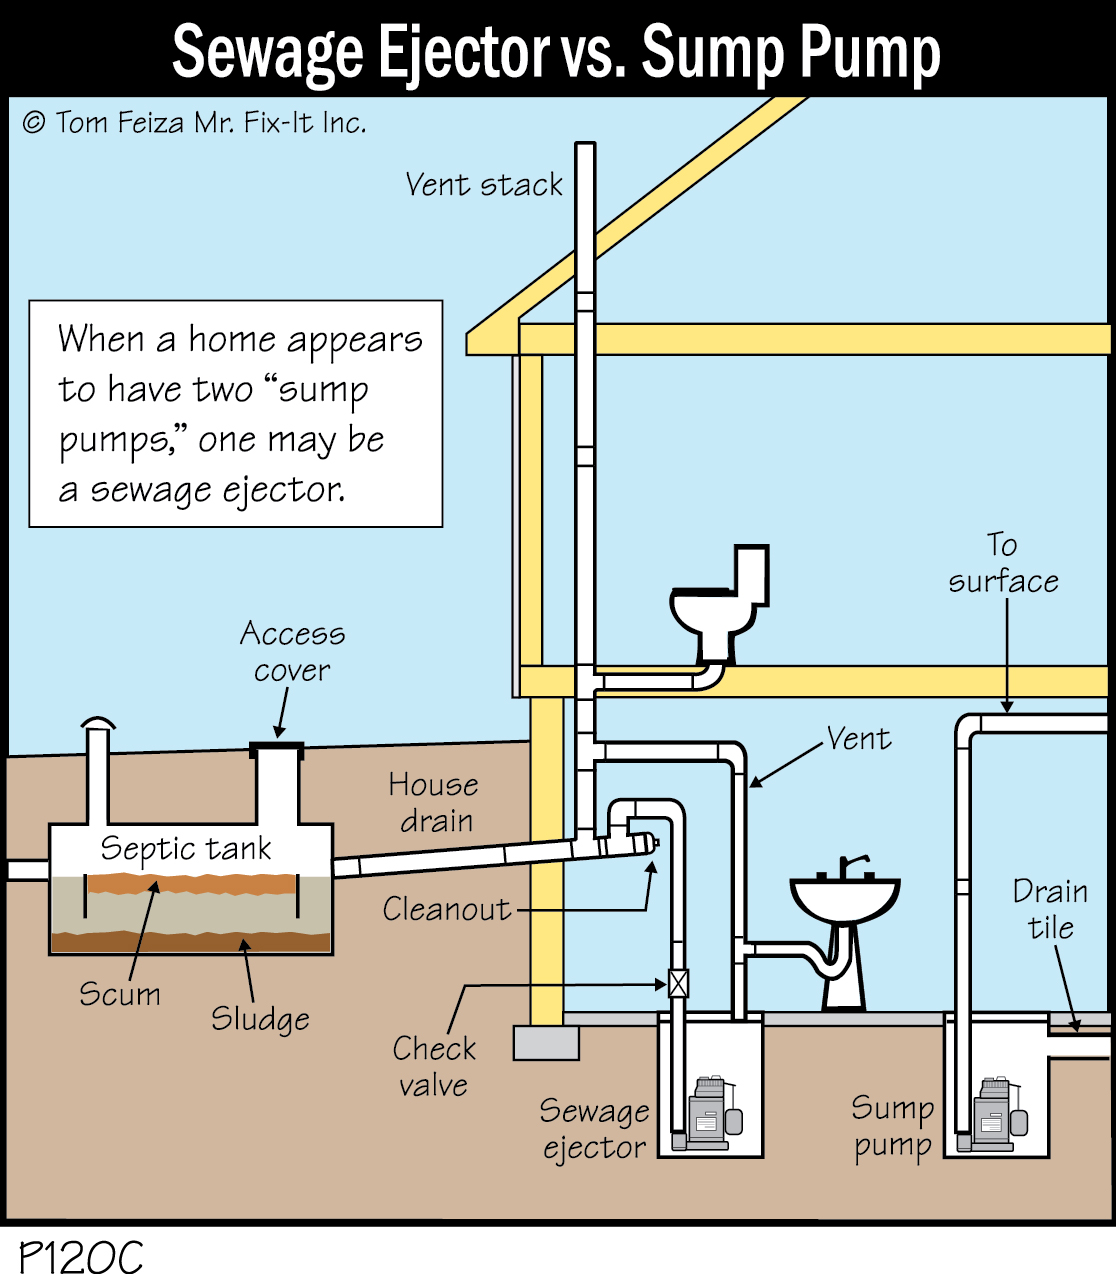
In most homes with basements and septic systems, sanitary system drainage will exit the basement 4 feet below the exterior soil depth, or about halfway up the basement wall. Sewage flows by gravity through the drainage pipe. But if there is a laundry tub, sink, bathroom, or floor drain in the basement, their wastewater must be pumped up to the main waste line. In this case, a sewage ejector or wastewater pump lifts the sewage water.
You can tell if your home has a sewage ejector by looking for a sealed crock with piping that leads to the septic system. Modern systems are sealed and vented. An older system may consist of an open crock if it just services a laundry tub or floor drain.
These pumps and crocks require little maintenance, but if the pump fails or water leaks from the crock, stop using water in the lower level, and call a plumber.
Sometimes a home that’s on a municipal sewage system will have a sewage ejection pump. This depends on the height of the main sewer line in the street and the height of the connection to the home.
Storm Sewer—Municipal or None?
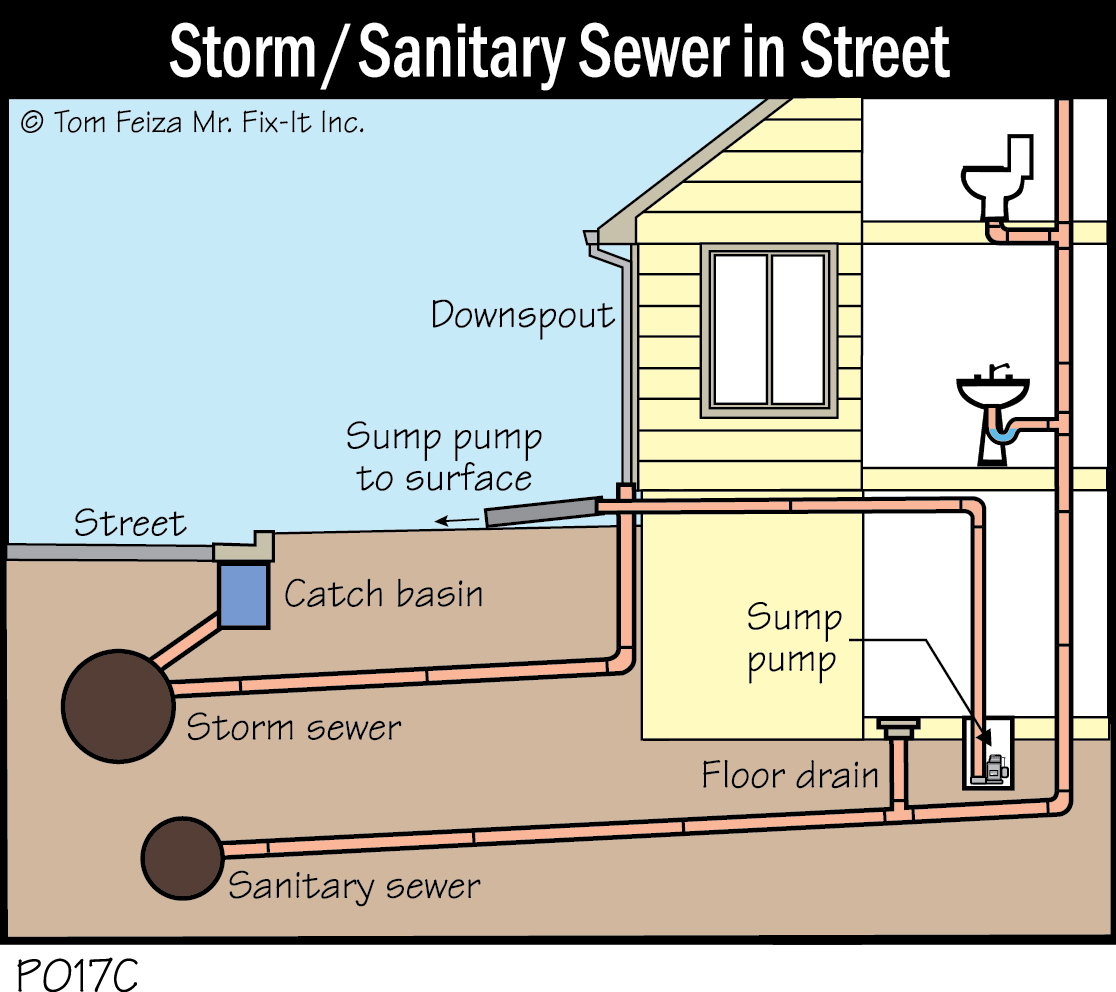
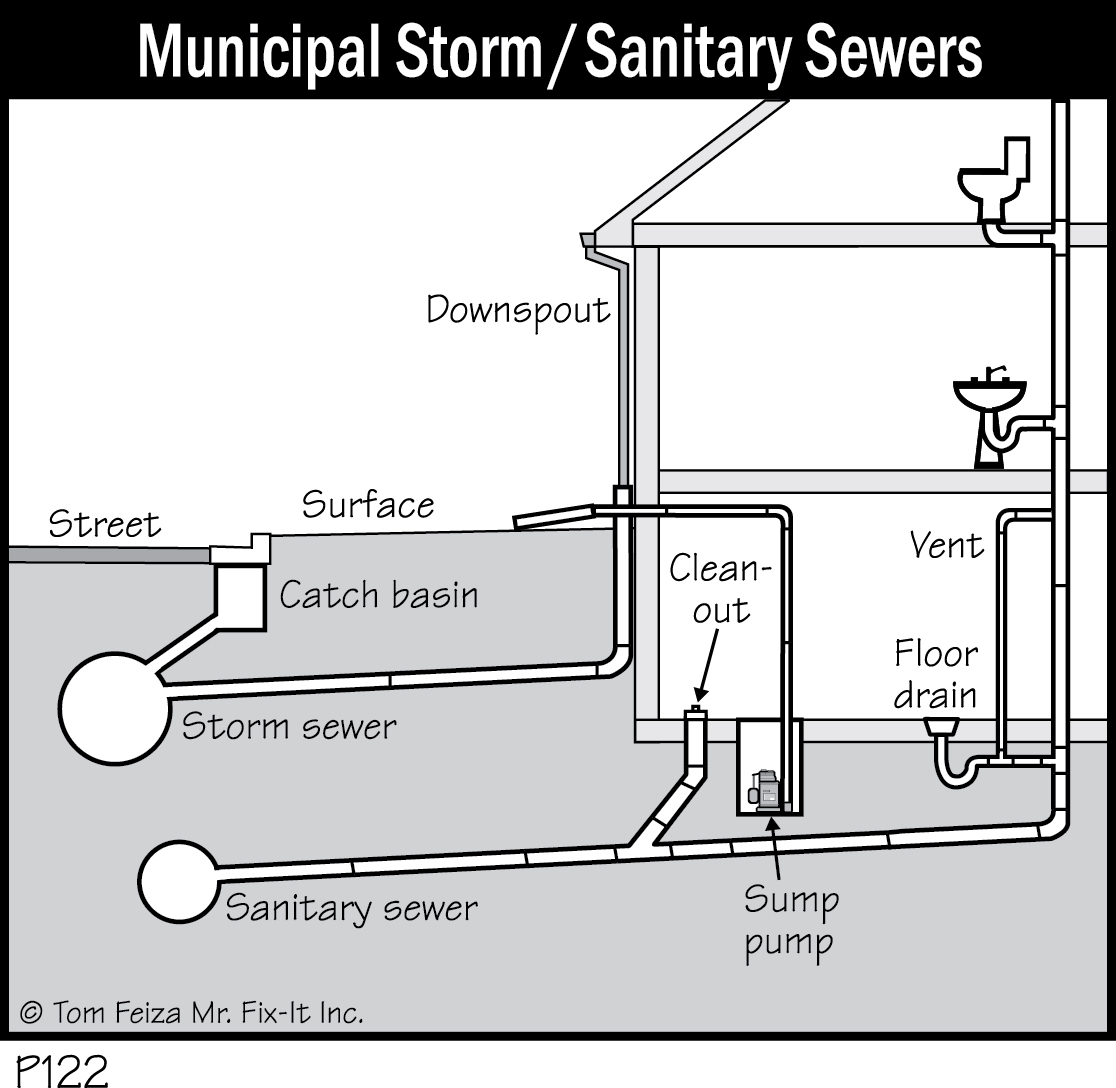
Modern municipalities have two distinct sets of piping beneath roads and streets: sanitary sewers and storm sewers. The sanitary (municipal) sewer system routes all toilet, sink and drain water to a sewage treatment plant for processing, after which the clean water is released to rivers, lakes and streams.
Cities, and some subdivisions, also have a separate system—the storm sewer system—that handles rainwater. This system directly discharges untreated rainwater/runoff into rivers and streams. Your sump pump and rain gutters may be connected to this system through an underground pipe. The storm sewer line in your basement may look just like the sanitary sewer line except that it’s not connected to toilets and sinks and doesn’t have a vent on the roof.
If your sump pump is routed to the sanitary sewer system instead, you are sending clean rainwater to the sewage treatment plant. That overloads the plant and creates an unnecessary treatment expense. So don’t connect your sump pump to the laundry tubs, because this water is routed to the sanitary sewer.
In rural areas, storm water may be routed into an open ditch beside the road. In densely populated areas, storm sewer piping below the street handles rainstorm runoff from hard surfaces like roofs, driveways, and parking lots. Such runoff is too great to be absorbed by the limited area of exposed soil in the city. Whenever you see sewer grates in the street, you are looking at parts of an underground storm sewer system.
Palmer Valve (Footing Drain)
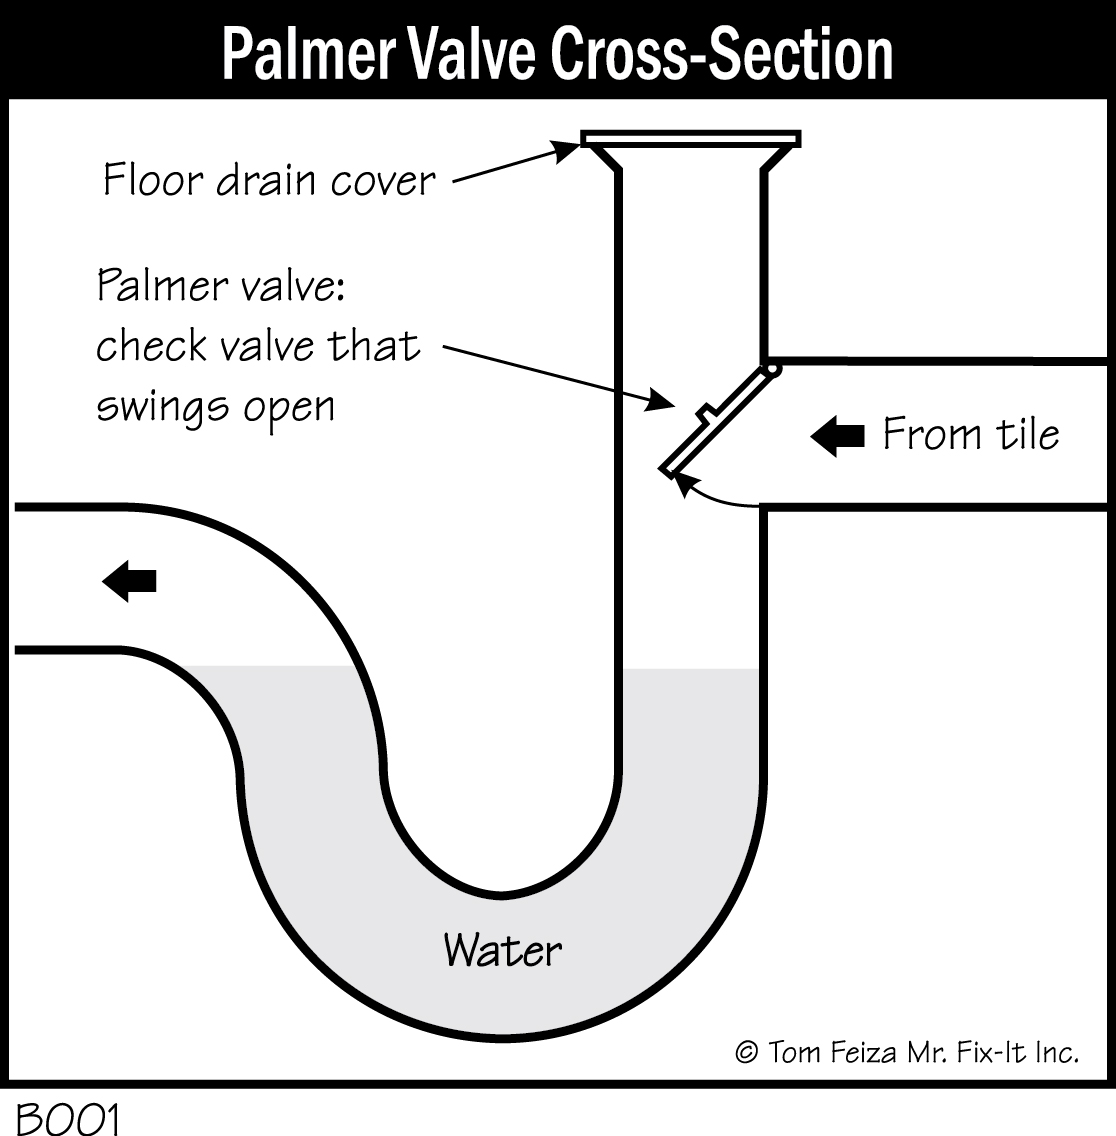
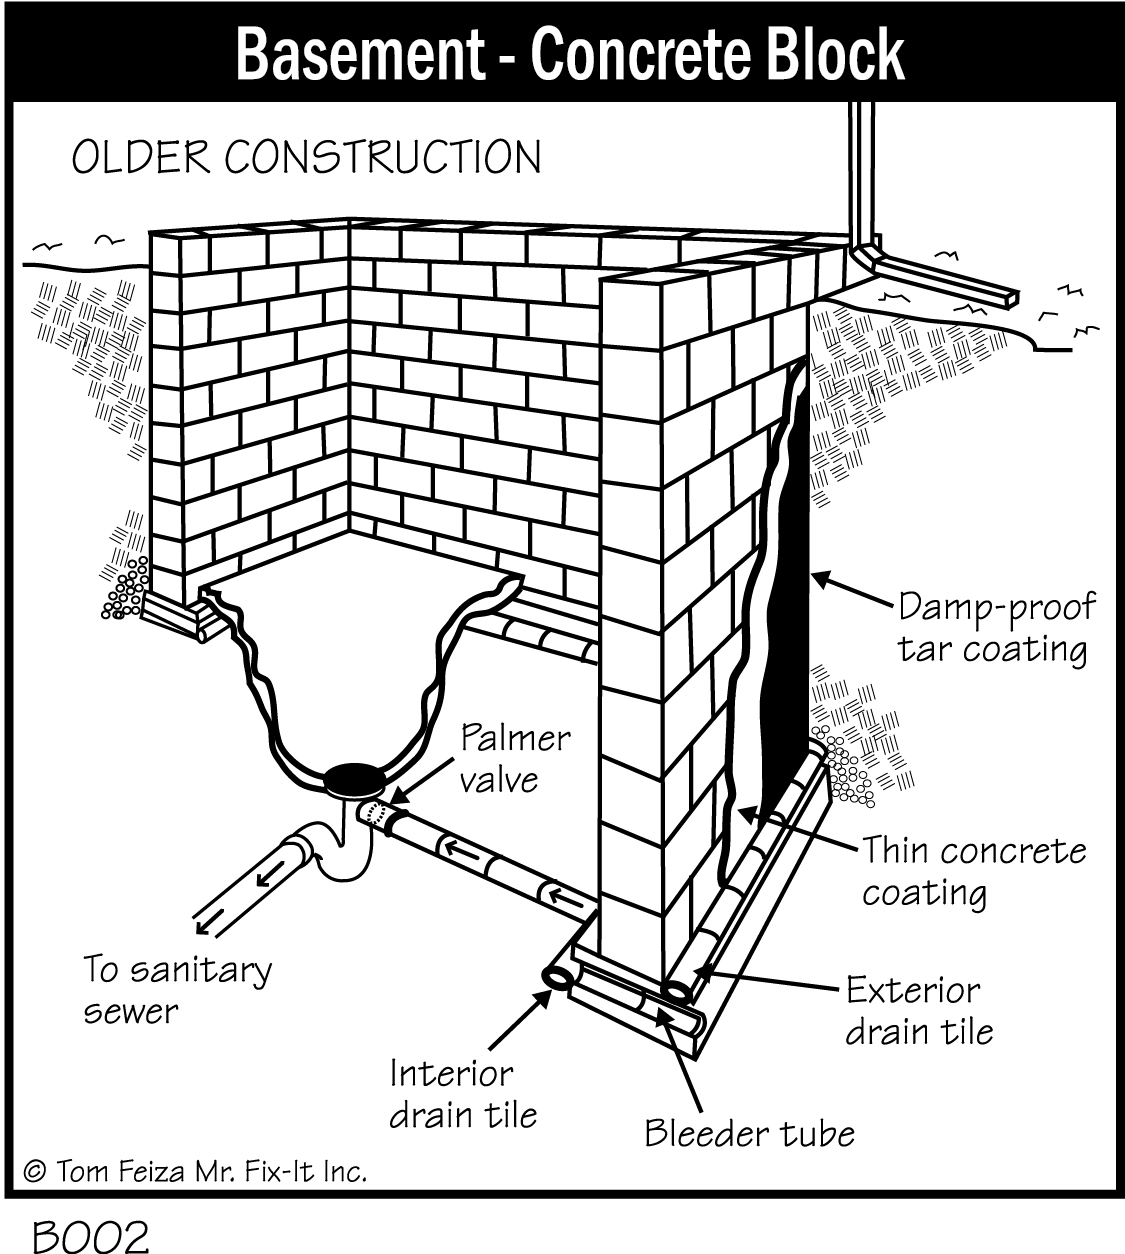
In some metropolitan areas, homes built between the 1920s and the 1950s had a “palmer valve” that routed clear storm water into the sanitary sewer lines. This practice is no longer permitted in new home construction. We cannot afford to treat clear water in the sewer treatment plants. We also can’t size sanitary sewer systems to accept large quantities of storm water during heavy rains.
If your house doesn’t have a sump pump, it may have a palmer valve— and if so, you should maintain it. In the basement, remove the cover from the floor drain and shine a bright flashlight down into it. The palmer valve is a round brass disc at the side of the vertical pipe, just above the water in the trap.
Hook the lower edge of the palmer valve brass disc with a stiff wire or tool to make sure it moves freely—the brass disc should swing easily from the hinge at its top. If this disc is stuck closed (and most of them are), water that collects in the basement drain tile system cannot be drained away. You may end up with water rising in your basement.
To loosen a stuck palmer valve, spray it with lubricating oil a few times over several days, and bang it with a stick or tool. Try to hook the bottom and lift it up. You could also grab it with your hand if you are a brave soul. Or hire a plumber to free the valve.
Irrigation Systems
Landscape irrigation systems come in all designs and types. They are not common in northern climates, although they may be used for more expensive housing. In dry southern climates, drip systems often are buried to deliver moisture to soil below the plants.
In northern climates, water must be drained from an underground system to prevent winter freezing. A professional best performs this service. In addition, the system will need routine maintenance of sprinkler heads, automatic valves, and piping.
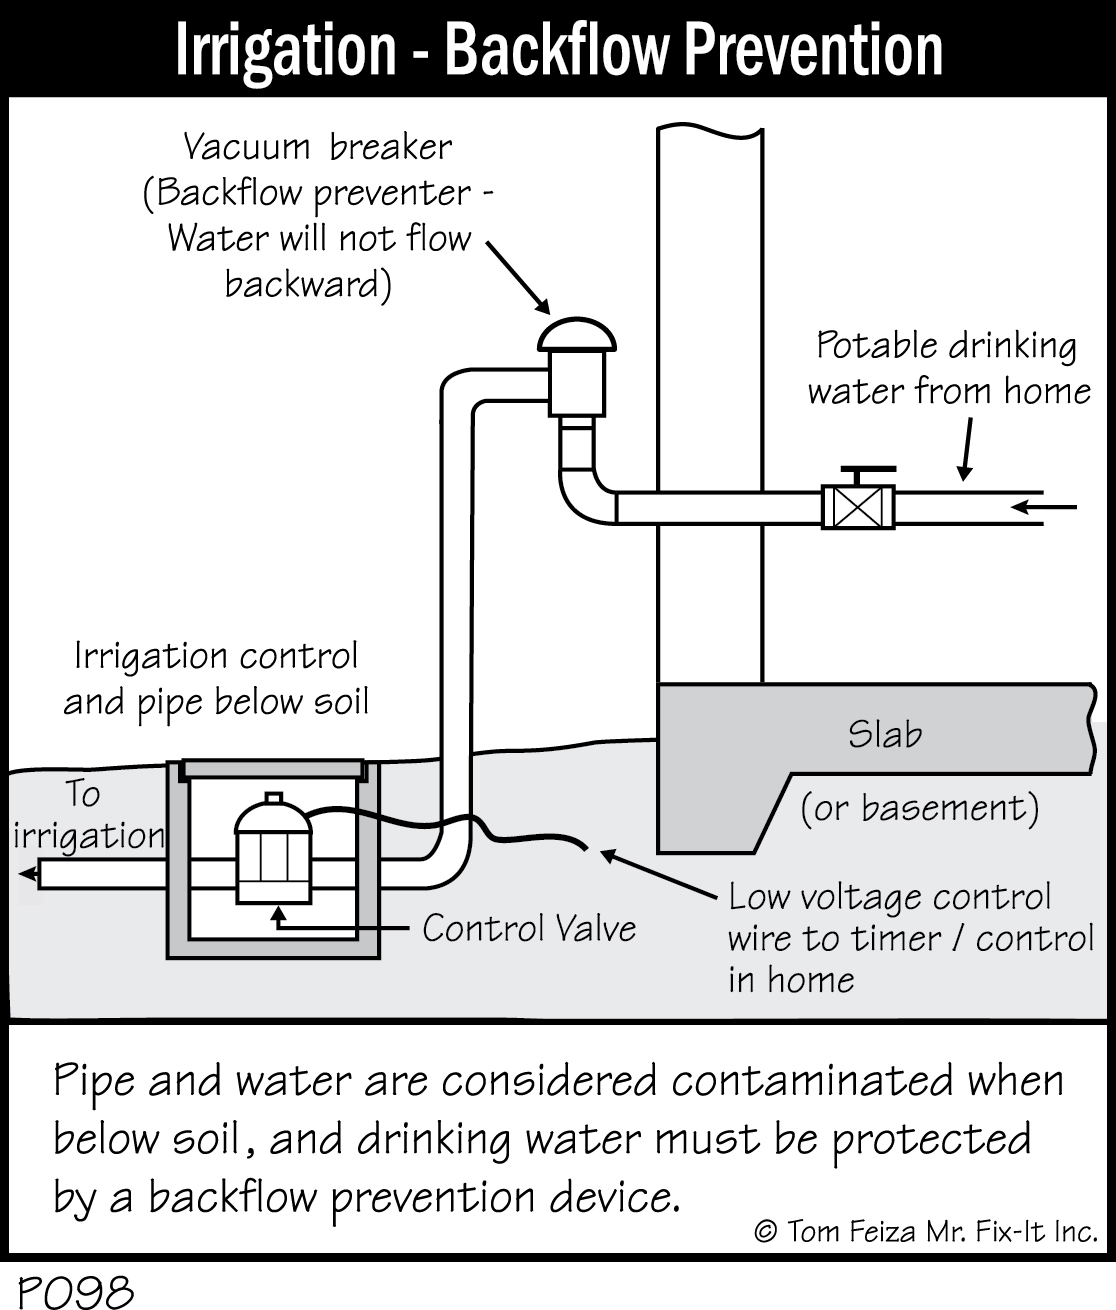
Most systems receive water from the home’s drinking (potable) water system. In this case the irrigation system must be separated from the drinking water with a vacuum breaker or a backflow prevention device. Typically this device is located at least 12 inches above the soil in the feed pipe to the system. The backflow preventer stops any backflow that would contaminate the drinking water.
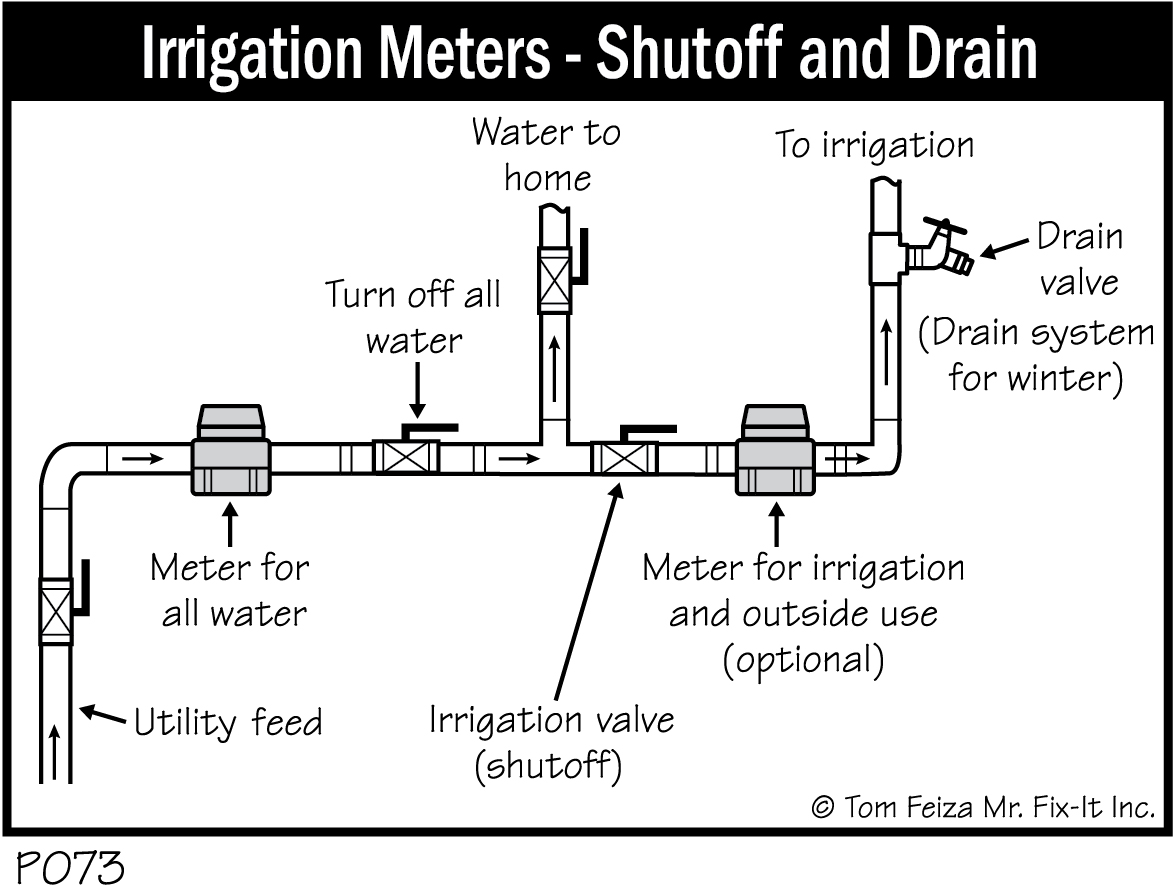
Where homes are on a metered municipal water system and a municipal sanitary sewer system, the irrigation system or even the exterior hose bib connections may be separately metered. This involves two water meters—one for the total amount of water used and one for the irrigation water. This allows the municipality to determine how much water is used for irrigation so the homeowner will not have to pay a sewer charge on it.
Natural Gas and Propane
Natural gas and propane are commonly used in central heating systems and may also be used for cooking, drying clothes, and operating fireplaces. Know the basics of the distribution system in your home and how to turn off the system in an emergency.
Natural Gas
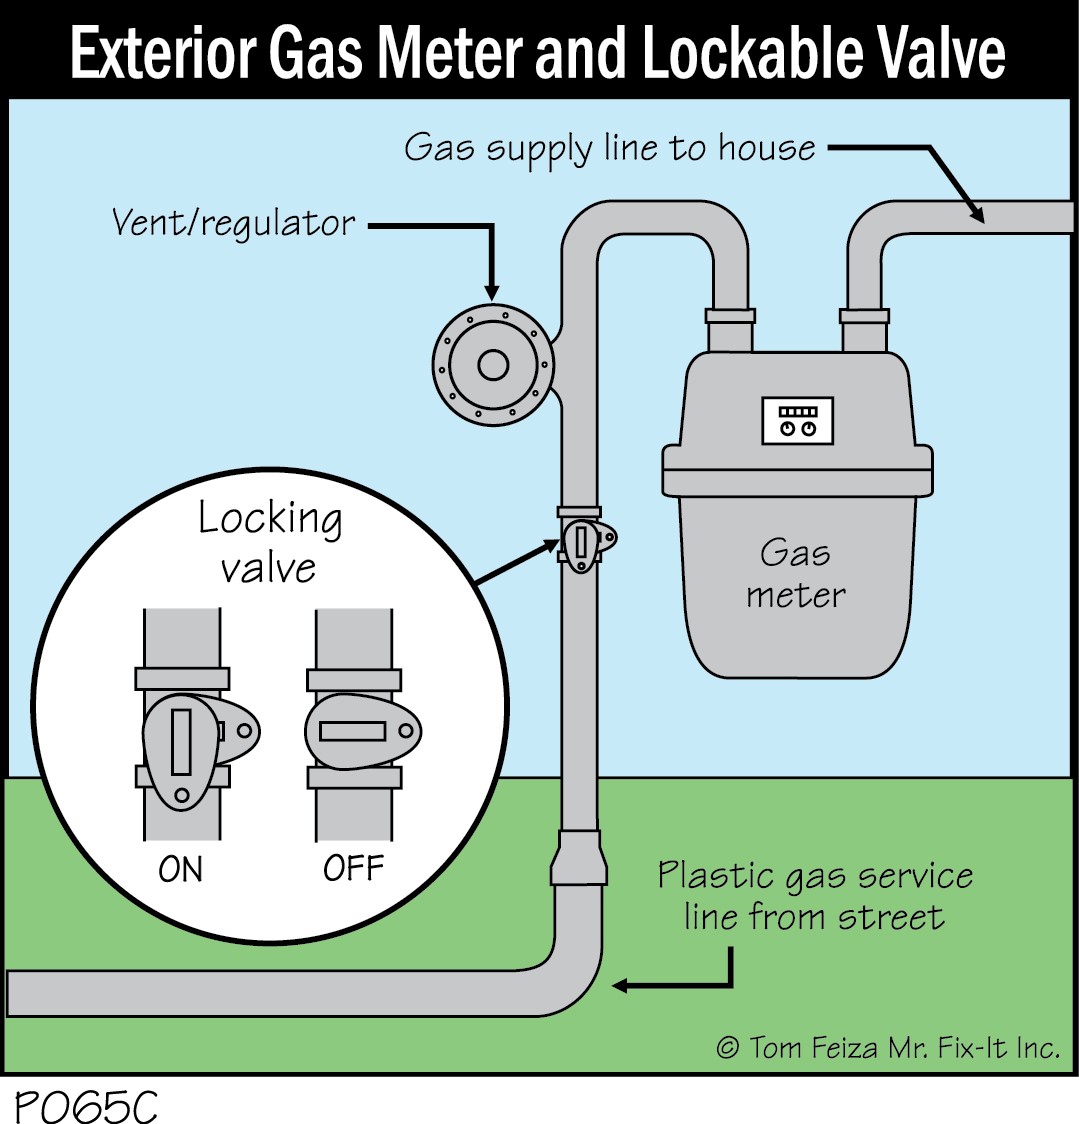
Natural gas is provided by a public utility in many areas. Underground piping distributes the gas, and a small line brings it to the house through a metering/control system outside or in the basement. Gas enters your home at very low pressure. There is a main shutoff valve near the meter, and the system has a relief valve and vent piping for safety.
Inside your home, natural gas may be distributed by “black iron” steel-screwed pipes. It can also be distributed by brass or copper pipes, depending on local requirements.
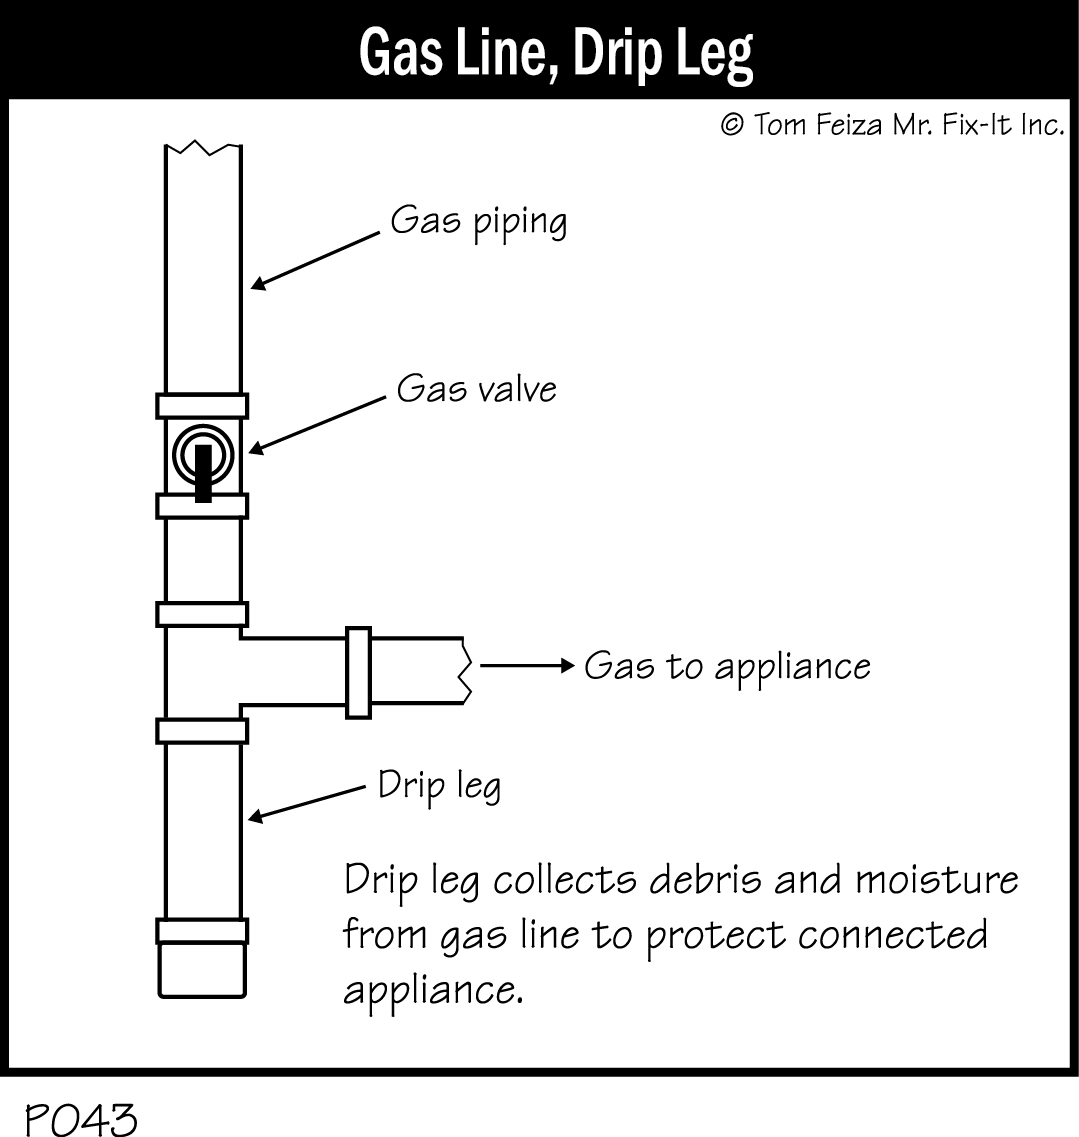
Natural gas piping should be well-supported and protected from damage. There should be a shutoff valve at each appliance connection to the piping. Most fixed gas appliances like the furnace or water heater will be directly connected to the gas piping without a flexible connector. Most connections will include a “drip leg,” a small vertical pipe below the appliance connection that catches any contamination before it reaches the gas control valves.
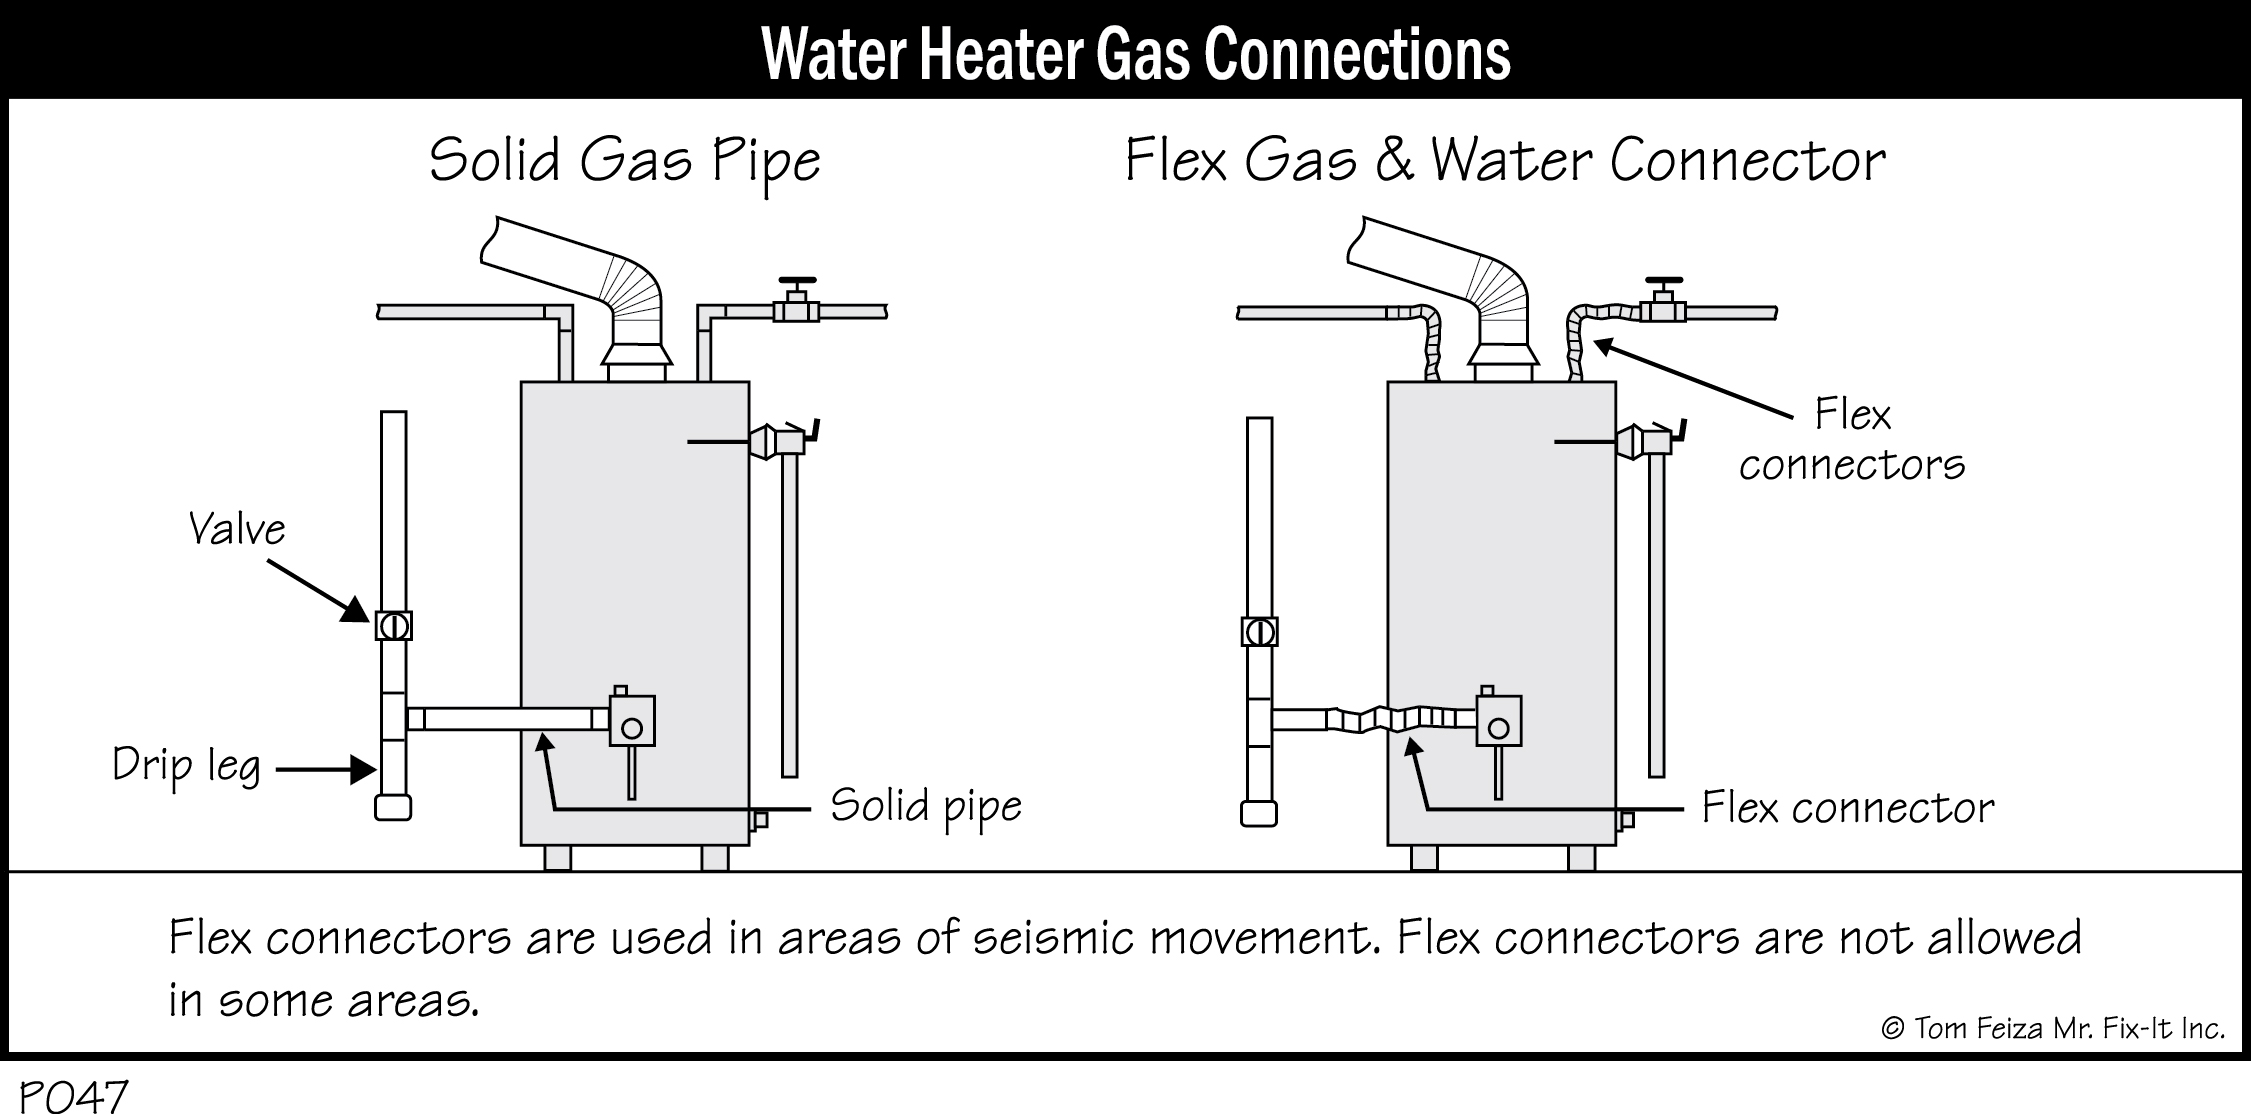
All flexible connectors should be the modern type that extend directly from the gas piping and shutoff valve to the appliance. Normally, flexible connectors are used only with appliances like stoves or dryers that can be moved for maintenance, but areas prone to earthquakes may allow or require flexible connectors at furnaces and water heaters.
The Consumer Product Safety Commission advises that older flexible gas connectors made of uncoated brass can leak. Your connectors should be made of plastic-coated brass or stainless steel. The CPSC advises that any uncoated brass connector should be immediately replaced by a professional. You will recognize uncoated brass by its coppery color, even if it’s old. Older connectors made of flexible aluminum or aluminum piping also should be replaced.
If a gas appliance is removed from the system, have a professional turn off the gas valve, cap the line beyond the valve, and check for leaks.
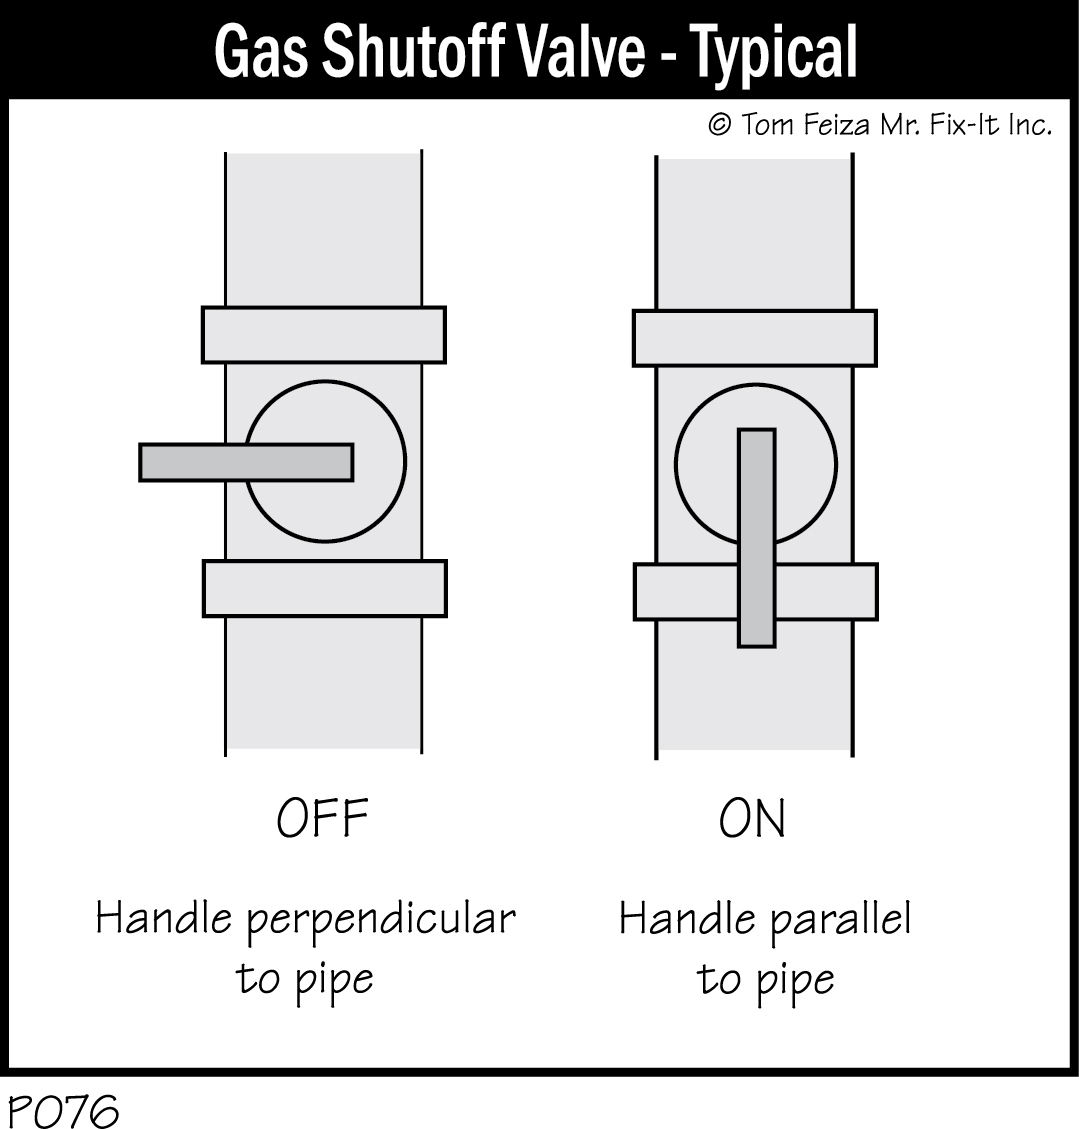
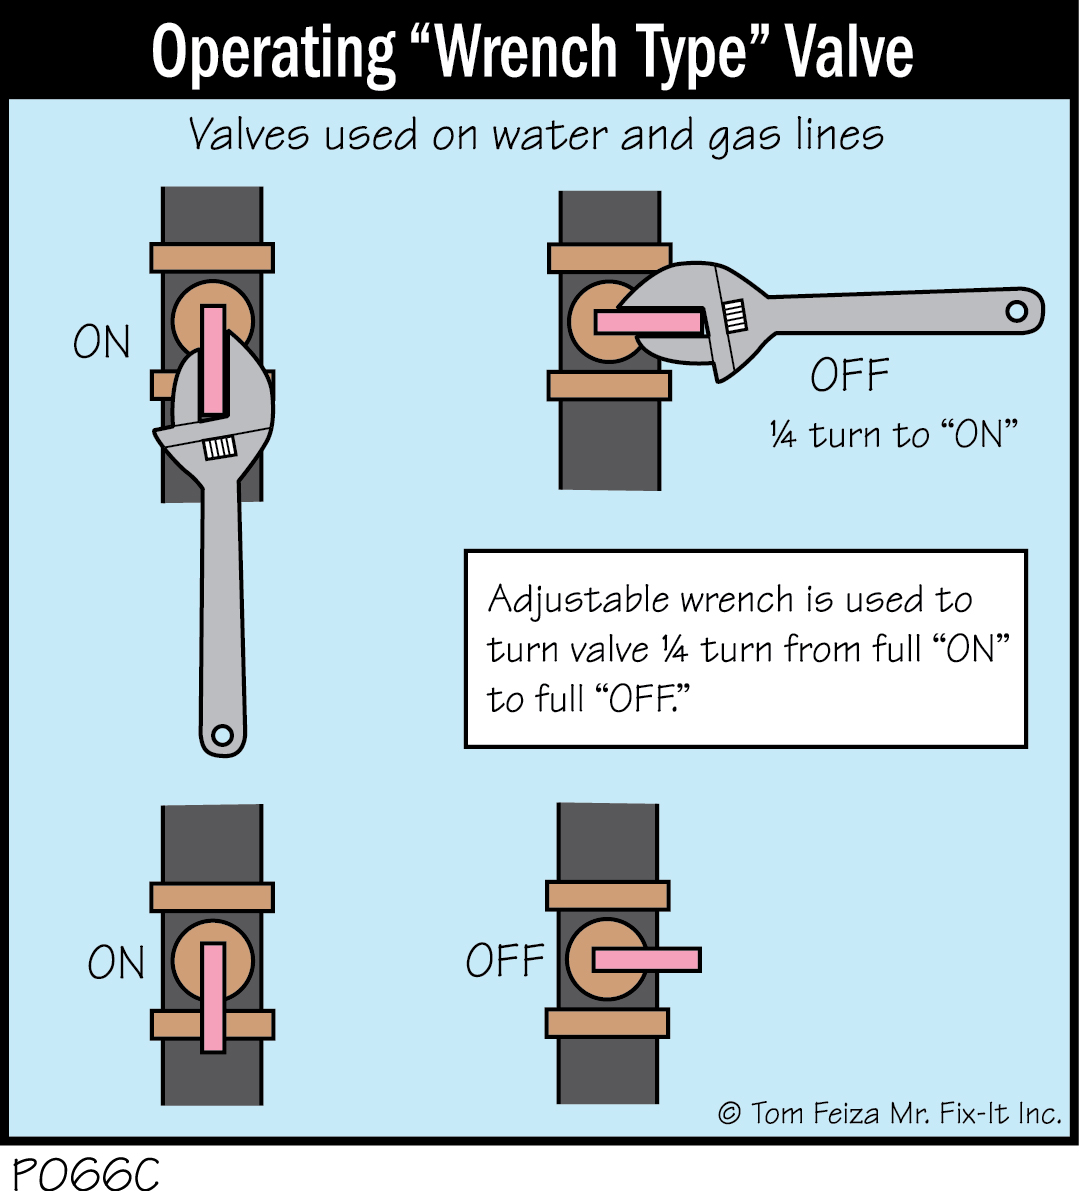
Gas valves turn off with a quarter-turn. When the valve handle is parallel to the piping, the valve is on. When the handle is perpendicular to the piping, the valve is off. Many valves must be turned with an adjustable wrench or pliers.
Propane
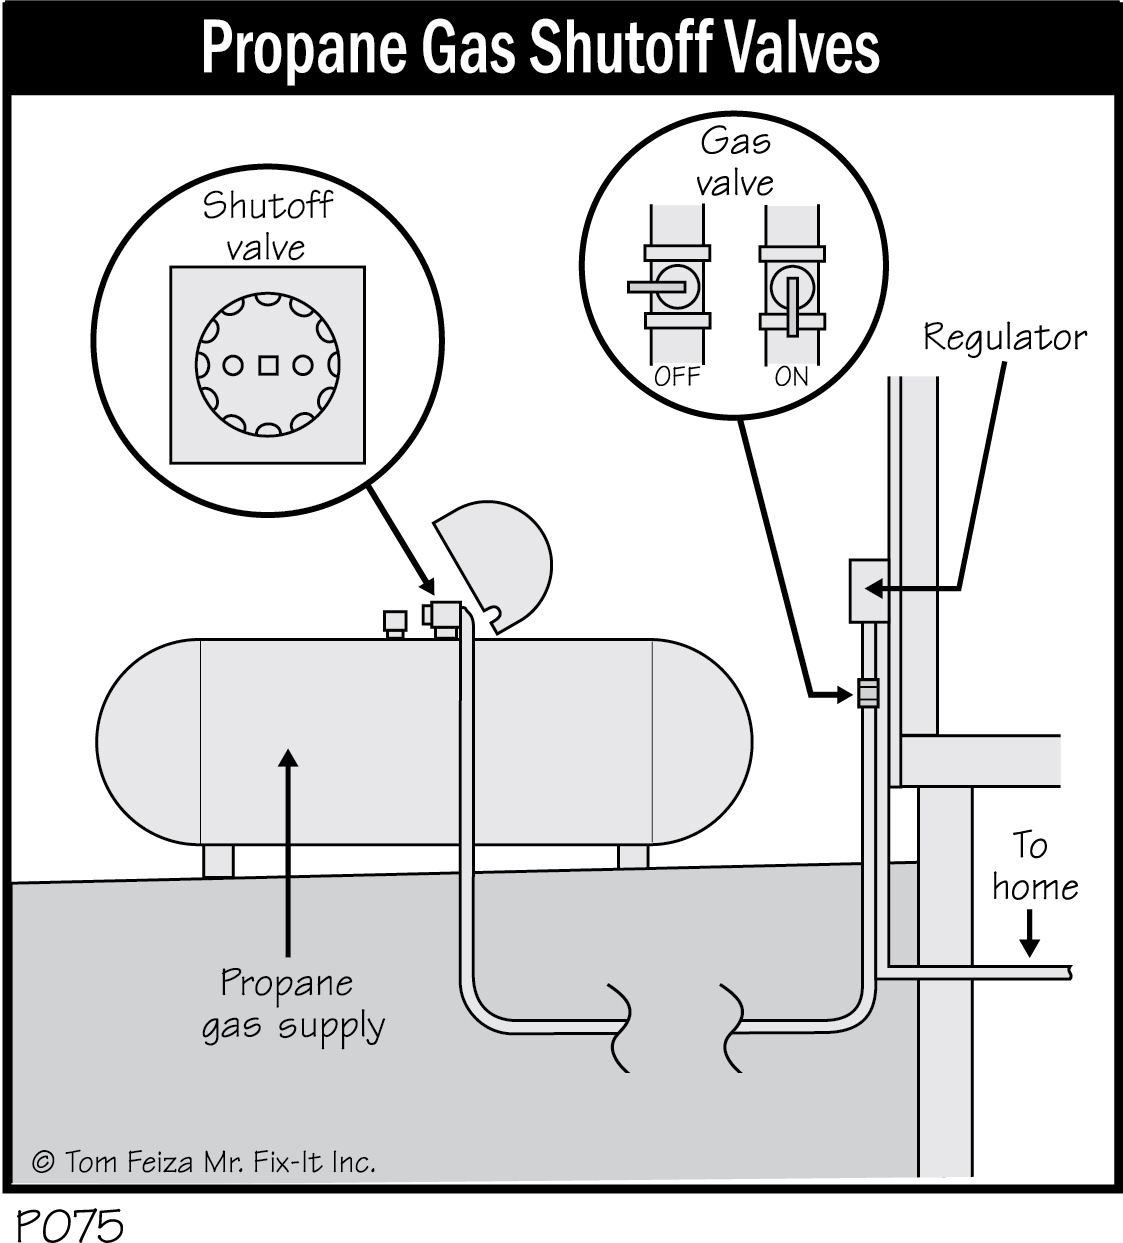
Propane is a gas that’s similar to natural gas, except that propane is provided in a storage tank on your property. Distribution piping is similar to that for natural gas except that there is no meter; you pay for the gas when it’s placed in the tank.
The main shutoff often is at the top of the tank. It may be a valve that requires several turns to shut off the gas. Review the valve and the rest of the system with your supplier. Follow all precautions noted above for natural gas.
Must Know / Must Do – Natural Gas and Propane
- Identify the main shutoff valve and know how it operates.
- Identify the shutoff for every gas appliance.
- Inspect all flexible gas connectors per CPSC standards (noted above).
- If you smell gas, leave the house. Don’t light a match, and don’t turn on a light. Use a neighbor’s phone to call the gas supplier.
It’s wise to sign up with a supplier who automatically fills the tank as needed. Often, the supplier can also service your heating equipment.
Heating Oil
Oil can be used in a heating system and may also be used to heat water. An oil system consists of a storage tank, valve, filter, and distribution piping. A fill and vent line will extend to the exterior of the house.
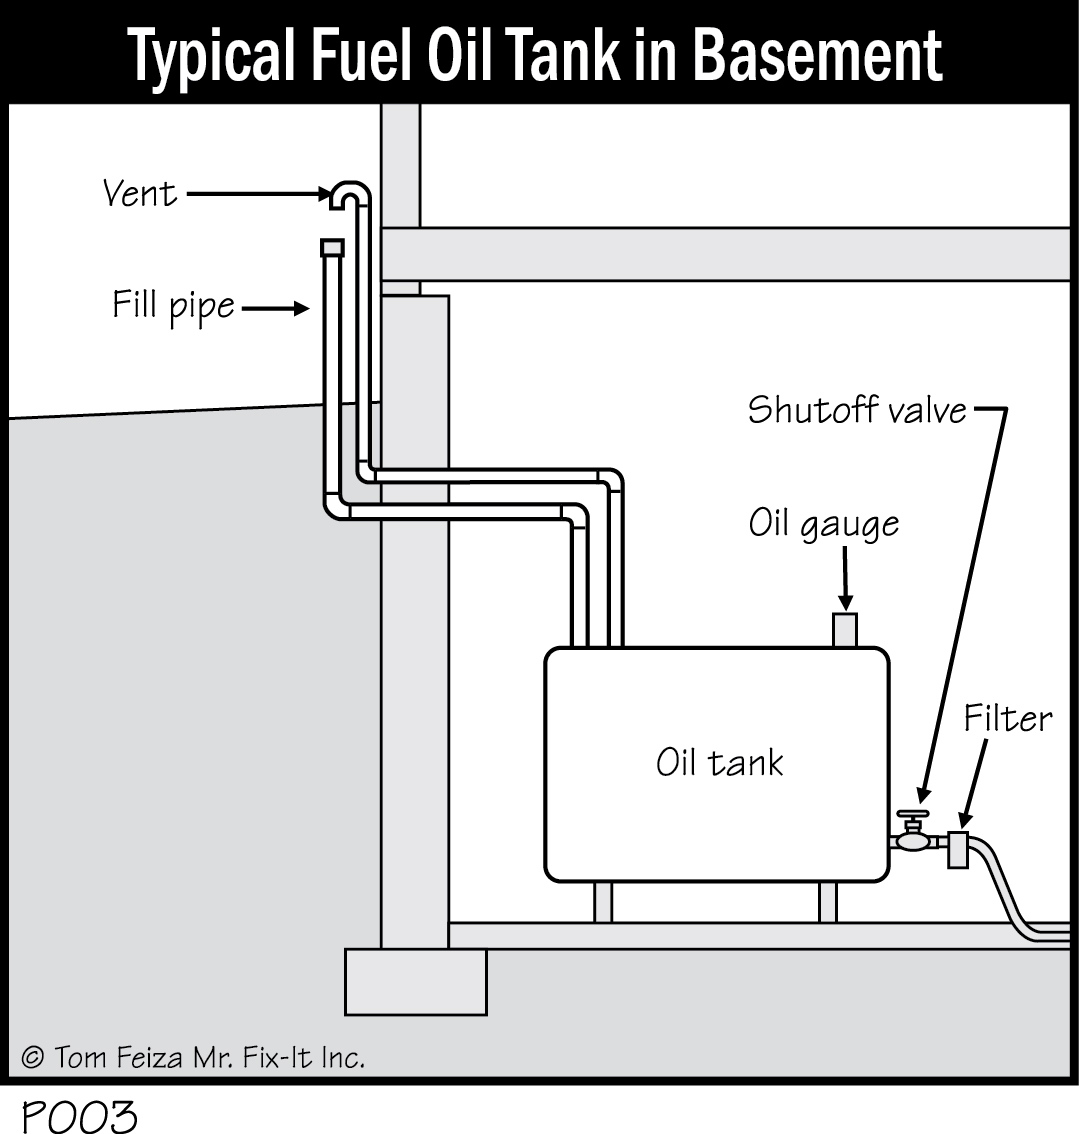
The oil storage tank often is located in the basement, but it may also be underground in your yard. If your tank is underground, contact the oil supplier or your municipality or state to check maintenance requirements and code regulations. Usually, underground storage tanks are tightly regulated because of the potential for a spill that could contaminate the environment.
Arrange to have a supplier automatically fill the tank and maintain the oil burner. Never, never, never let the system run out of oil—this can lead to a very expensive service call.
Must Know / Must Do – Heating Oil
- Identify the shutoff valve and know how to operate it.
- Never allow the system to run out of oil.
- The system should not smell or leak. Fix all leaks promptly.
- For underground tanks: contact municipal or state agency for registration and maintenance requirements.
