- Foundation Basics
- Protecting Your Basement Foundation
- Termite Protection
- Structure, Frame and Siding
- Stucco – Cement
- Windows and Doors
- Insulation and Ventilation
- Roofs and Gutters
- Chimney, Flue and Vent
- Orphaned Water Heater in Masonry Chimney
- Seismic Movement
Foundation Basics
A foundation provides a stable, rigid base to support a home. The foundation supports the frame and structure and protects it from moisture and contact with the soil. The foundation must rest on firm soil and be protected from water entry or excessive dampness.
Full Depth Basement, Crawl Spaces
Foundation types vary with local weather conditions and accepted local practices. In northern climates, the foundation must be deep enough to extend below the frost line. This can be 4 feet or more, so full basements are common. (Frost causes soil to expand, and the foundation must be below the frost line so it won’t move with this expansion.) In warmer climates that have little or no frost, the foundation may be a crawl space or concrete slab poured “on grade” or directly on the soil. In a coastal region, the foundation may be piers or posts that raise the house above potential high water levels. In some areas, foundations are made of pressure-treated wood.
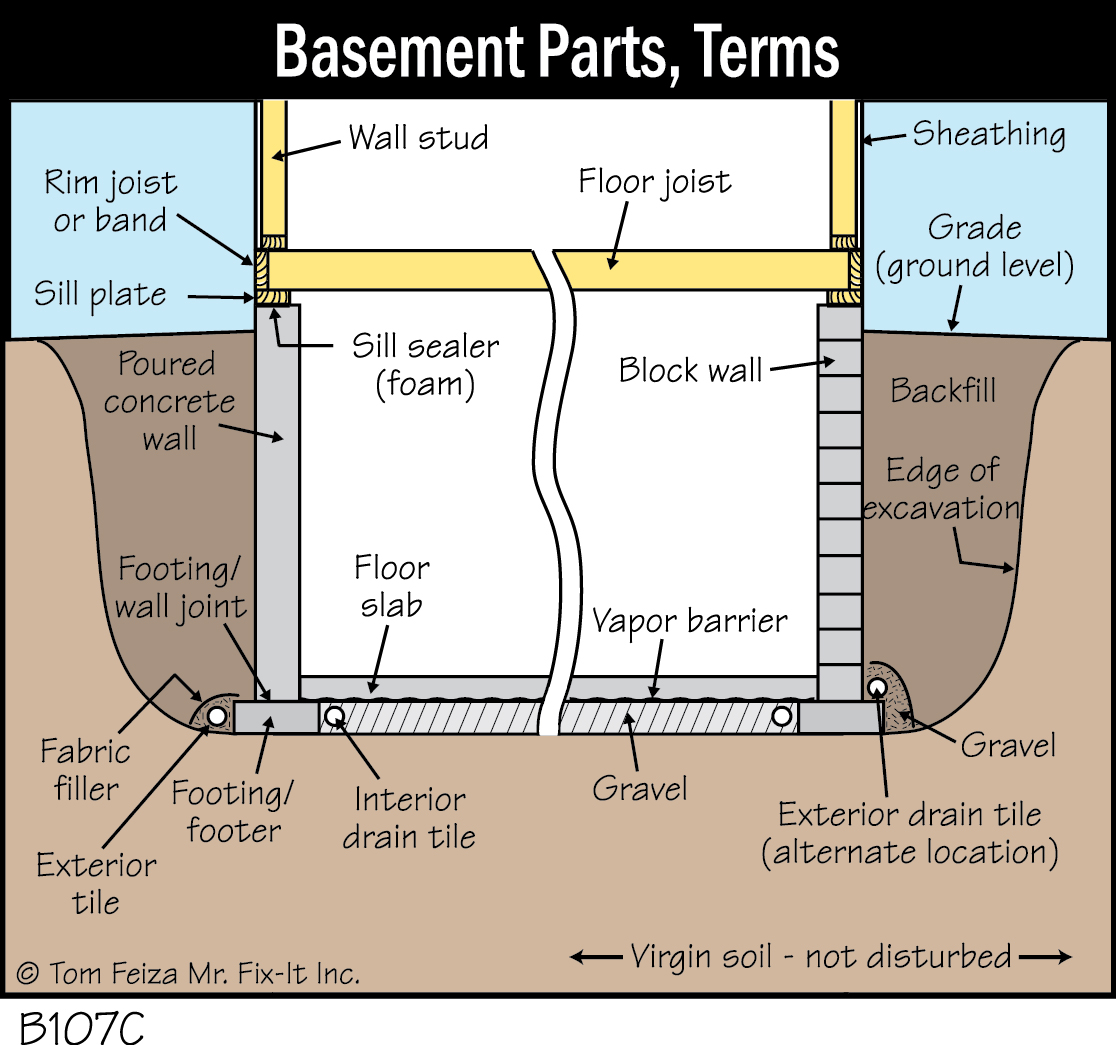
The majority of homes in northern climates are built on foundations that form a crawl space or full basement. The basement rests on a footing that supports the home’s weight. Foundation walls are constructed of brick, concrete block, poured concrete, clay tile, stone, or similar materials. The basement floor usually consists of poured concrete. Crawl spaces often have a dirt floor.
Must Know / Must Do—Foundations
- Understand the type of foundation that supports your home.
- Protect your foundation from water damage. Never allow water to pond around the foundation.
- Protect your foundation and the rest of your home from insects.
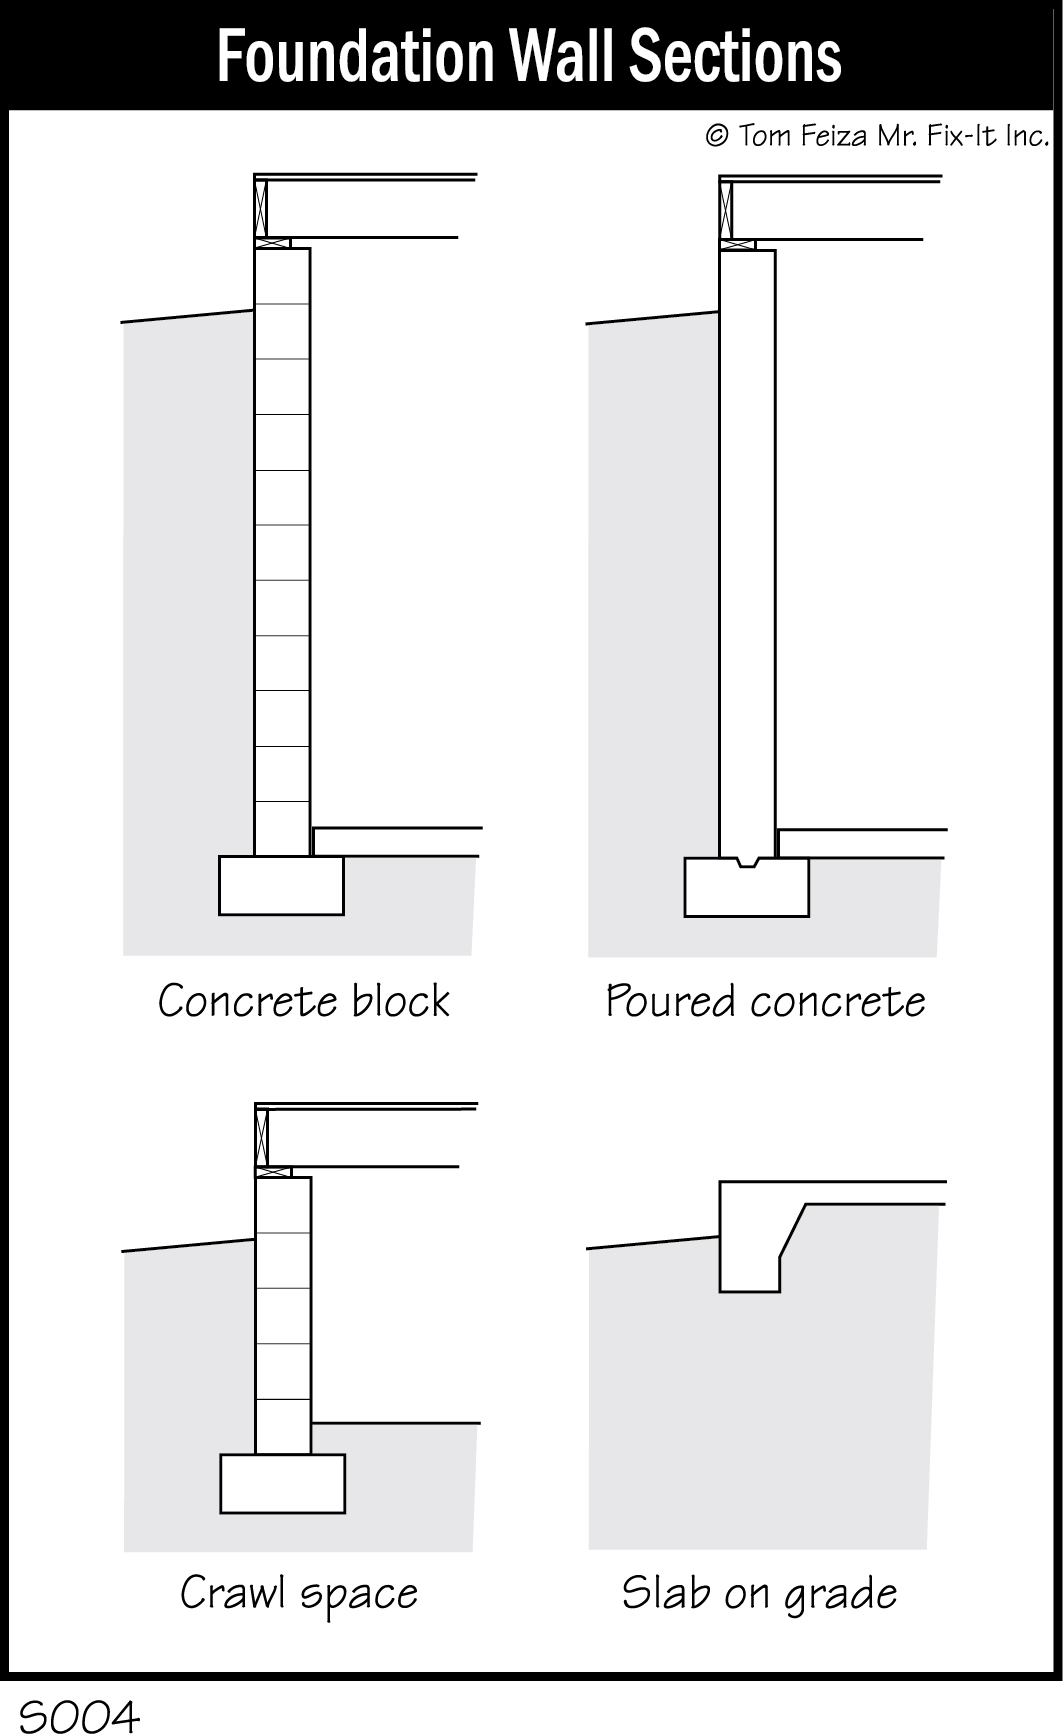
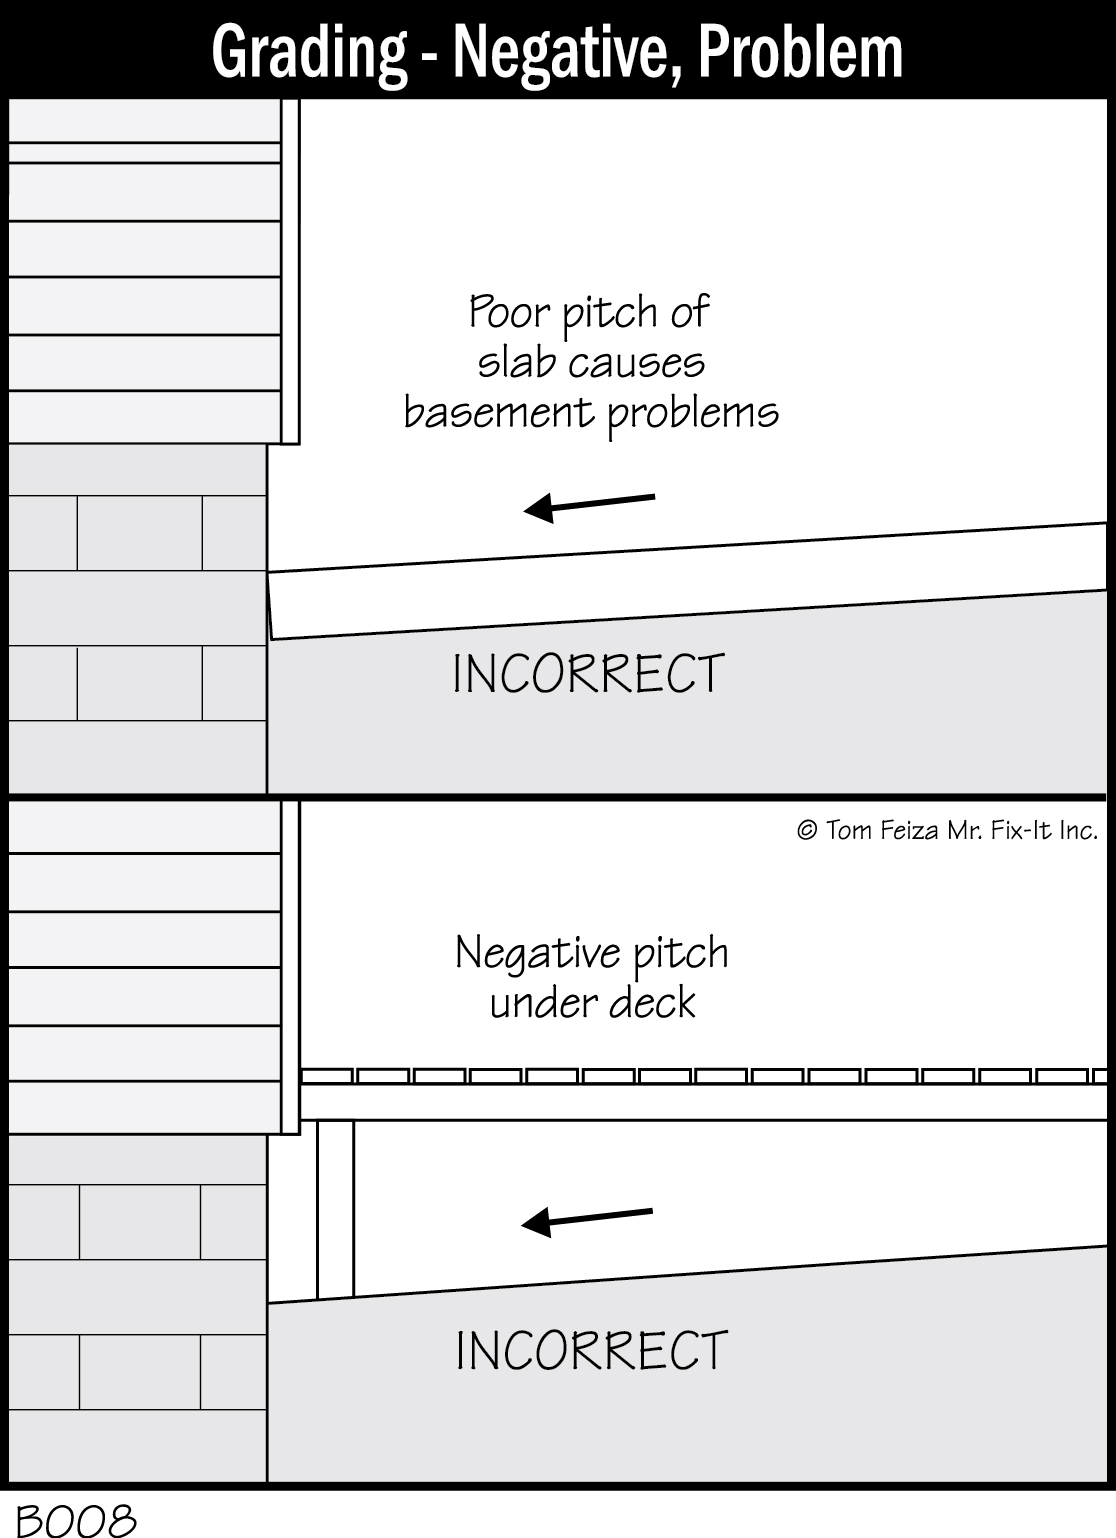
Full-depth basements are the most complicated type of foundation because of potential water problems and the pressure of soil outside the basement walls. While full-depth basements require the most maintenance, crawl spaces and slab foundations must also be protected from excessive moisture.
Slab Foundations
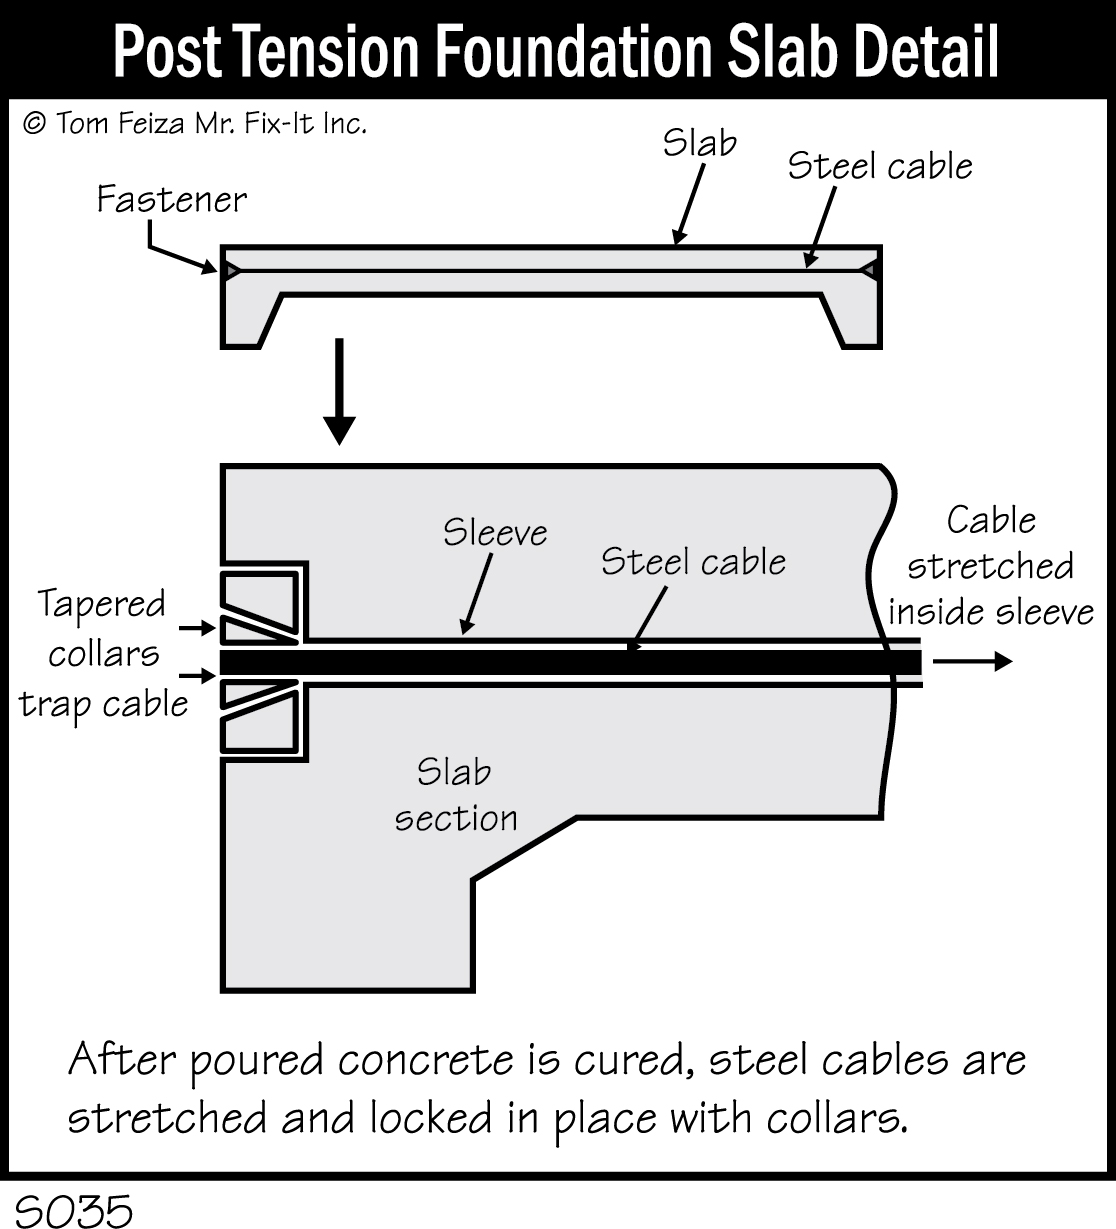
In warmer climates, a foundation must be placed on firm soil for proper support, but frost is not an issue. In warmer climates, houses often rest on a “slab on grade,” meaning that the foundation is a slab of concrete poured directly on grade. Often these types of foundations are thicker at the edge, and reinforcing steel is set inside the slab to provide structural strength and to resist cracking and movement. With this type of foundation, plumbing, heating and utility lines may be set in the slab.
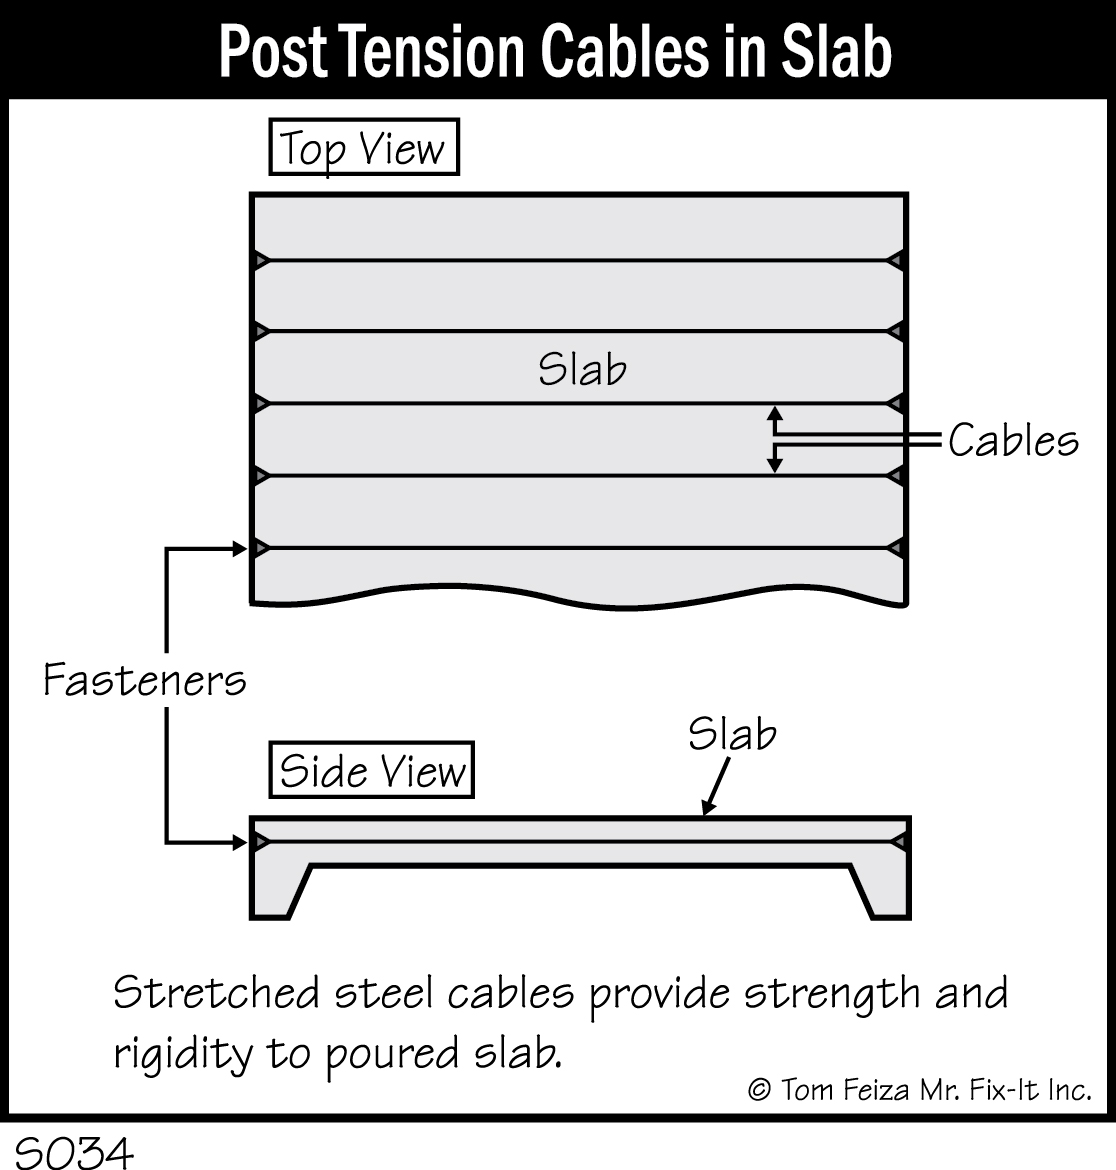
A slab foundation may also be reinforced with steel cables pulled tightly inside tubes that are set in the concrete slab. During construction, the tubes and steel cables are set in place; concrete is poured, and it sets. Special hydraulic jacks stretch the cables, and they are fastened at the edges of the concrete with special tapered steel wedges. These “post tensioned” steel cables compress the concrete and provide rigidity and strength to the concrete slab.
Local conditions must be considered in maintaining a foundation. Slab foundations must be protected from changes in water in the soil supporting the slab to prevent heaving and cracking. Excessive moisture can make the soil swell, and lack of moisture can make the soil shrink.
Pier, Post, Pile, Caisson Foundations
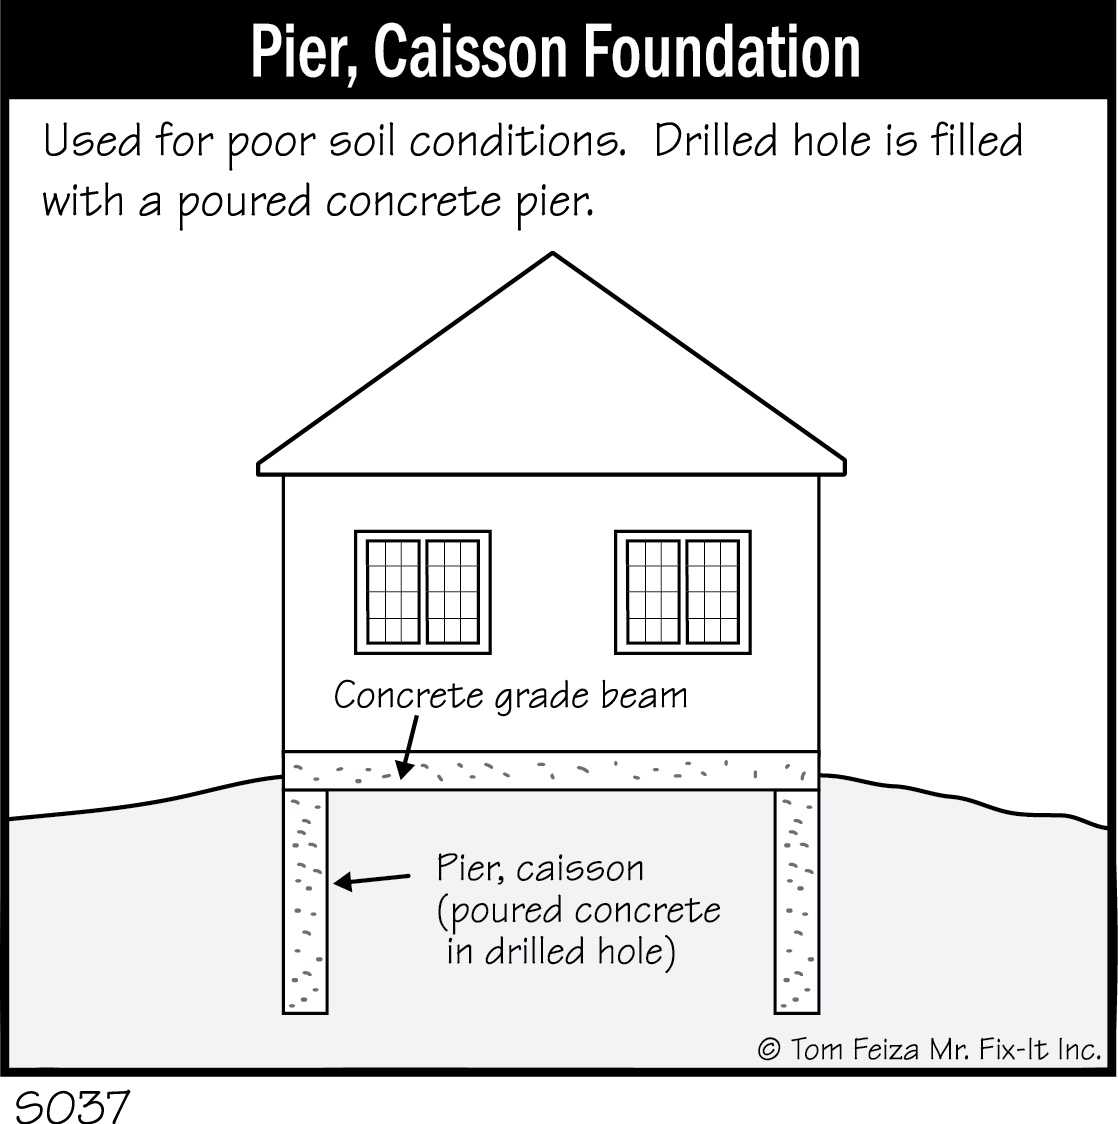
In areas where soil conditions will not support a basement spread footing or a slab on grade, a post and beam foundation is an option. Generally, pier, post and caisson refer to a vertical post set into the soil down to a firm bearing soil or rock. These types of foundations are well suited for soft soils, soils that expand, and coastal or hillside construction. Usually, the post is constructed of poured reinforced concrete, and it supports a beam that forms the base of the home.
The hole may be drilled for the caisson, and then a steel-reinforced concrete post is poured. A pile is driven into the ground until it reaches suitable soil or rock that provides proper support. This type of construction requires a site evaluation and engineering design.
I will focus on the construction and maintenance of full-depth foundations. The necessary maintenance of crawl spaces is similar. For slabs on grade, follow the recommendations for protecting the foundation from water.

Protecting Your Basement Foundation
Basement foundations require simple, routine maintenance to prevent damage that requires costly repairs. Since most damage to basements occurs slowly, over many years, if you ignore routine maintenance you may not notice a problem until there is a water leak or a major crack and wall movement. So take some time to inspect your basement and its environment. A little common sense and simple maintenance will prevent potentially serious problems and extend the trouble-free performance of your basement.
Over the years, your home’s original water diversion systems require maintenance and repair. They simply can’t be ignored. Let’s walk through the basics of maintaining your hole in the ground.
Grading to Protect the Foundation
Proper grading around the house is your best protection against seepage into the basement that may cause expensive damage. When a home is built, workers dig the excavation several feet larger than the basement walls to allow for construction clearances.
Most of the hole around your basement is filled with soil from the site. This may contain gravel, rock, wood, paper, and unfortunately almost anything no longer useful for home construction. For the next 20 years, this soil and “stuff” settles around your basement walls. It settles quickly for the first few years and more slowly after that.
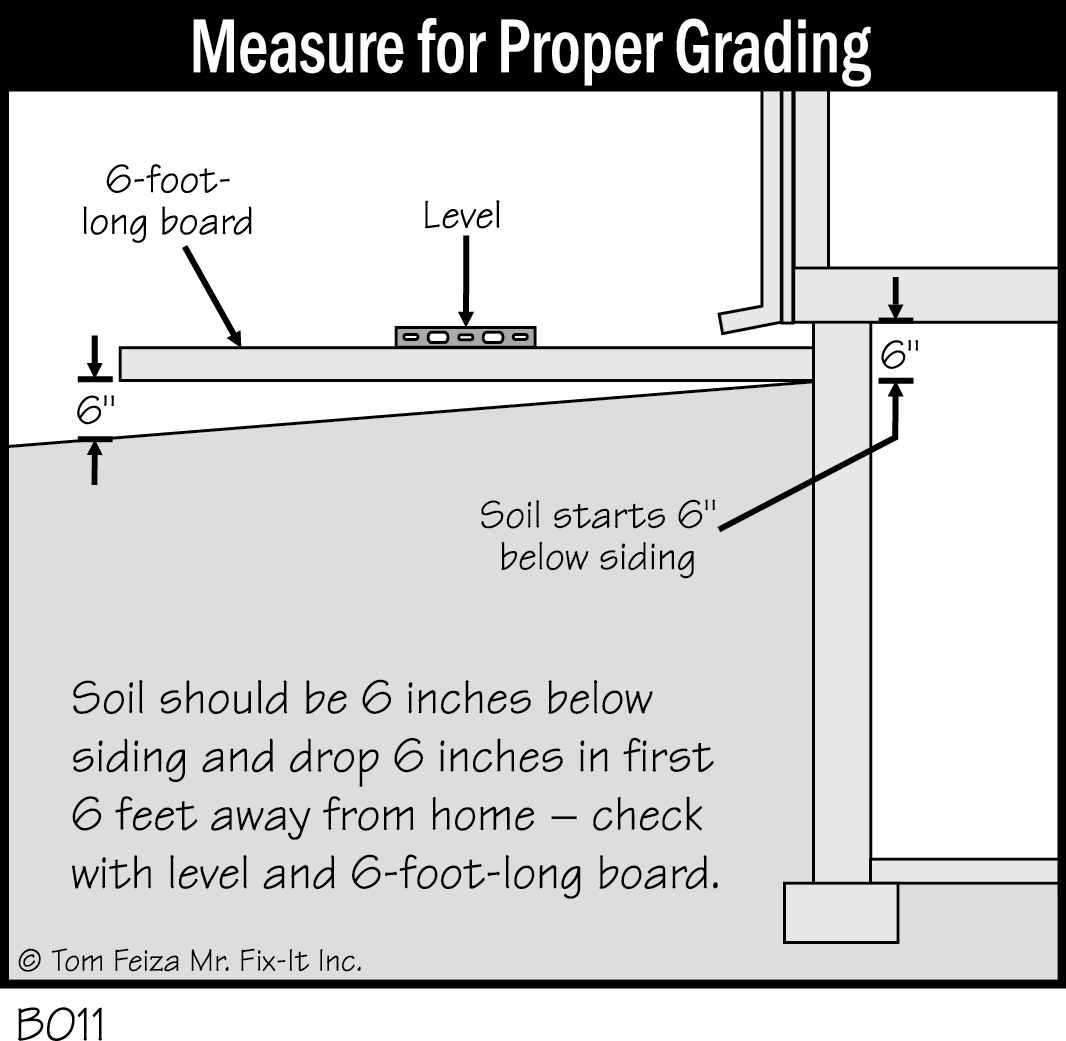
To divert surface water, the soil should pitch away from your home with a 1” pitch per linear foot for about 6 feet beyond the foundation. That is a 6″ drop in 6 feet. You can measure this with a level and a straightedge held on top of the soil next to the foundation. At a minimum, the pitch should always have some slope for 6 feet beyond the foundation.
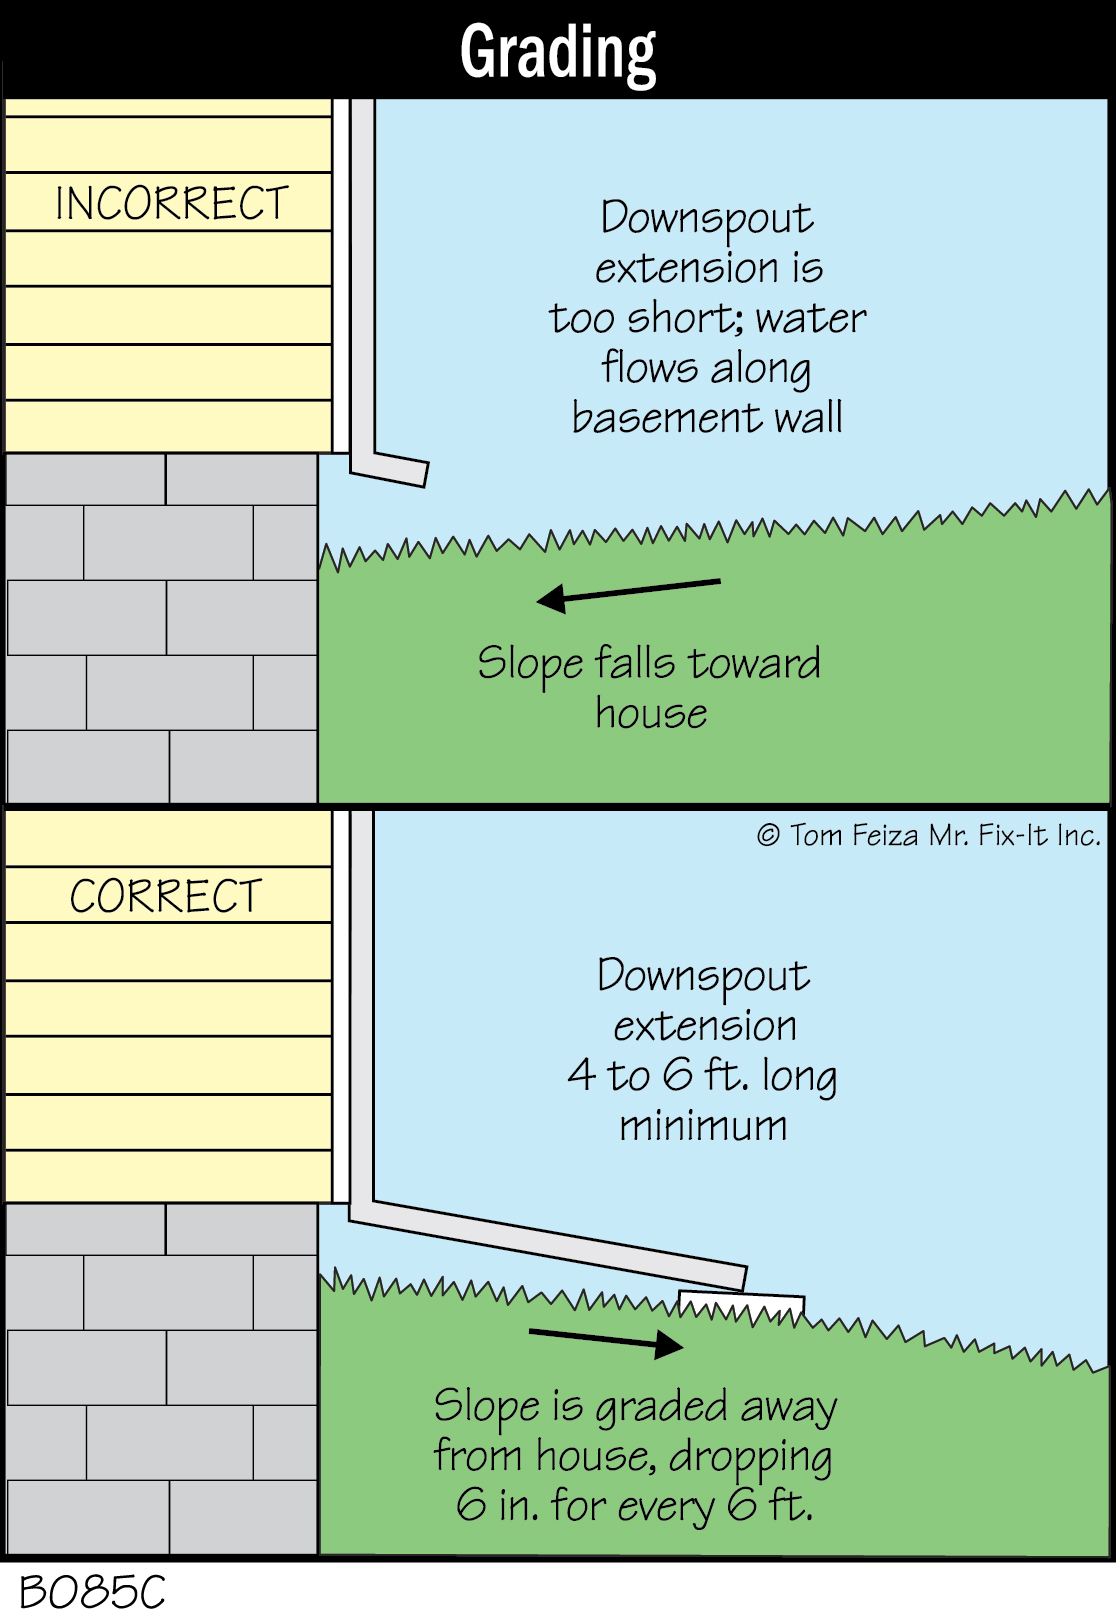
The soil should also be 6” below siding and wood trim to prevent water and insect damage. If wood siding touches the ground, water will wick up and rot the siding and framing.
To improve the grade, you have several options, depending on the landscape materials near your home. Bushes near the foundation, planted above the original foundation hole, often settle. If there is bare soil under the bushes, just add more soil. However, adding more than a few inches of soil can damage bushes by eliminating air from the roots. Check with a professional landscaper on the potential damage to your type of bushes. You may need to raise the bushes and fill under them.
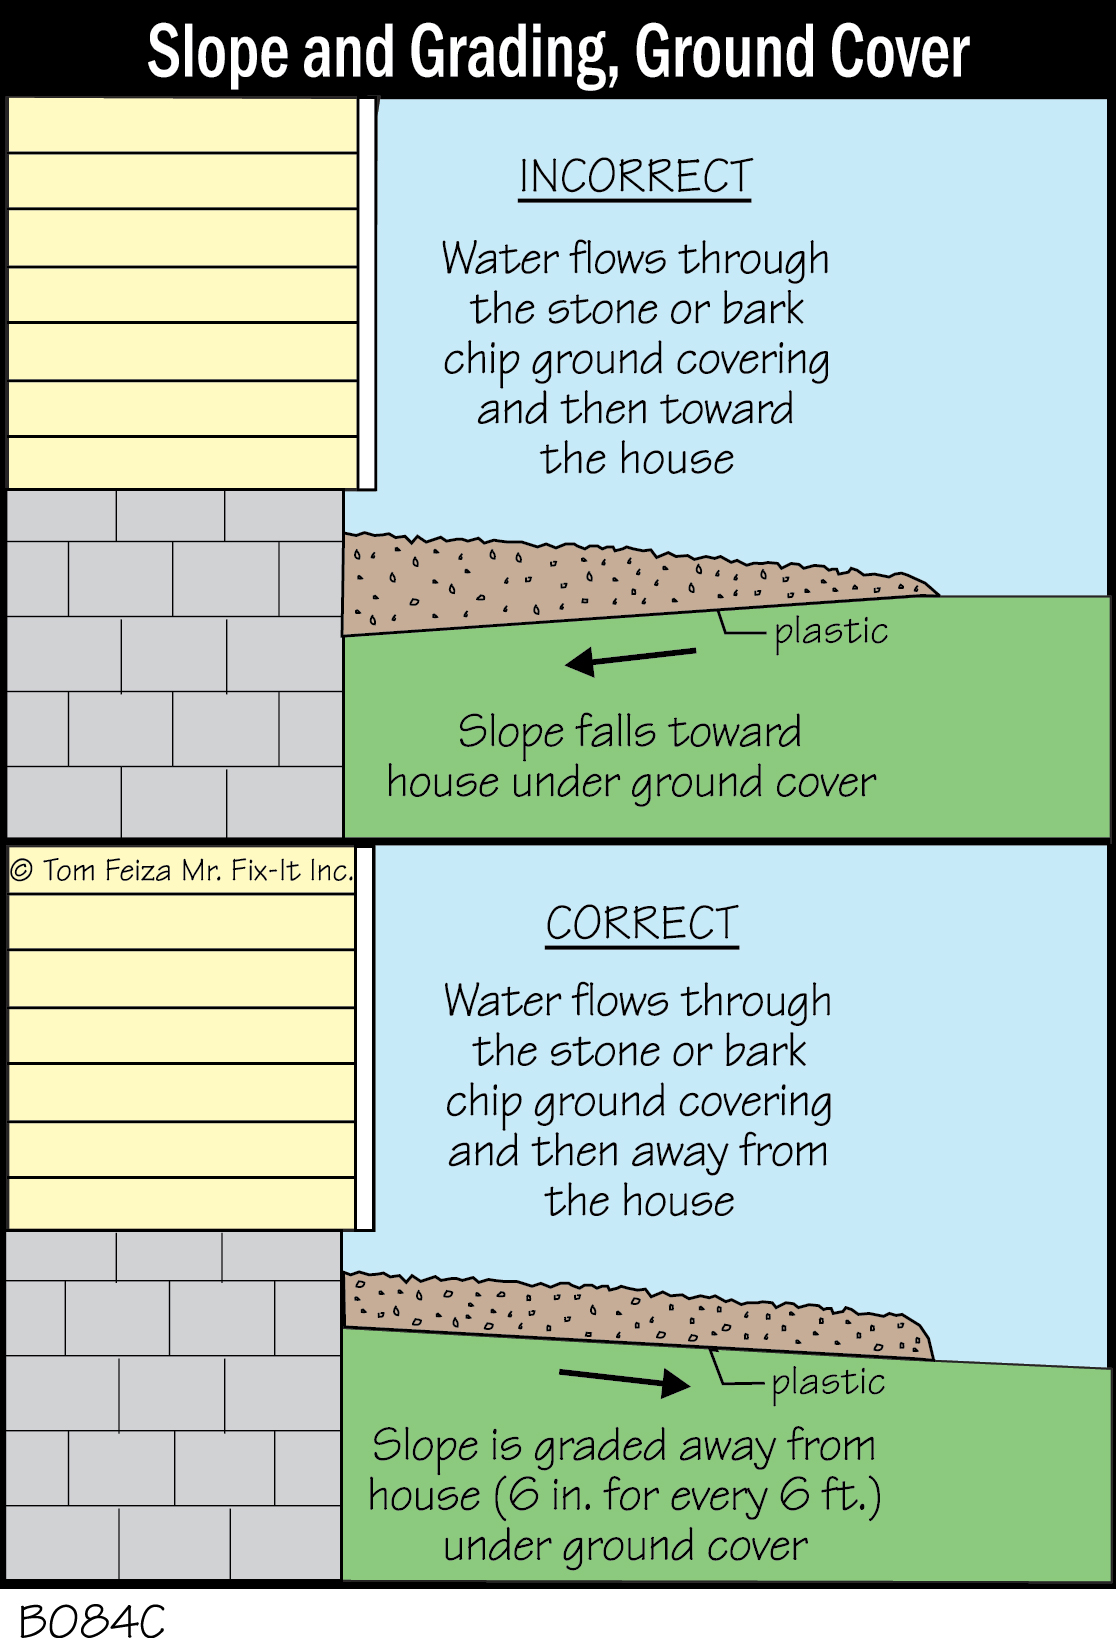
If the area around the foundation has a planting bed or bushes with a ground cover, the soil under the ground cover must pitch away from the foundation. Dig through the ground cover in several areas to check the grade of the soil. To improve this situation, remove the ground cover and fill with soil. Then replace the ground cover.
You may wish to use a fabric weed barrier or black plastic over the soil. The weed barrier will stop weeds while allowing air and water movement— good for plants but not ideal for the basement.
Black plastic does the best job of deflecting water and protecting your basement, but it can be hard on plants. If you use black plastic, cut large holes for plants to improve access to moisture and air.
If there is sod next to the foundation, cut it with a sod cutter and fold it away from the foundation. Add soil, then lay the sod back in place. You could add soil directly over the sod, but that would require re-seeding, and the area will settle as the buried sod decomposes. Cover the sod only if it is in very poor condition or if you need a dramatic change in grade. For flower beds and bare soil, just add topsoil fill.
When grading, don’t use a light moss-type soil; it will settle too much and hold moisture. In areas where you will not be planting, you can use clay. In planting beds use a blended or brown planting soil, or garden soil. This heavier mixture will not wash away into the yard.
Don’t forget to grade areas under decks. You can use black plastic over the properly graded soil to deflect water and stop weeds. A thin cover of gravel or stone will hold down the plastic and make the area more attractive.

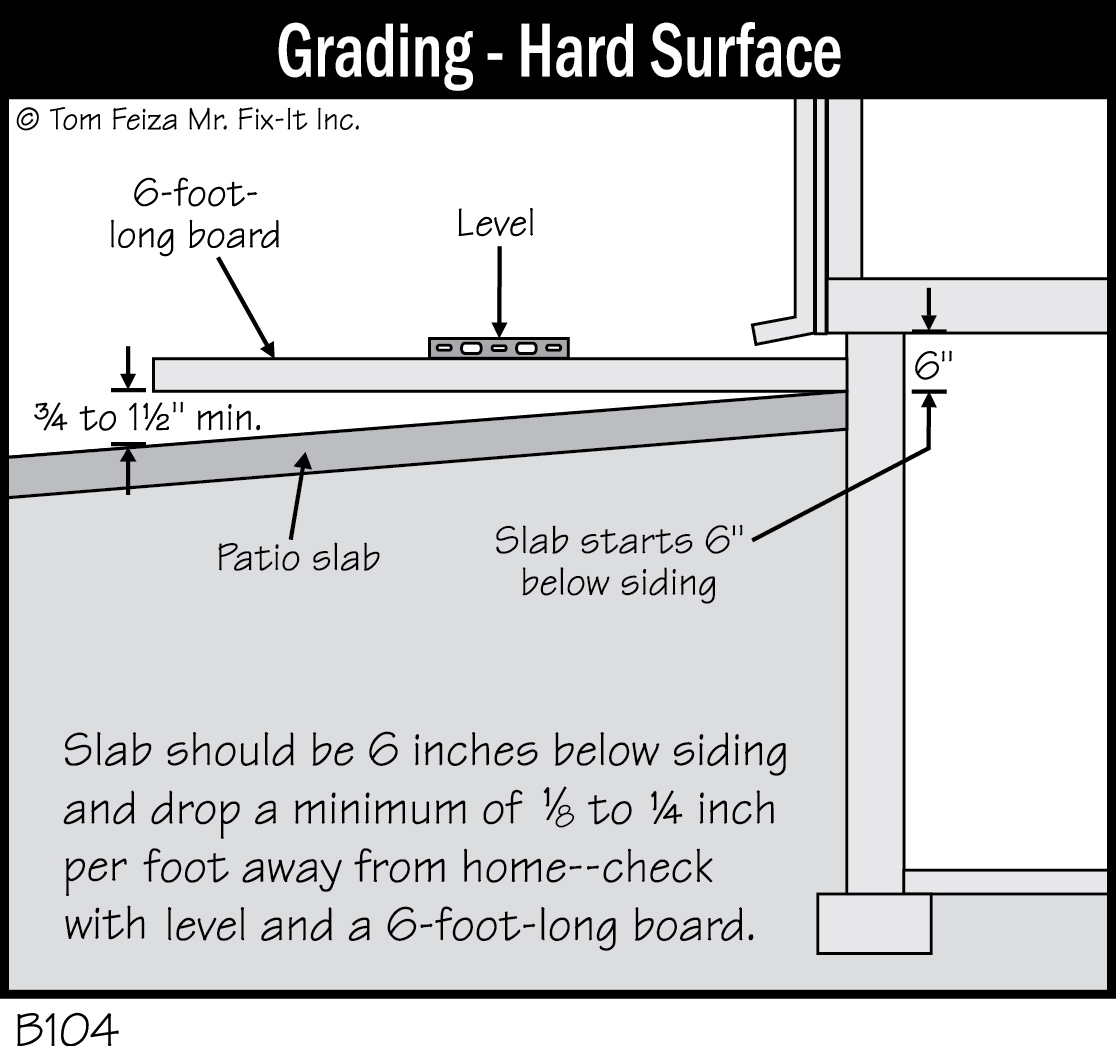
All hard surfaces such as walks and driveways should also be pitched away from your foundation. The good news is that only a slight grade, as little as 1/4” per foot, is adequate for hard surfaces.
Check Gutters and Downspouts
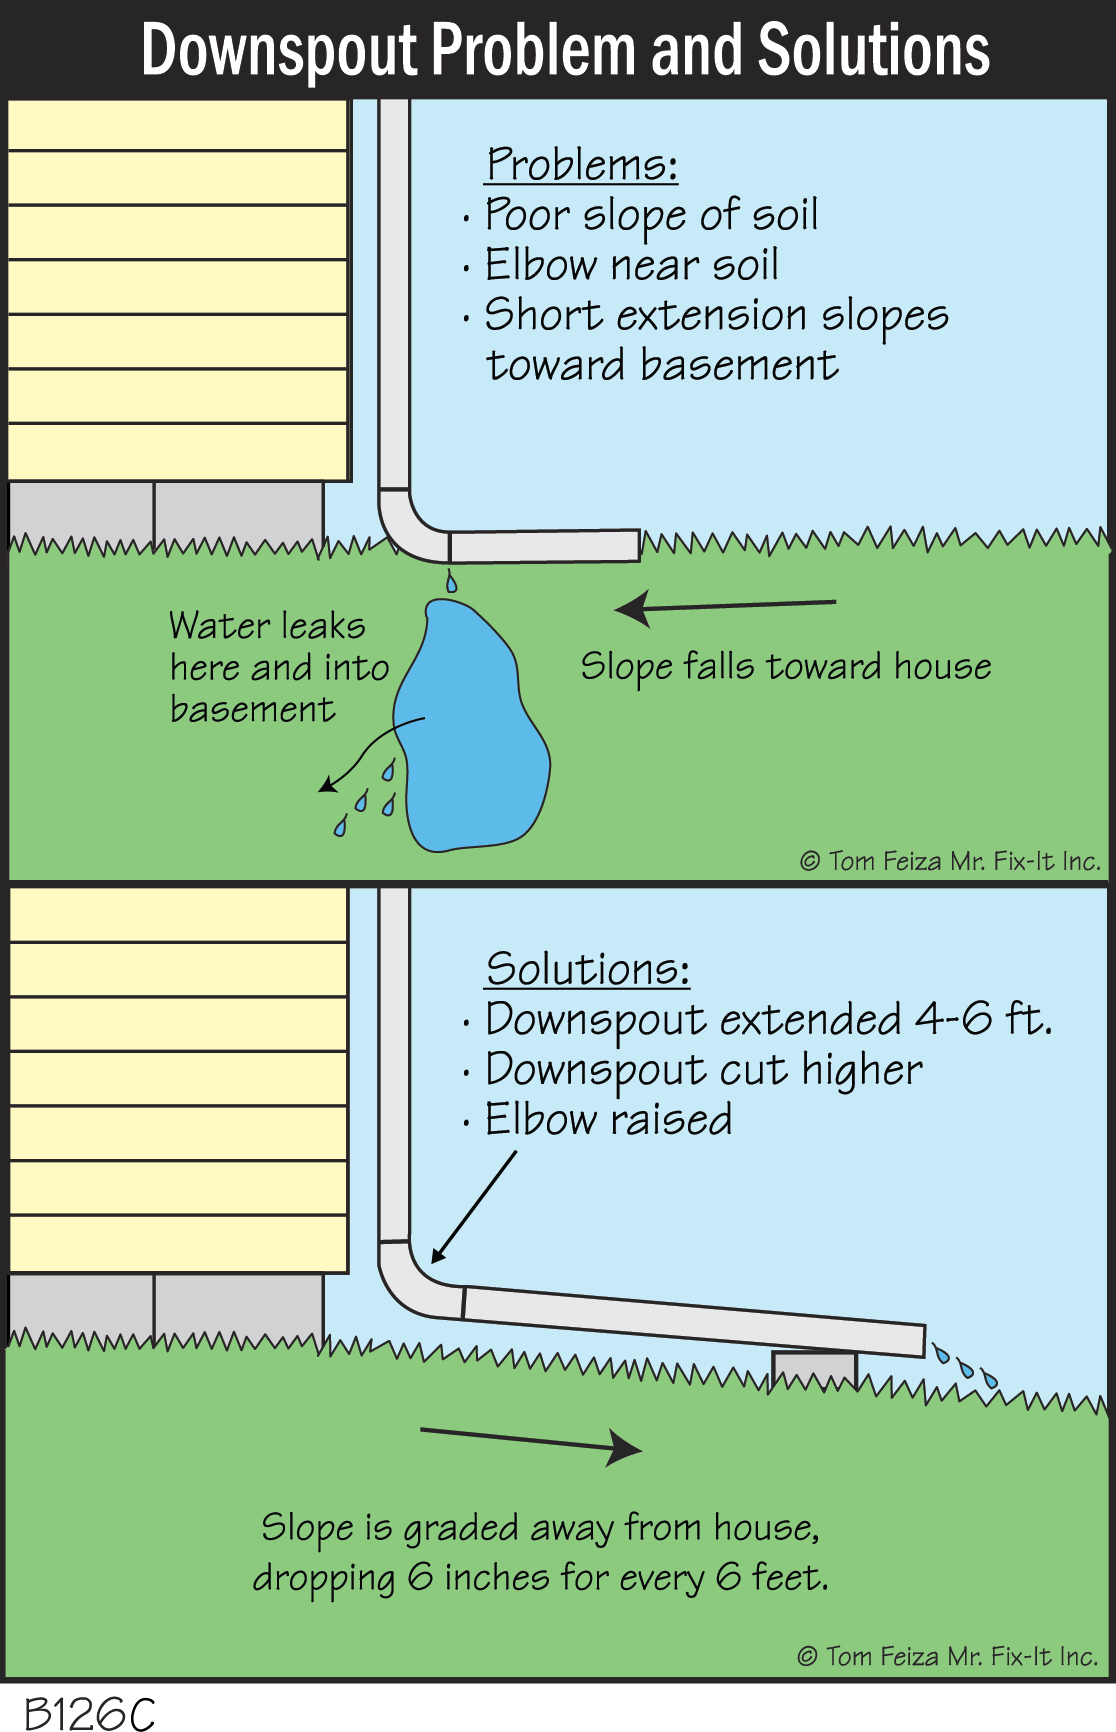
Gutters collect tremendous quantities of water from the roof and must deliver that water away from the foundation. Keep your downspouts extended at least 6 to 8 feet away from the foundation to a spot where the natural grade of the soil continues moving the water away.
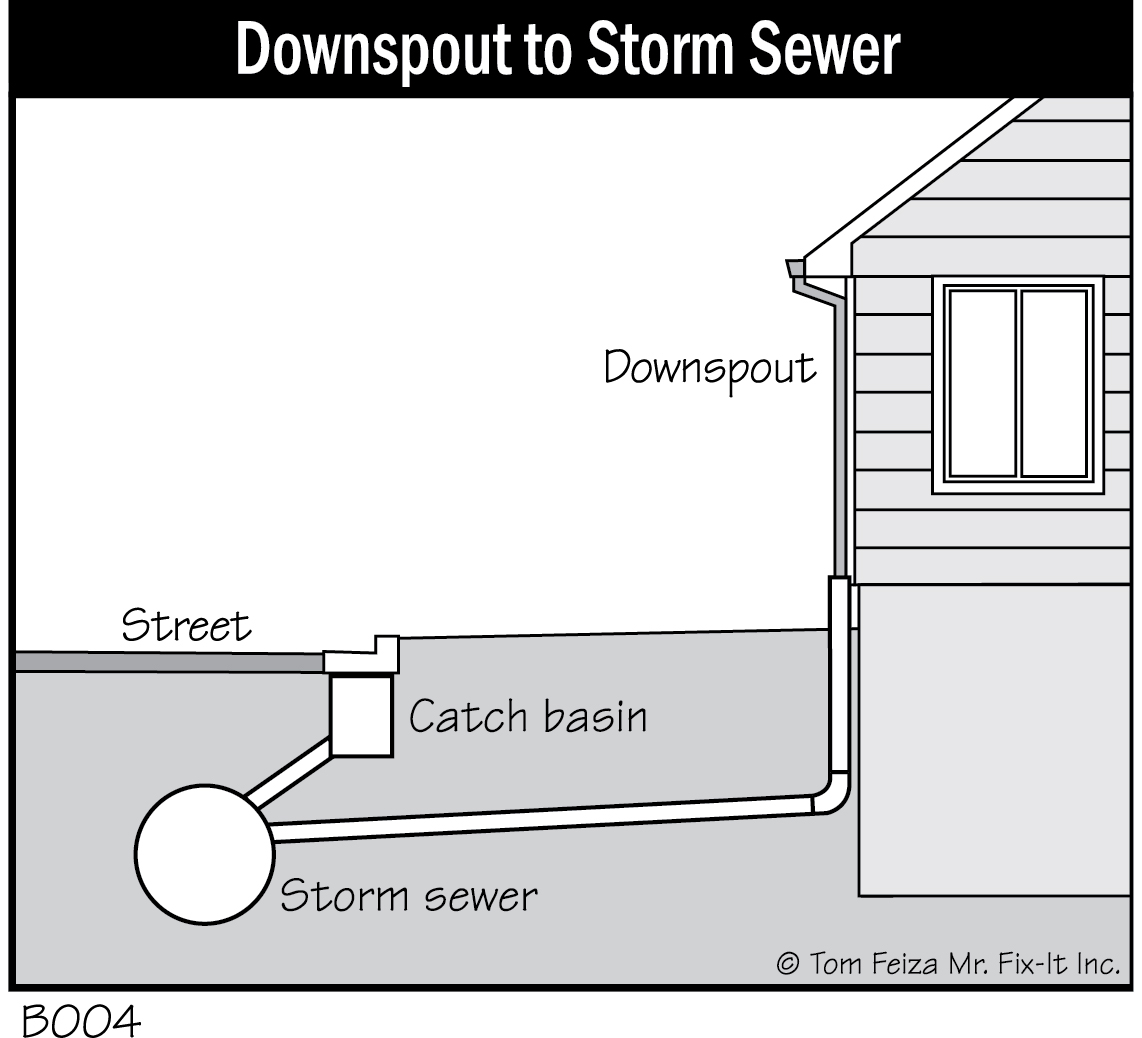
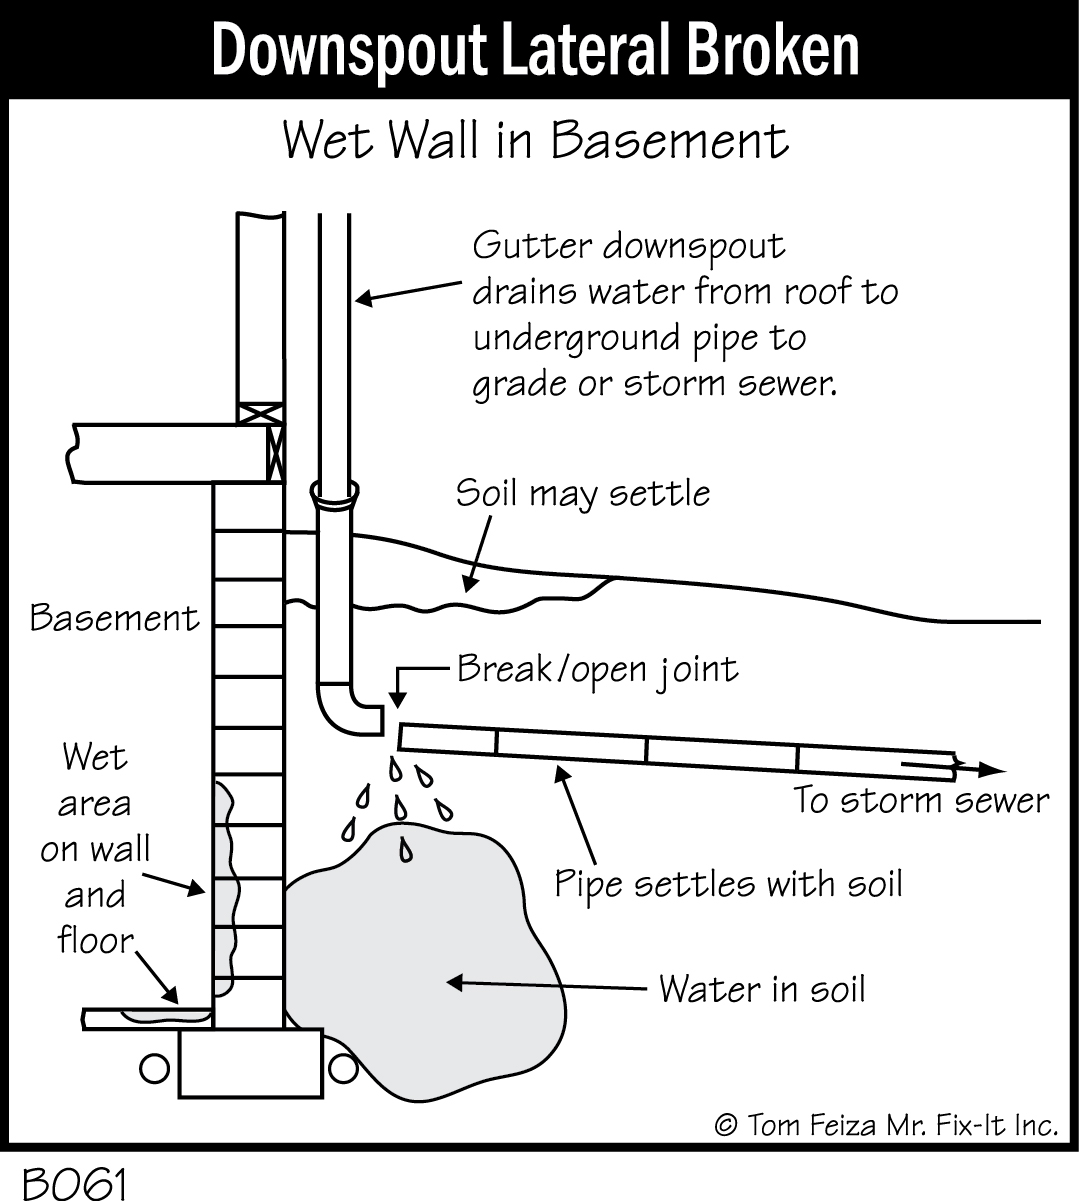
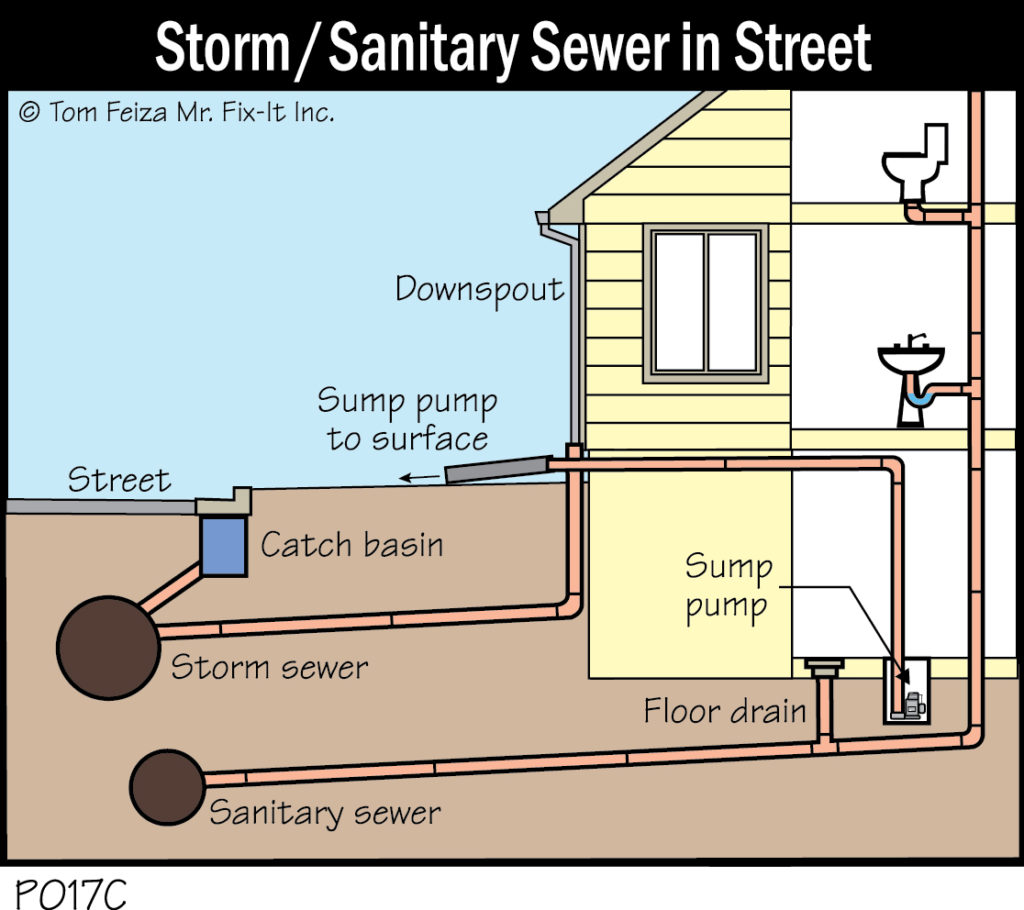
If your area has underground storm sewers, make sure all downspouts are properly connected to the visible pipe fittings and that water flows into the storm sewer pipe during rainstorms. If this pipe backs up during a storm, it indicates that the storm sewer line is plugged or broken. Test the line by running a hose into the gutter. You can have this line cleaned by a sewer cleaner.

If dampness and seepage appear on basement walls near an underground storm sewer connection, a broken storm sewer line may be the cause. You can run water into the gutter during a dry spell; if moisture seeps into the basement, it indicates that the underground line is damaged. A sewer cleaner can evaluate and repair the line.
Keep gutters clean to prevent plugging and overflowing of downspouts and storm sewer lines.
Window Wells
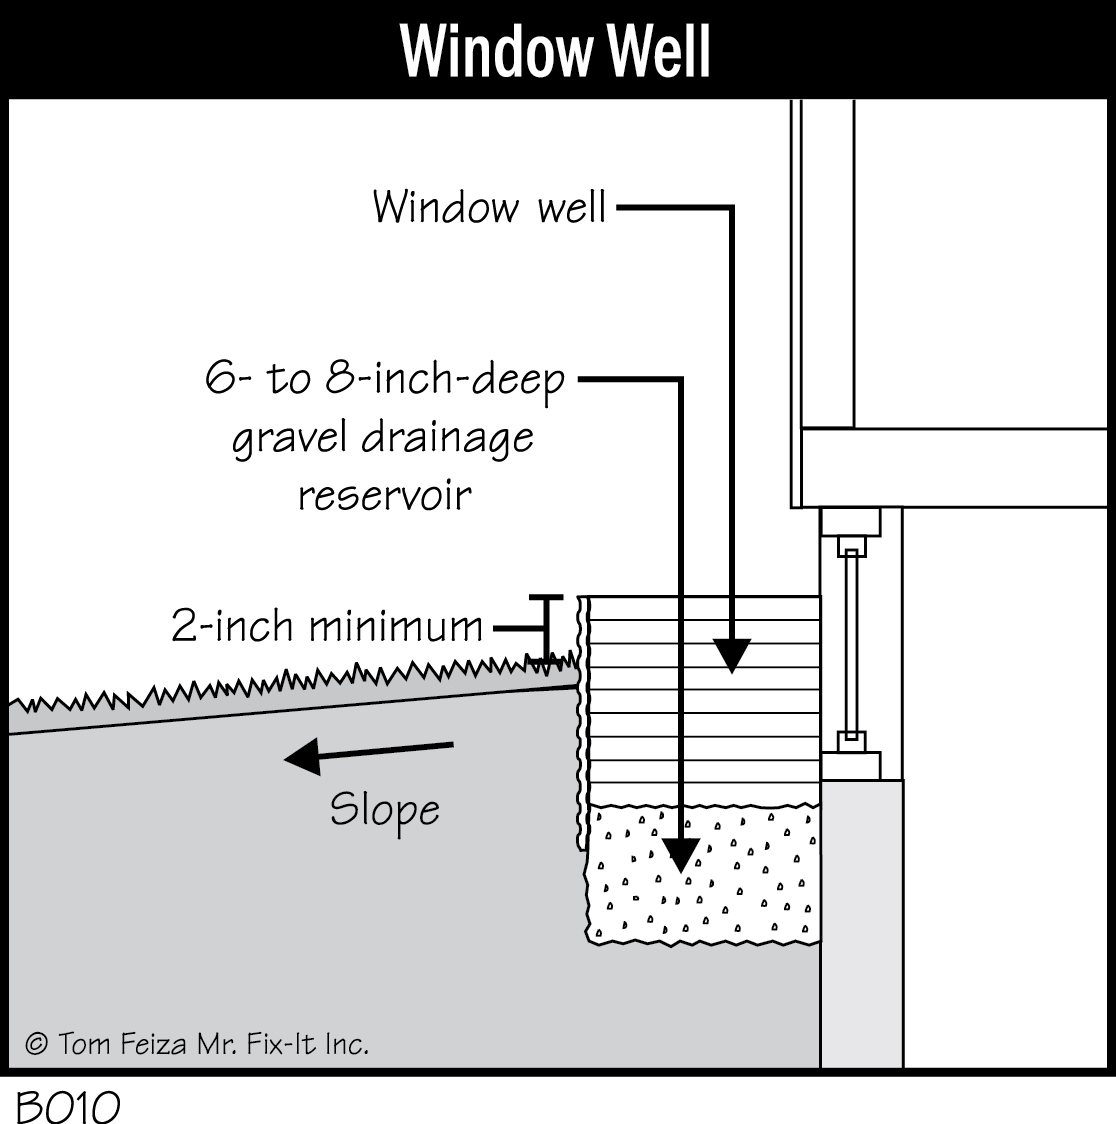
Window wells hold soil away from foundation windows as the grade is raised. The window well should fit tightly against the foundation wall to prevent leaks. The grade around the well should pitch away so water isn’t directed into the well. If a window well fills with water, check the fit of the well and the grade around it.
Keep window wells clean and free of all plant material. Fill the bottom of the well with gravel to allow for good drainage and to stop any plant growth.
If the grade and fit around the window well are in good condition but the well still fills with water, dig out the bottom of the well about 18” and fill with washed stone. The stone will ensure proper drainage to the tile system. If you have a problem window well, dig down several feet inside it with a post hole digger; then fill the hole with washed stone. This channel helps drain the window well to the basement tile. However, you should only dig this channel if you know the drain tile system is working. If it isn’t, you will create a tube of frozen water that can push against the basement wall.
Foundations—The Bottom Line
If you follow these simple inspection and maintenance tips, your basement will perform for many years without failure. All foundations have some problem symptoms, but if you maintain your foundation, minor problems will not become major crises. If you notice severe drainage problems, wall cracks or wall movement, contact a professional home inspector or basement consultant to evaluate your specific situation.
If a major problem is identified, don’t feel threatened, and don’t jump at the first evaluation or repair proposal. It often takes years for a basement or foundation problem to develop, and the situation will not require immediate repair. Take time to solicit several evaluations and repair proposals. Check each contractor’s references, and make sure the contractor belongs to a professional builders’ or remodelers’ organization.
Termite Protection
In warmer climates, the wood structure of a home must be protected from termites and other pests. This often requires special construction techniques and constant diligence to check for potential problems. Often a pest control contractor should be hired on a routine basis.
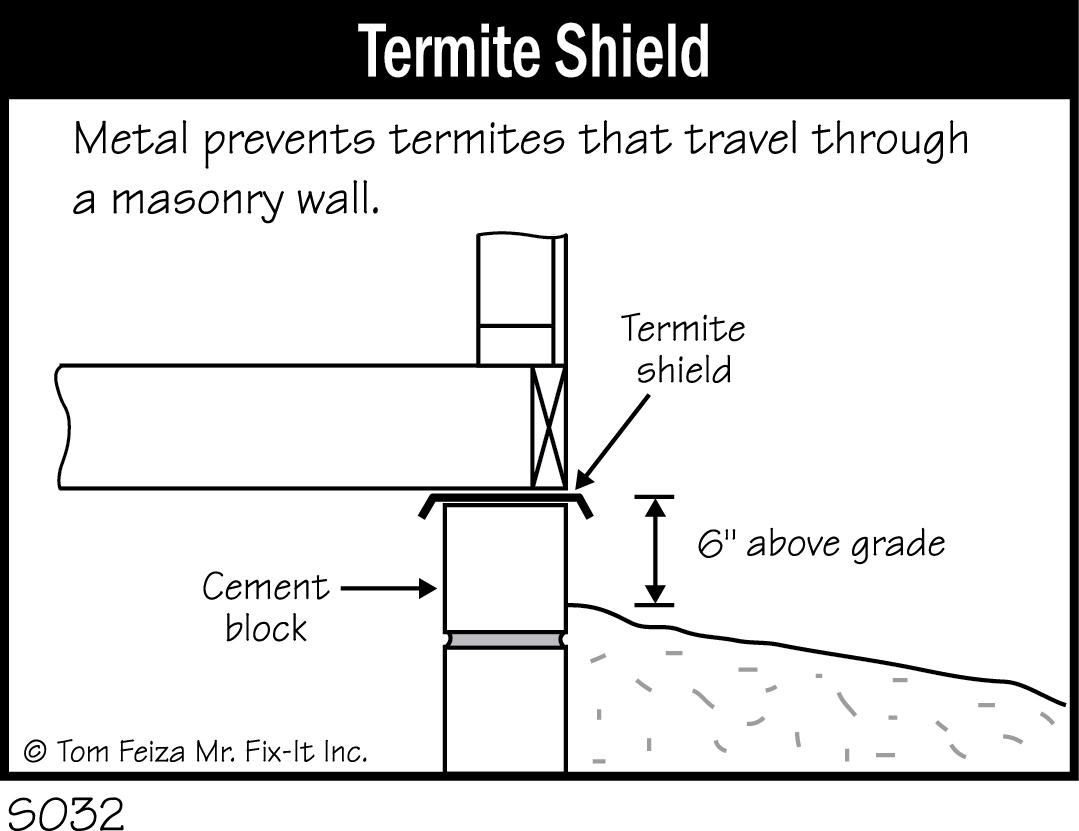
Homeowners must eliminate soil contact with the wood structure of the home. Potential entry points for pests include contact points of trees and shrubs as well as firewood stacked against a home. In areas where termites are a problem, special precautions like a termite shield can separate the wood structure from the soil to prevent insect movement.
Structure, Frame and Siding
The structural frame of your home rests on the foundation or basement and holds up the floors, interior walls, and roof. Most homes in the U.S. are framed with wood, but a few are built with a brick or block support structure. Once the frame and structure are properly designed and installed, little maintenance is needed except to protect the struc- ture from water and insects.
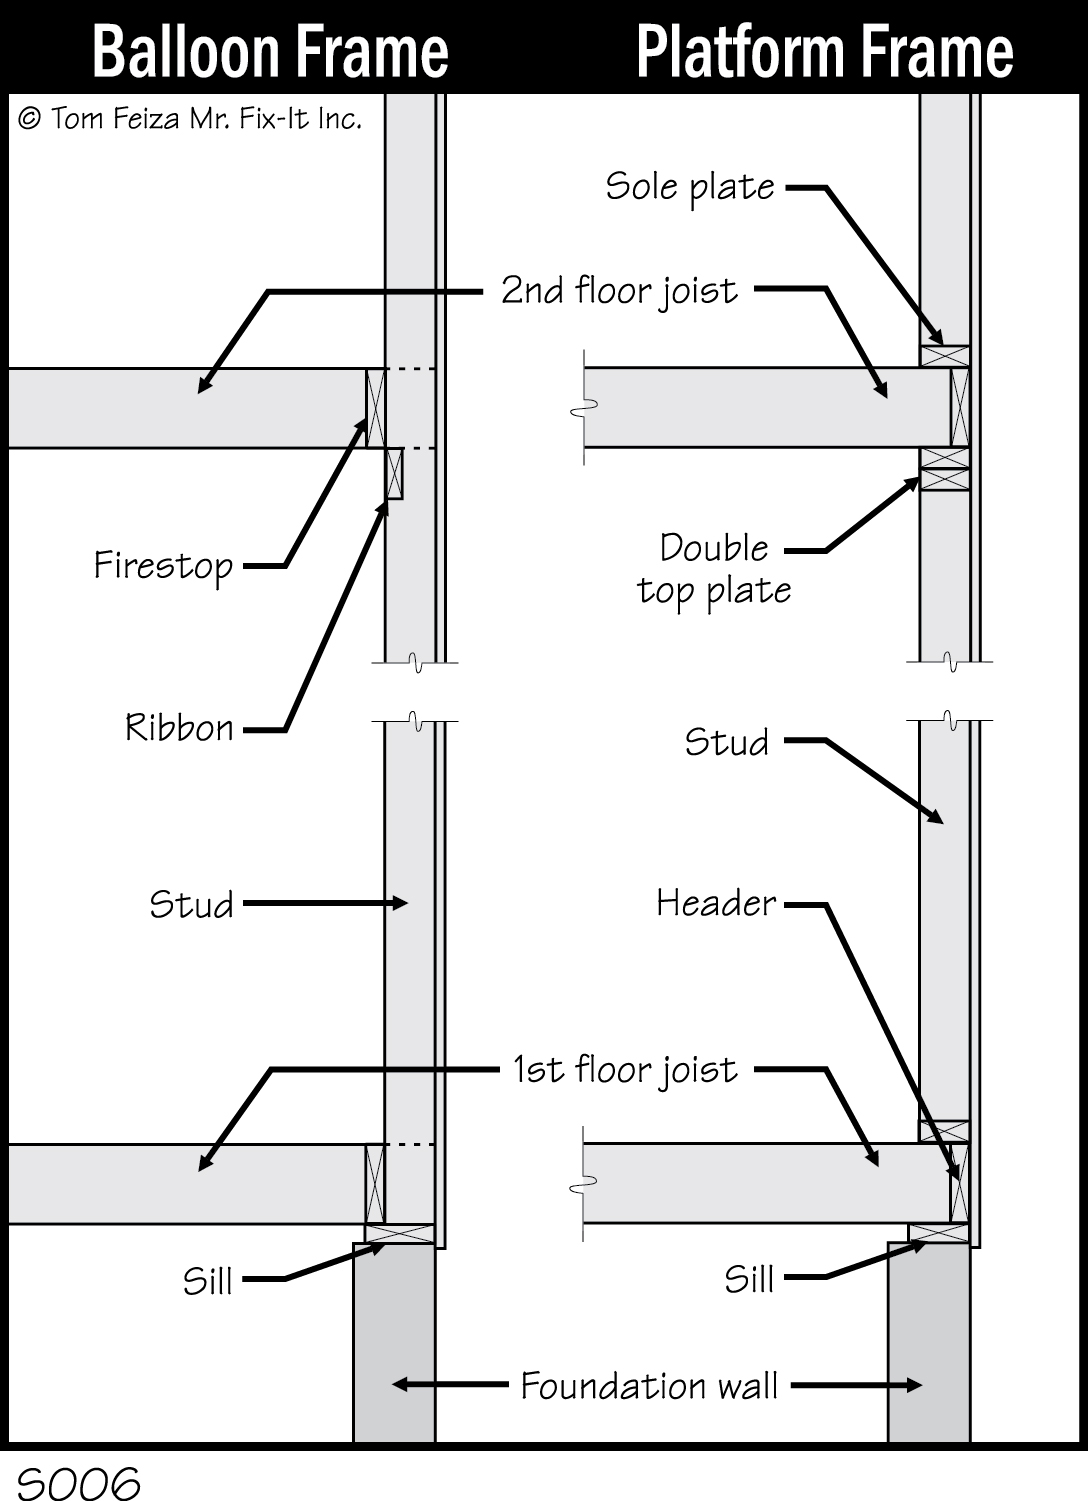
Platform Framing
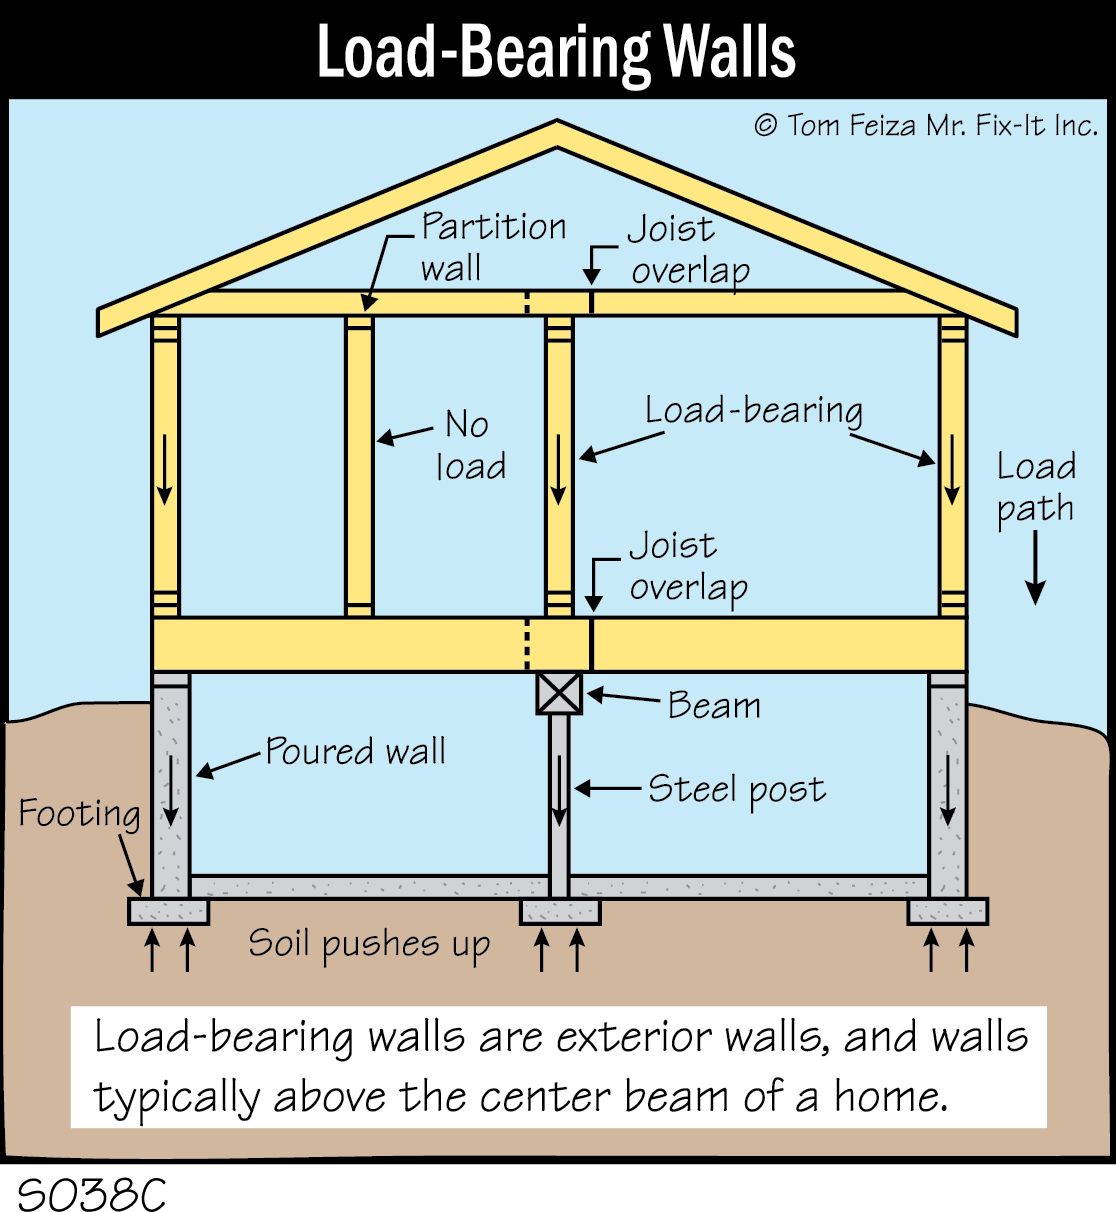
Most homes are built with platform framing. The framing starts with a “platform” of floor joists built over the foundation wall. The joists support the deck. There is usually a beam down the center of the foundation that supports the center of the joists. Posts rest on footings and the foundation wall support beam.
The wooden structure of the home is built to transfer weight loads to the foundation structure. Normally this includes load-bearing interior walls that run parallel to the supporting beam. The exterior walls also carry loads. Some interior walls are partition walls and don’t support the structure; they just divide or partition the space. Don’t modify any walls without evaluating where the loads of the structure are supported.
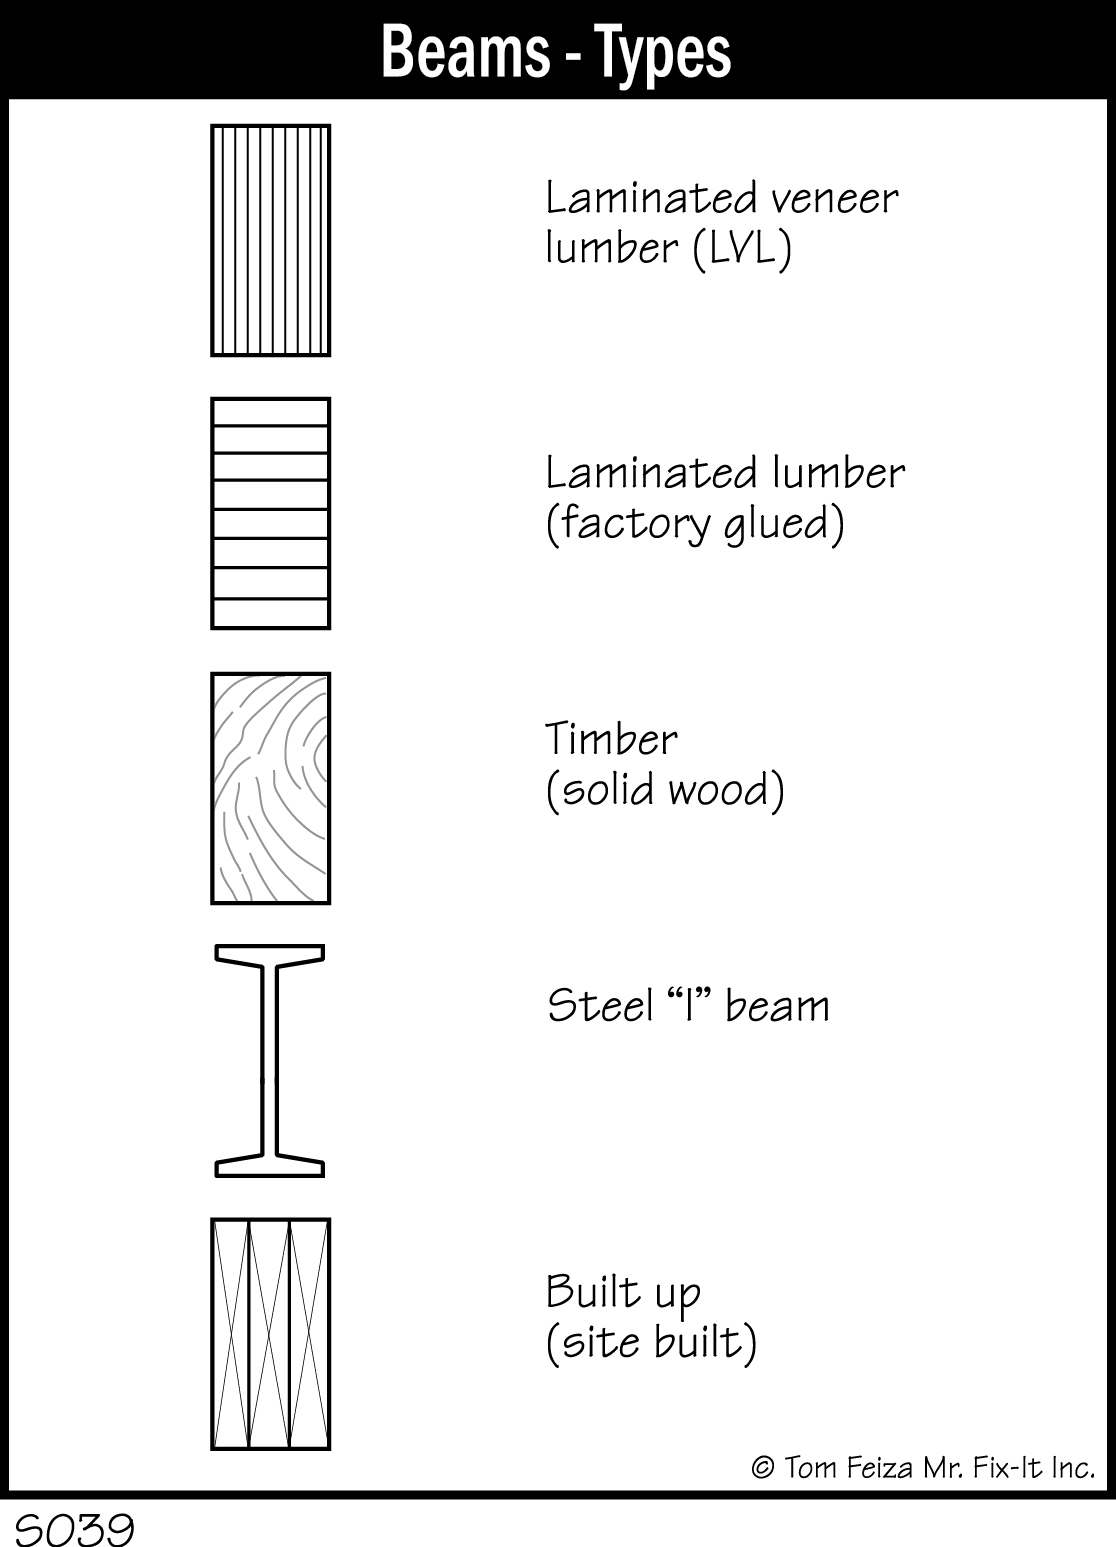
Building up from the foundation structure, the floors are supported by floor joists covered with some type of subflooring material spanning the joists. Exterior walls are placed on the subflooring, and a second floor is added in a similar fashion. Exterior walls and the interior load-bearing walls support the roof structure and ceiling. Various materials have been used for floor joists and beams through the years.

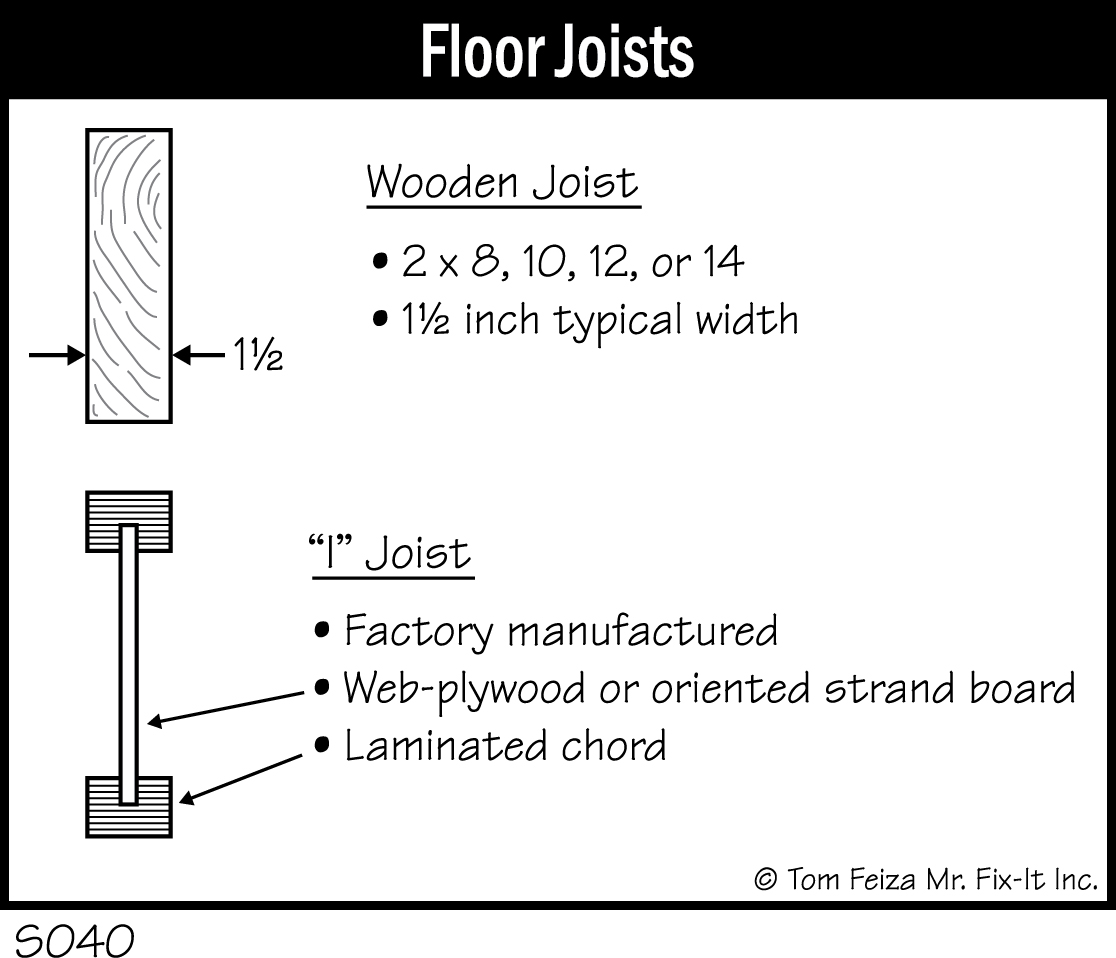
Floor joists can be wood lumber or manufactured I- Joist systems. Wood joists have been constructed since wood or “stick” framing techniques started around 1880. Recently, I-Joist systems have been used because they enable longer spans and provide more dimensional stability than natural wood. Trusses can also be placed to provide floor support, allowing long spans and often eliminating the center beam or center support structure.
Subflooring covers the floor joist system and supports the floor loads. Materials used for subflooring have varied through the years. Until about 1960, solid 1” x 6” wood was used for subflooring. Around 1960, plywood became popular, and multiple layers of materials were often used. Now, specially designed, single-layer oriented strand board panels are used for subflooring.
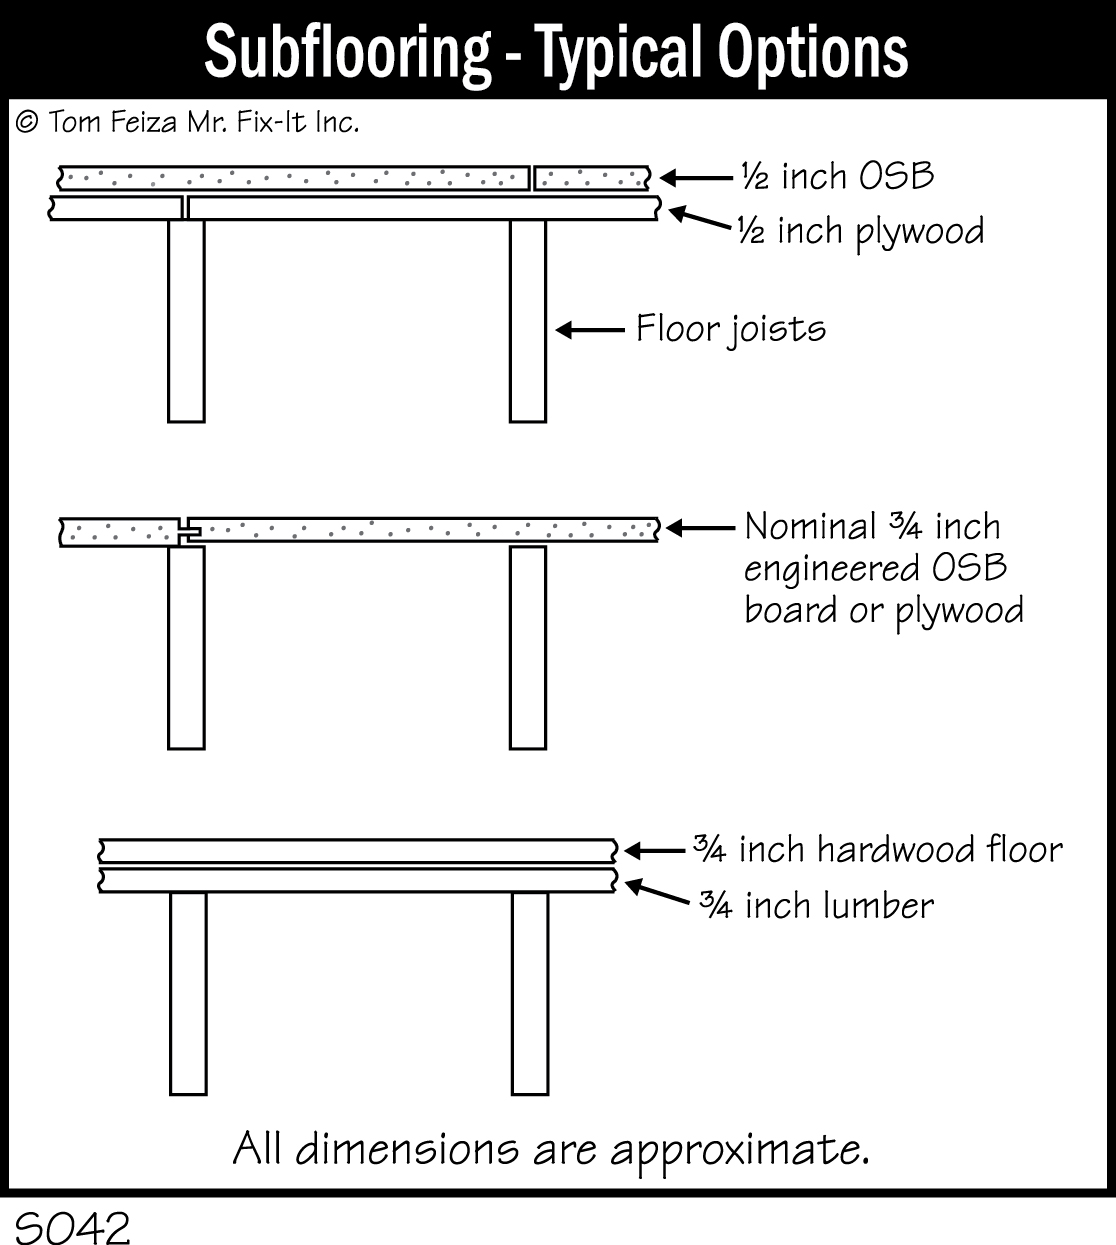
Ceramic tile flooring presents a special challenge for wood frame construction. It requires additional support because any movement in the subfloor will create cracks in tile and grout and will loosen the tile. Years ago, subflooring was designed to hold a layer of poured concrete or grout to support the tile. Today, stronger subflooring and cement boards are used as a base for tile.
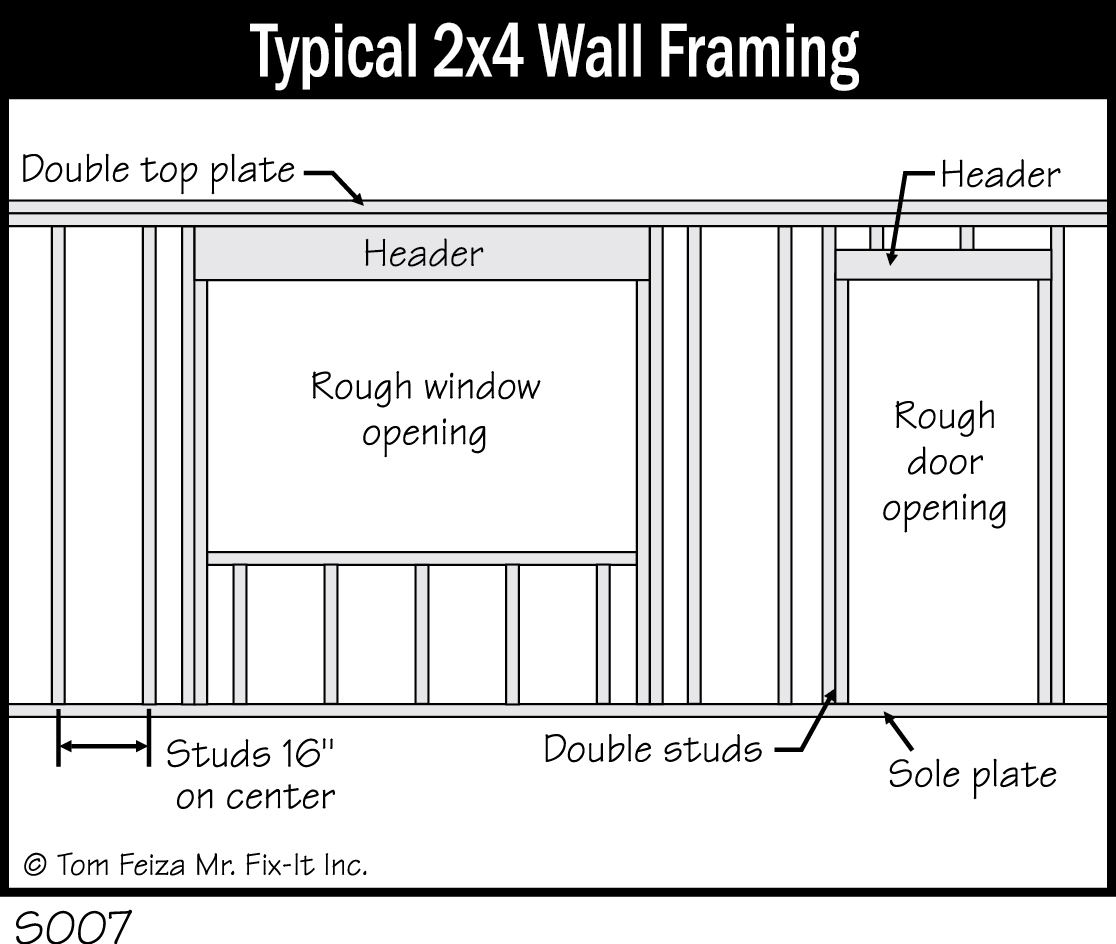
The rest of the structure arises above this first platform. It is supported with 2 by 4 or 2 by 6 exterior walls and interior support walls. For a two-story home, a second platform is built above the first floor walls, and then more walls are framed above this platform. Finally, a roof is framed above the wall framing.
The basic platform frame has many possible variations. An older home may have “balloon” framing in which exterior wall studs extend from the foundation to the roof without platforms. Some homes are built with post and beam framing like that used for barns. Some homes have brick or block exterior walls that support the structure.
Since your home’s framing is completed, all you need to know (if it’s performing well) is that you shouldn’t modify the structure of your home without contacting a professional.

Must Know / Must Do Structure
- Understand the basic structure of your home.
- Never modify or remove structural framing without an expert’s advice.
- Protect the structure from water and insects.
- Excessive cracking or movement indicate structural problems to be investigated.
Exterior Walls
The exterior walls are framed to support the structure, allow for window and door openings, and protect the structure from the elements. Most exterior walls are framed with 2 by 4 studs spaced 16” on center. The studs are braced in the corners and doubled around window and door openings. Special “headers” are placed over openings to support the weight above the opening.
Exterior wall framing allows space for electrical, cable, telephone and heat distribution components. The framing also supports exterior siding or cladding and includes space for insulation.
Siding
Many options exist for siding homes: brick, stone, wood, aluminum, vinyl, cement, asbestos, logs, steel siding, wood products, stucco, and even steel panels. Identify the type of siding you have, and maintain the surface. This usually requires caulking and painting. Watch for excessive movement, water leaks and excessive paint damage.
Remember that homes built before 1978 may be painted with lead-based paints. Take special precautions if these finishes chip and flake or if you need to remove them. See the chapter on Environmental and Safety Concerns for more information on lead hazards.
Must Know / Must Do—Siding
- Maintain all painted surfaces.
- Maintain caulk and sealants.
- Be aware of potential lead hazards.
Brick
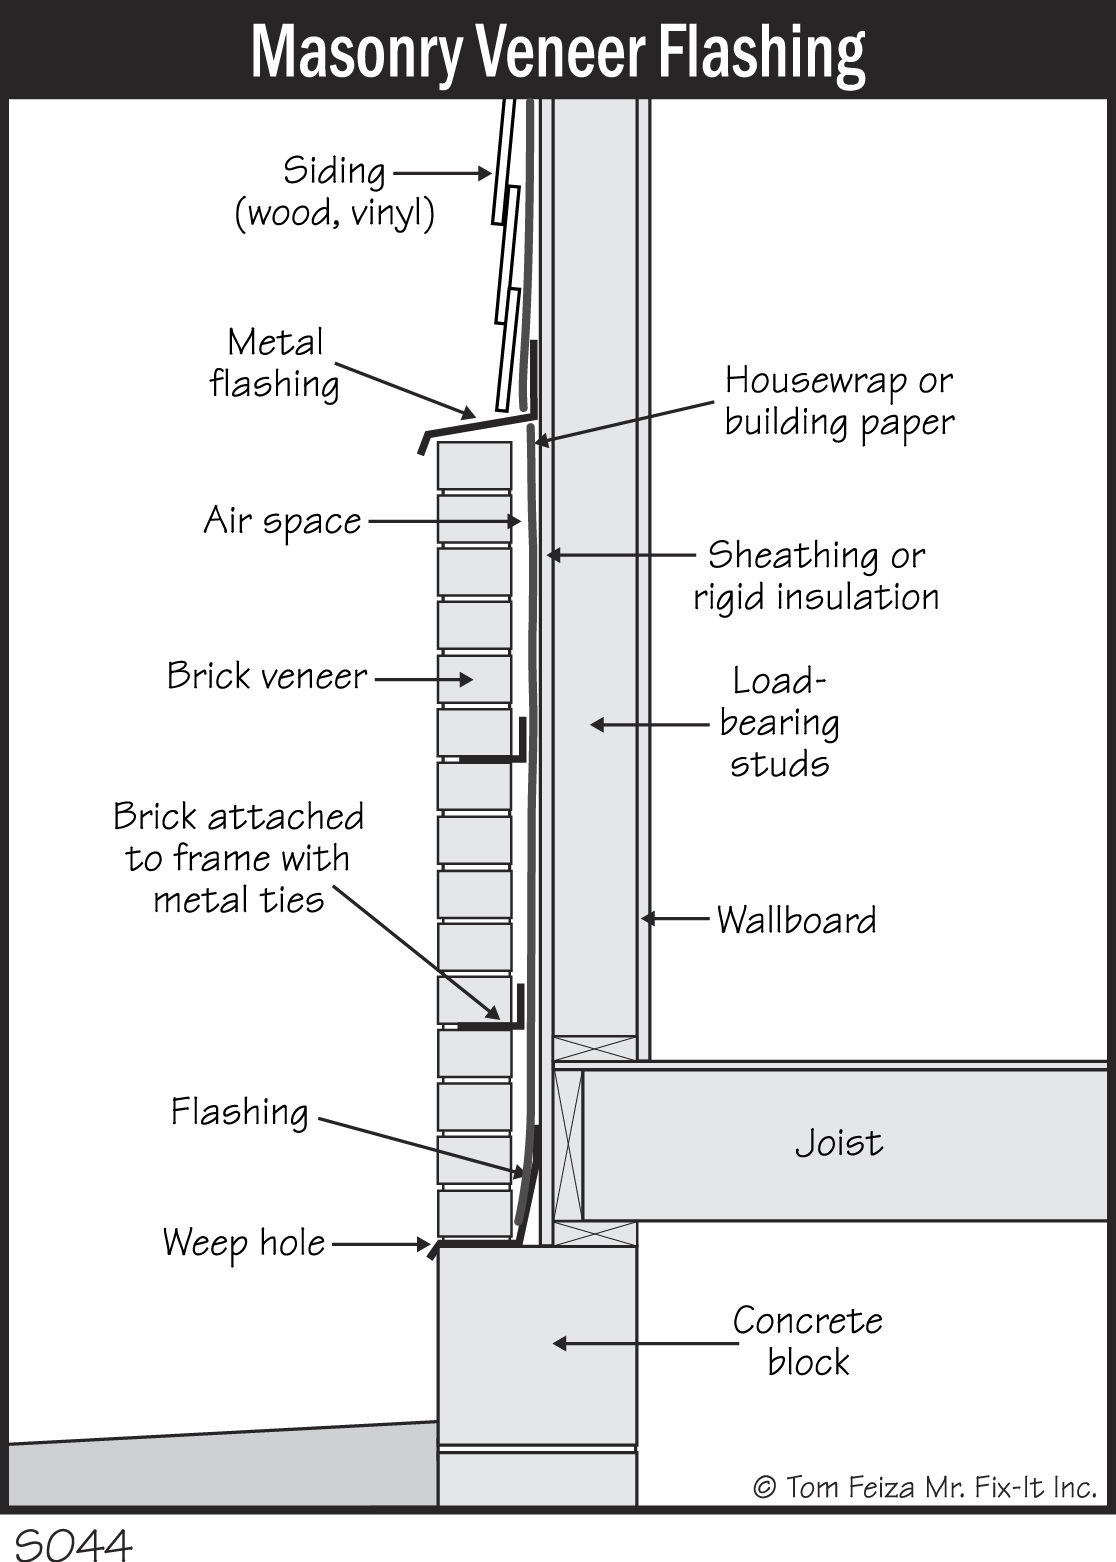
So you have an all-brick home, and it is beautiful, low-maintenance, cozy and warm. Brick homes are beautiful and valuable, but very few really have a brick structure; rather, they’re brick veneer. Don’t worry, you want a home that’s brick veneer.
If your home was built before 1900, there is a chance that it actually has a brick structure. That means the exterior wall is solid brick, several layers thick, and the brick supports the home’s framing and floors. Very few modern brick homes are built this way.
A typical modern brick home has a wood frame that supports the structure. The brick is applied as a veneer or siding over the outside. This method allows for better insulation of walls and a more user-friendly stucture that meets the needs of modern construction.
With brick veneer, you do need to watch for cracking and movement, as well as deterioration of mortar joints. Most brick veneer performs well for years with little maintenance.
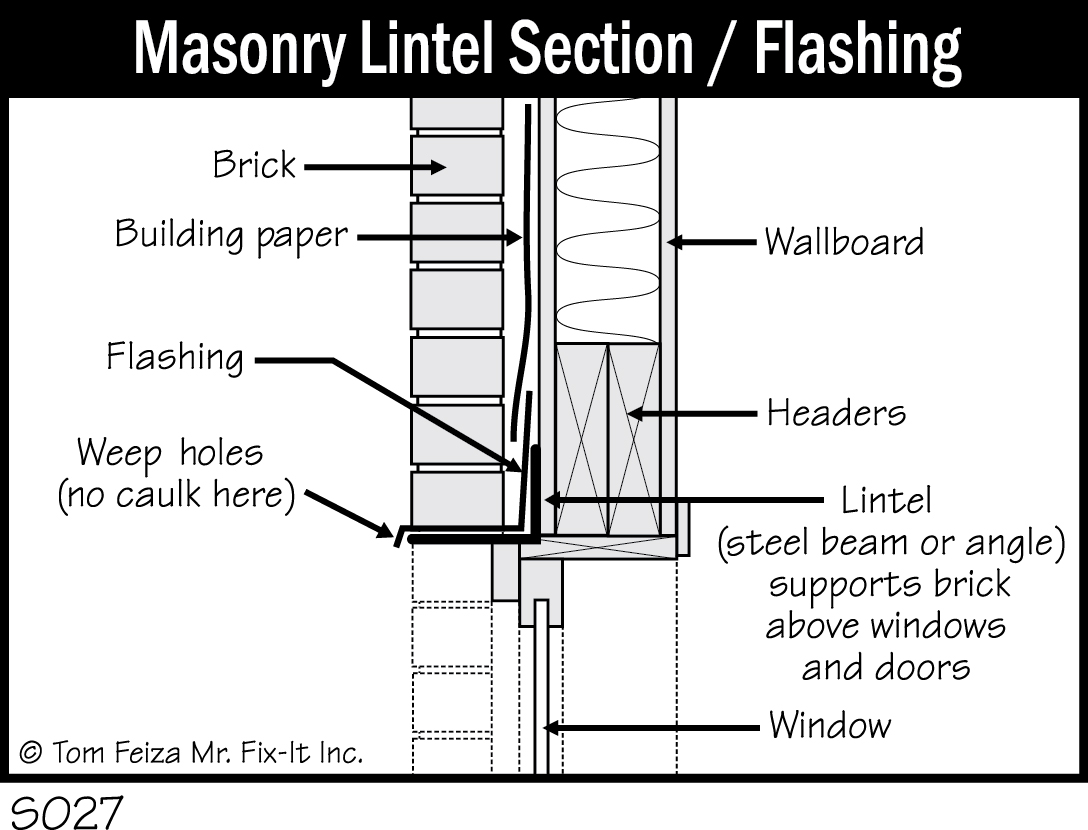
One important element of maintenance involves the steel lintels over window and door openings. A lintel is a steel angle iron or beam that supports the masonry above the opening. Since window frames and door frames are not designed to support masonry, the lintel spans the opening and transfers the load to the masonry on either side. The exposed steel of the lintel must be painted with exterior metal paint to prevent rust. If the lintel rusts, the metal expands, creating cracks in the mortar joints at the top corners of the openings. If excessive rust builds up, the lintel will fail and must be replaced.
Must Know / Must Do—Brick
- Maintain steel lintels.
- Watch for cracks or excessive movement.
- Maintain caulk and sealants at penetrations and windows/doors.
Look at any brick building and you’ll probably see many rusted lintels causing mortar cracking and failure. You may also see that in some buildings, arches, cast concrete or large stones span the openings, eliminating the need for a metal lintel.
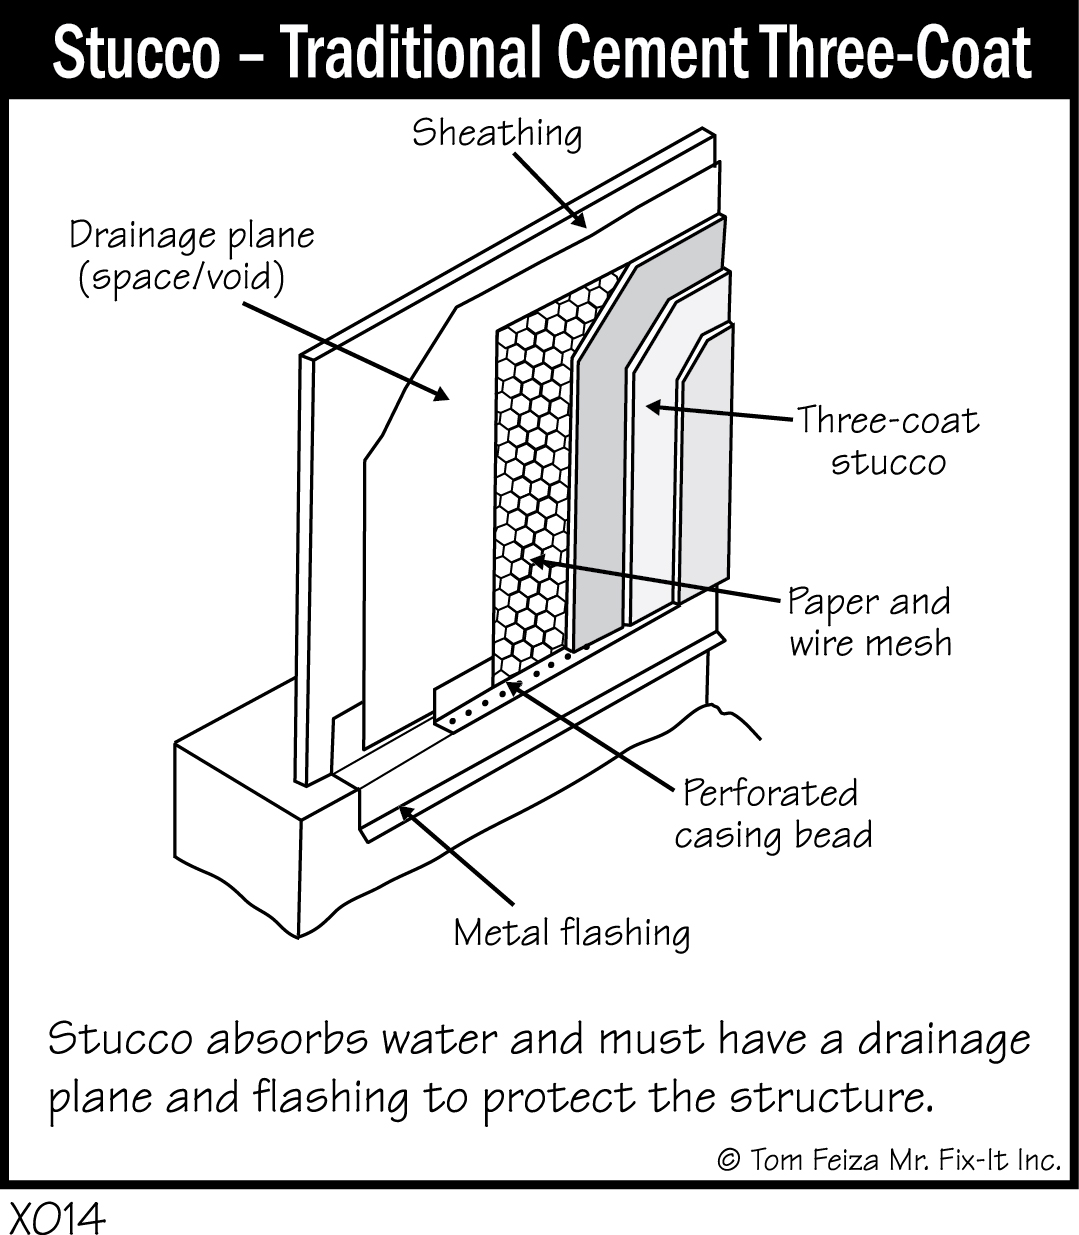
Stucco – Cement
Older homes and new homes in dry, warmer climates often have traditional cement stucco siding. Typically, this stucco consists of a three-part system applied over rigid sheathing material. Often a wire mesh is applied to the sheathing and over a building paper or drainage plane. The stucco is applied in three coats—base coat, scratch coat and a finish coat which often has a decorative surface.
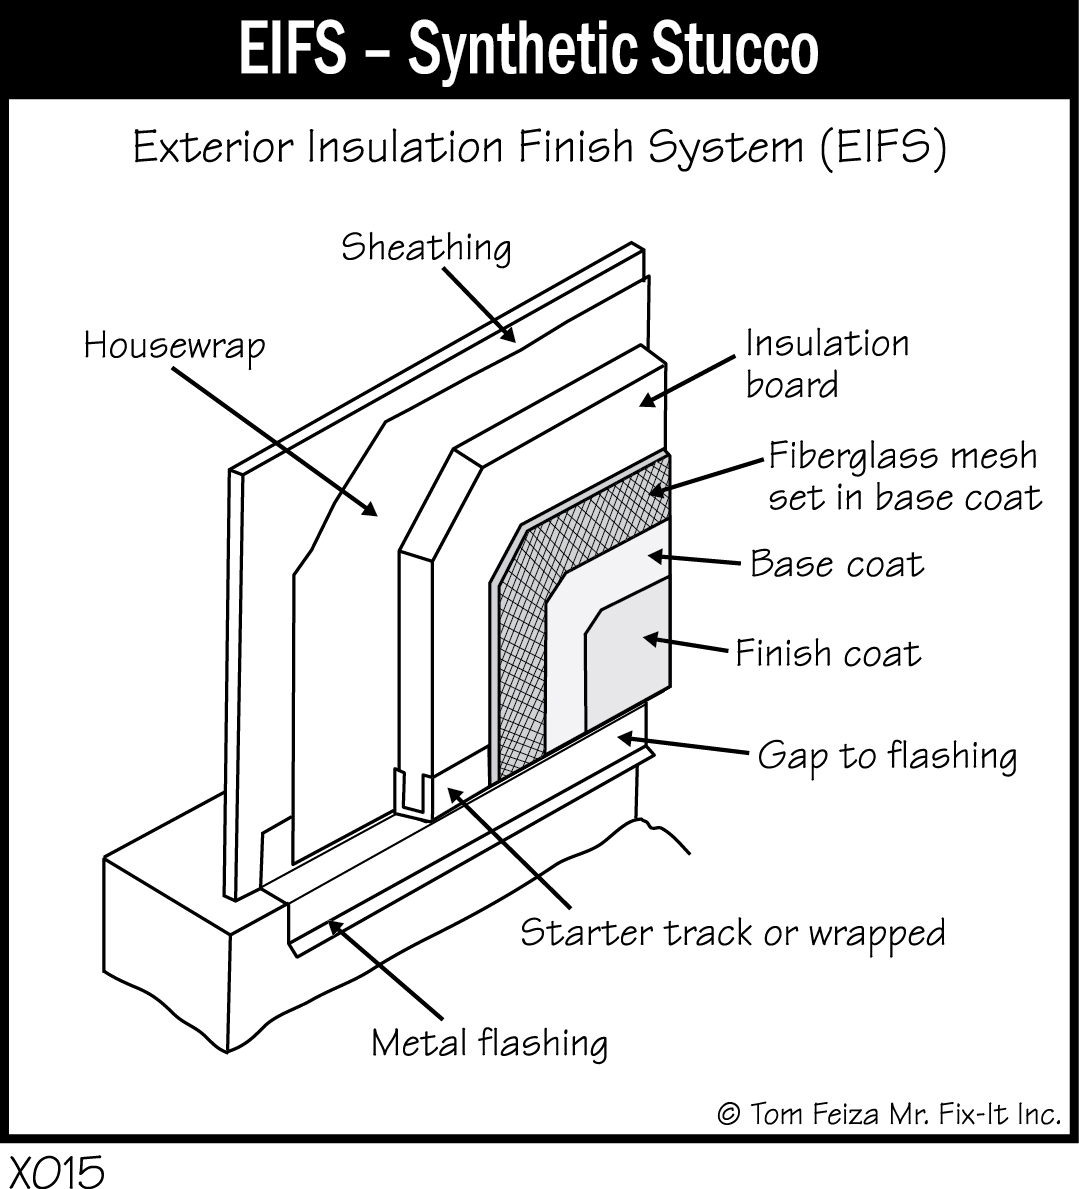
Synthetic Stucco or Exterior Insulation Finish System – EIFS
Since about 1980, synthetic stucco material has been adapted to wood frame construction. This exterior insulation finish system, often referred to as EIFS, is a thin acrylic coating applied over rigid insulation board or cement board. Corners and joints are taped with a special mesh, and the finish is applied in two coats. The material looks like cement stucco or concrete. It can be painted and textured. In some cases, problems have occurred with moisture intrusion, and a specialized third-part inspector often evaluates this material. Properly installed, the material is effective and energy efficient.
Vinyl and Aluminum Siding
Many homes are covered with aluminum or vinyl siding that provides an economical and attractive surface. Since 1990, vinyl has because the more popular product because it maintains its color and does not dent. If your home has siding, you must maintain caulk where needed. Remember that fading aluminum siding can be easily cleaned or even cleaned and then painted with latex paint. Don’t put the barbecue grill too close to the vinyl siding—the siding can melt.
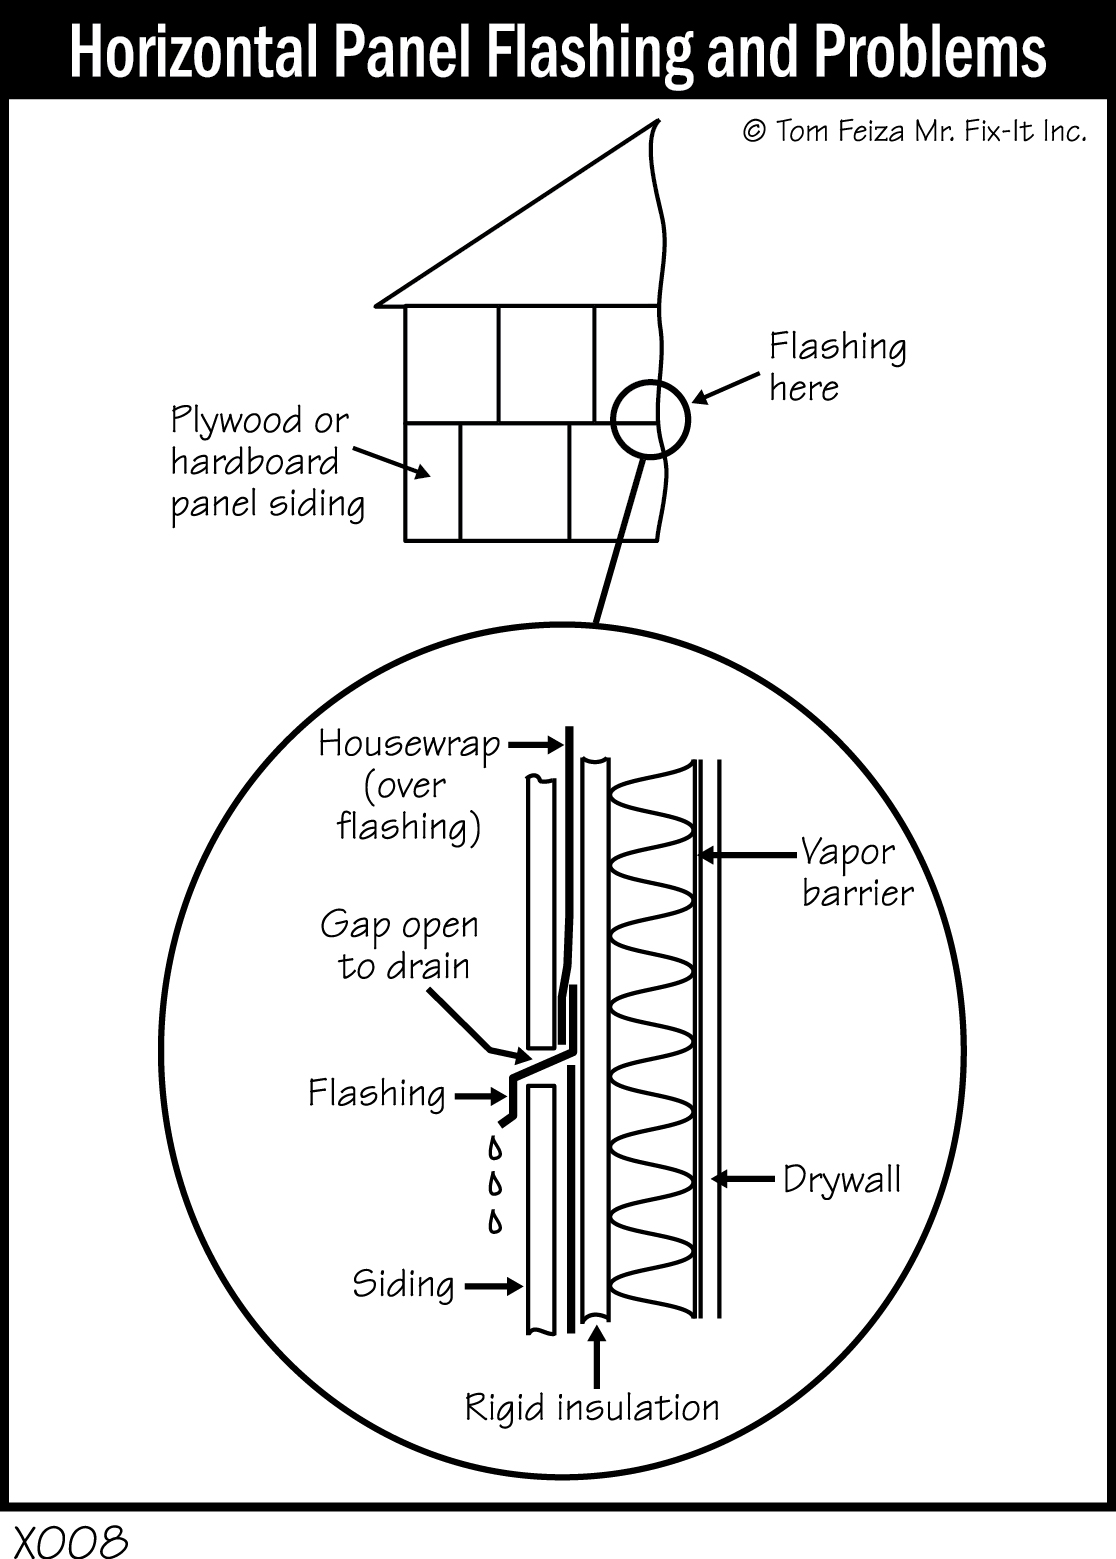
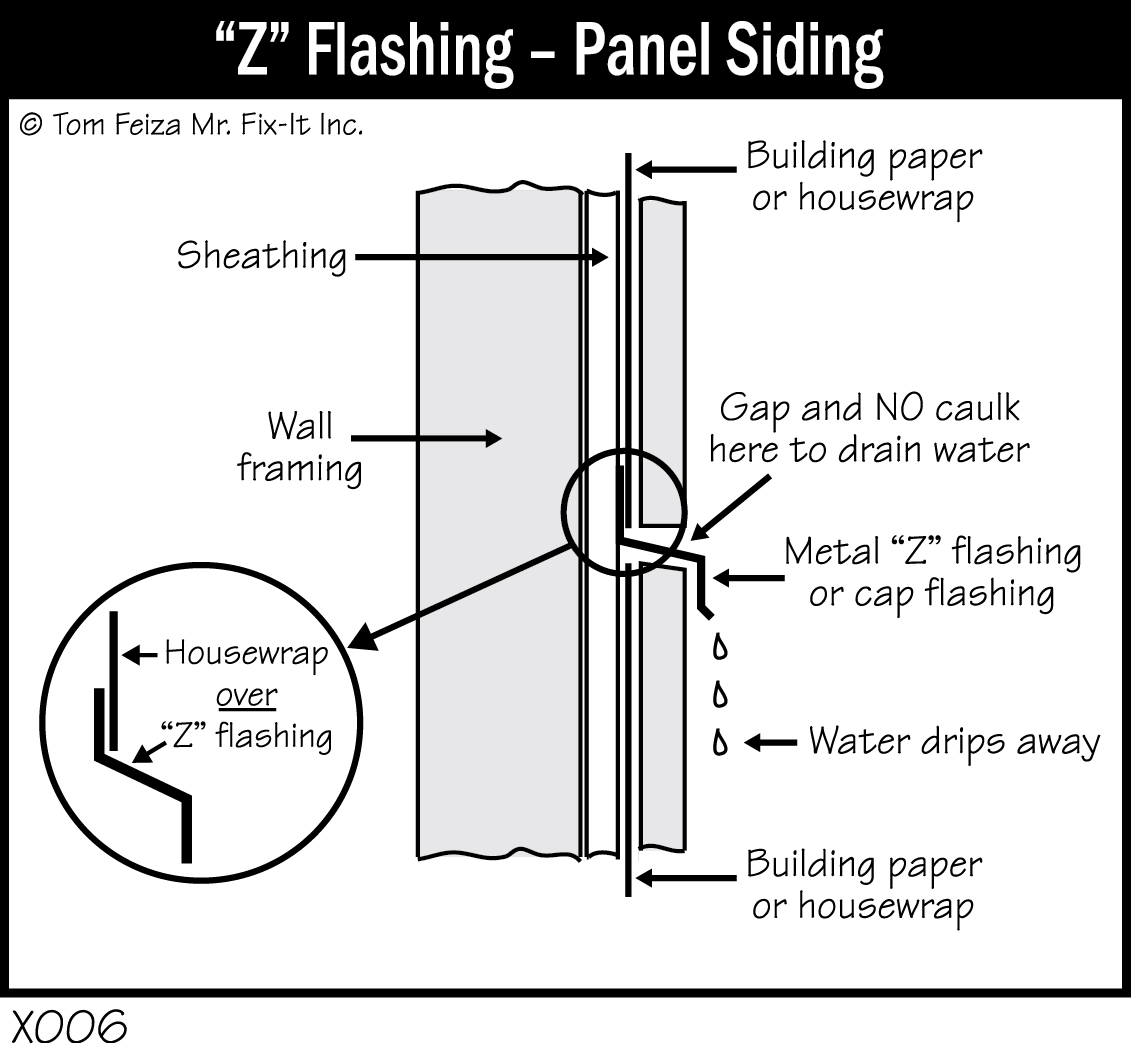
Plywood, Wood Fiber, Wood Siding
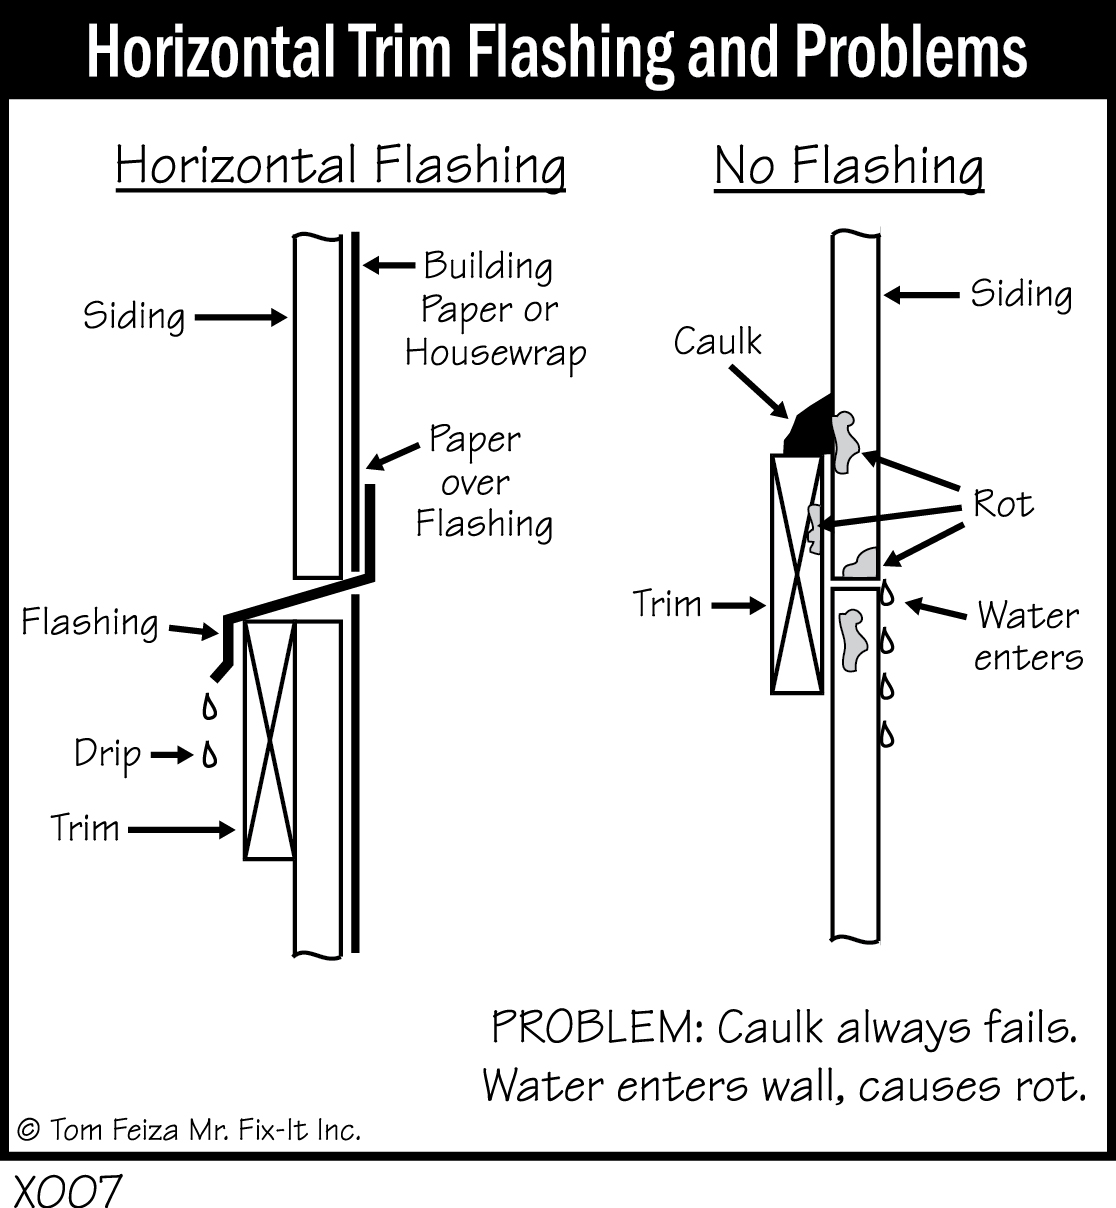
All of these materials require routine maintenance of caulk and paint finishes. Watch for horizontal flashing at trim and windows. Often the flashing is not properly designed or installed, and rot can develop if you don’t maintain caulk and paint.
Plywood or panel siding can present a unique problem with caulk at horizontal joints. These joints should have a “Z” or cap flashing, and there should be no caulk at the top of the metal flashing. This is left open to allow water to drain.
Cement Board
Cement board is a fiber and cement panel designed to replace wood siding, wood panels and trim. The siding is durable and needs minimal maintenance. The surface must be periodically painted, and caulk joints must be maintained. Currently this is the best alternative to cedar siding, and its texture and appearance imitate real cedar.
Windows and Doors
It would take an entire book to cover all types of windows and doors and their maintenance. I will cover basic types and provide important maintenance tips. For specific information on maintaining and repairing the windows and doors in your home, contact the manufacturer.
Maintenance information and parts are readily available for windows and doors produced in the last 20 years. For older windows and doors, you will rarely find information and must rely on after-market products. Thousands of companies produced windows and doors through the years, and many are no longer in business.
Windows
Windows come in all shapes, sizes and types. Various types include double-hung, casement, sliders, hopper, fixed, garden, bow and bay. The list goes on and on.
Materials used for window frames include wood, steel, aluminum, vinyl, and combinations of these products. Higher-cost windows have wood framing on the inside for enhanced appearance and a metal coating on the outside for low maintenance.
There are also many glass options. In older homes you will find the basic single-pane glass, usually with a separate storm window. From there we have insulated glass consisting of two panes with a sealed air space between layers. Newer insulated glass is improved with an invisible “low E” coating on one side that lowers heat transmission. Glass can also be tripled-glazed, meaning there are three sealed panes. Other modern advances include a special inert gas that fills the space between panes; special coatings; and insulating spacers.
The keys to maintaining your window are to (1) keep exterior portions of the window weathertight, and (2) maintain painted and varnished surfaces.
On the outside, maintain all painted surfaces and the glazing compound that seals the window glass to the sash. Make sure that caulk which seals the window frame to the brick or siding is tight and secure. Investigate excessive mildew or peeling paint—these are signs of moisture problems.
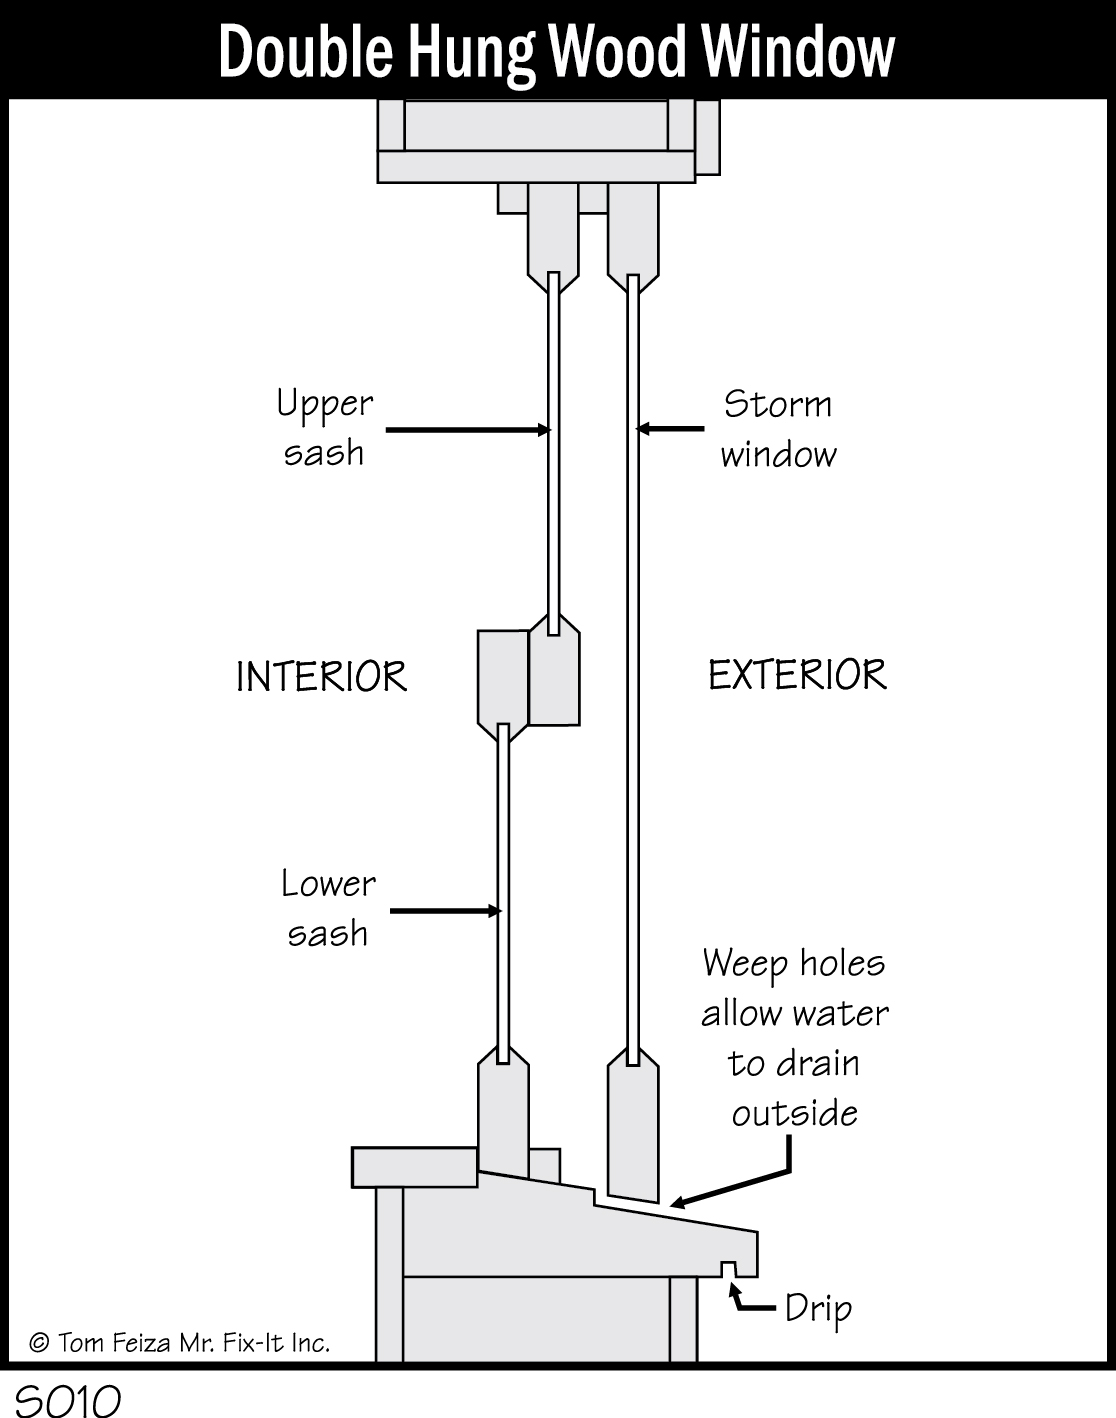
The spacing between the primary (interior) window and the storm window on an older system can cause problems. Most storms have a small slot or hole on the lower edge, next to the wooden sill. This “weep hole,” which is 1/4” or smaller, allows condensation and water to drain (“weep”) to the outside, preventing rot and mildew that could cause serious damage. However, well-intentioned homeowners sometimes caulk weep holes shut, hoping to save energy. Weep holes should always be left open.
Caution
Double-hung windows have a cord and a weight or spring that balances the weight of the window to keep it open. If the spring or cord breaks, the sash can crash shut, causing serious injury. If your window slams shut, repair the cord or spring, or secure the window to the frame with a metal clip and screw to prevent anyone from opening the window and getting injured.
Meticulously check and maintain the condition of painted wood-framed windows and doors. Pay special attention to south-facing surfaces because the sun accelerates deterioration of caulk, paint and glazing products. Check the corners and ends of wood framing; this is where wood rot starts, and it can cause serious problems.
If you are lucky enough to have casement windows—great. They seal tightly and work well. But when they stick, it is easy to damage the crank mechanism. If you are trying to open a sticky casement window, never force the crank. It will break. Remove the screen and then gently force the window open with your hand, not with the crank.
To open a sticky double-hung or slider window, try to jar the window closed by striking the frame with a closed fist. Be careful. Don’t hit it so hard that you break the glass. If the window is painted shut, you must break away all the paint before you try to open it.
Must Know / Must Do Windows
- Maintain paint, putty, caulk and glazing compounds.
- Check the “weep holes” of storm windows.
- Repair broken sash cords and springs to prevent injury.
- Peeling paint on older windows may be a lead hazard–See Chapter 2.
Garage Doors
Garage doors are made of hundreds of possible combinations of materials, rollers, tracks, operators, springs, locks, and other options. Your main responsibilities are to maintain finishes, tighten hardware, and test the safety of operation.
Many garage doors are made of wood and wood products that require routine painting. When you paint a garage door, paint all six sides of each panel. Don’t neglect the inside of the door panel, and don’t neglect the edges.
Hardware—rollers, hinges and tracks—requires routine maintenance. Because the doors are open and closed so often, hardware and fasteners are always being jarred and bounced, which loosens bolts, screws and other fasteners and eventually affects the smooth operation of the door. Tighten all hardware on your garage door at least twice a year. Put the door in the closed position, make sure all hinges and rollers are aligned, and then tighten bolts and nuts. Inspect rollers to make sure that they line up with the tracks. Tracks should be parallel to the edges of the door. Replace any rollers that have damaged bearings. Lubricate rollers and hinges with a special garage door lubricant, silicone spray, or light oil.

If the door has damaged springs, pulleys or cables, have them repaired by a professional. These springs store tremendous amounts of force, and they can cause serious injury if not handled properly. Professional service is also a good option if the door is not properly aligned to the tracks and the frame opening.
Must Know / Must Do Garage Door
- Maintain painted finishes on the door.
- Tighten hardware twice a year.
- Hire a professional for repair of springs, cables and rollers.
- Check with the manufacturer of your door for specific maintenance information.
Garage Door Openers
Many of us take our garage door openers for granted: push the button, and we drive into our dry and lighted garage. These openers provide many years of trouble-free service, but they do require routine maintenance and safety tests. An improperly maintained garage door opener poses a safety hazard.
Contact the manufacturer of your opener for specific safety and maintenance requirements.
Follow these safety precautions:
- Do not stand or walk under a moving door. Do not try to rush under a door as it closes.
- Keep the remote control units away from children.
- Explain to children that garage doors are not toys and that the door can hurt them.
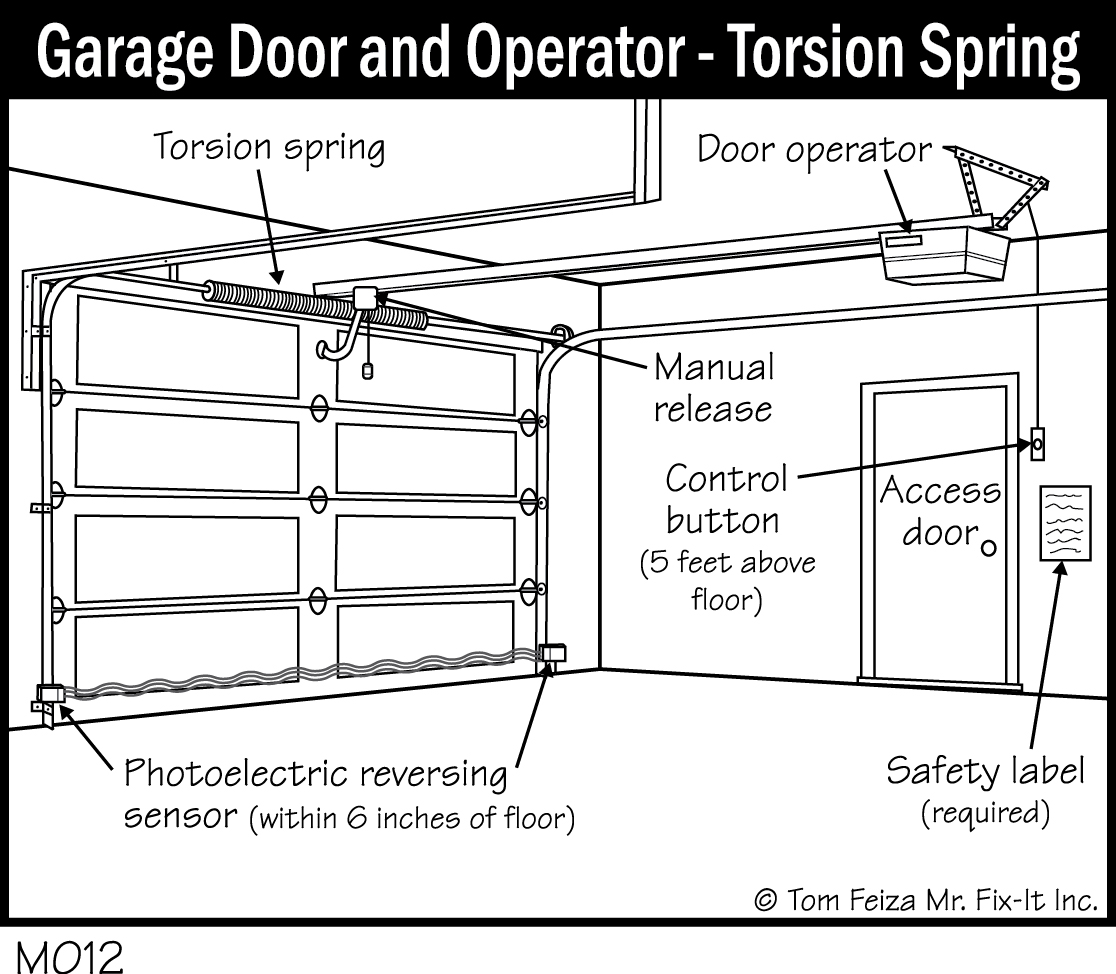
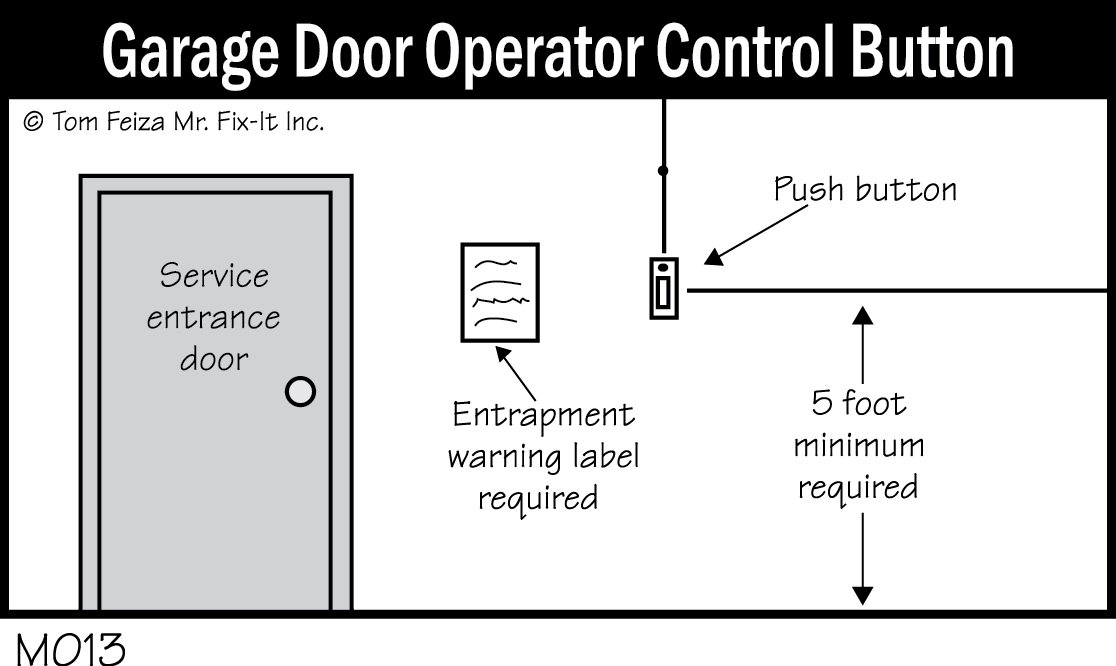
- Mount the pushbutton control at least 5 feet from the floor to keep it out of reach of children.
- When closing the door, observe it until it is fully closed.
- Check the safety reverse once monthly.
Every garage door should have a safety device that reverses the door if it meets resistance while closing. Very old units may not have a safety reverse; these should be replaced.
Must Know / Must Do Garage Door Openers
- Follow all safety precautions.
- Perform monthly safety tests of the automatic reverse.
- Check the balance of the door once a year.
- Always consult a professional for repair of springs, pulleys and cables.
- Contact the manufacturer for specific safety and maintenance recommendations.
Openers manufactured after April 1, 1982, must have a safety reverse that activates after striking a 1”-high object. Openers manufactured before that time were required to reverse off a 2” object. If your door does not reverse with the 1” test, replace it.
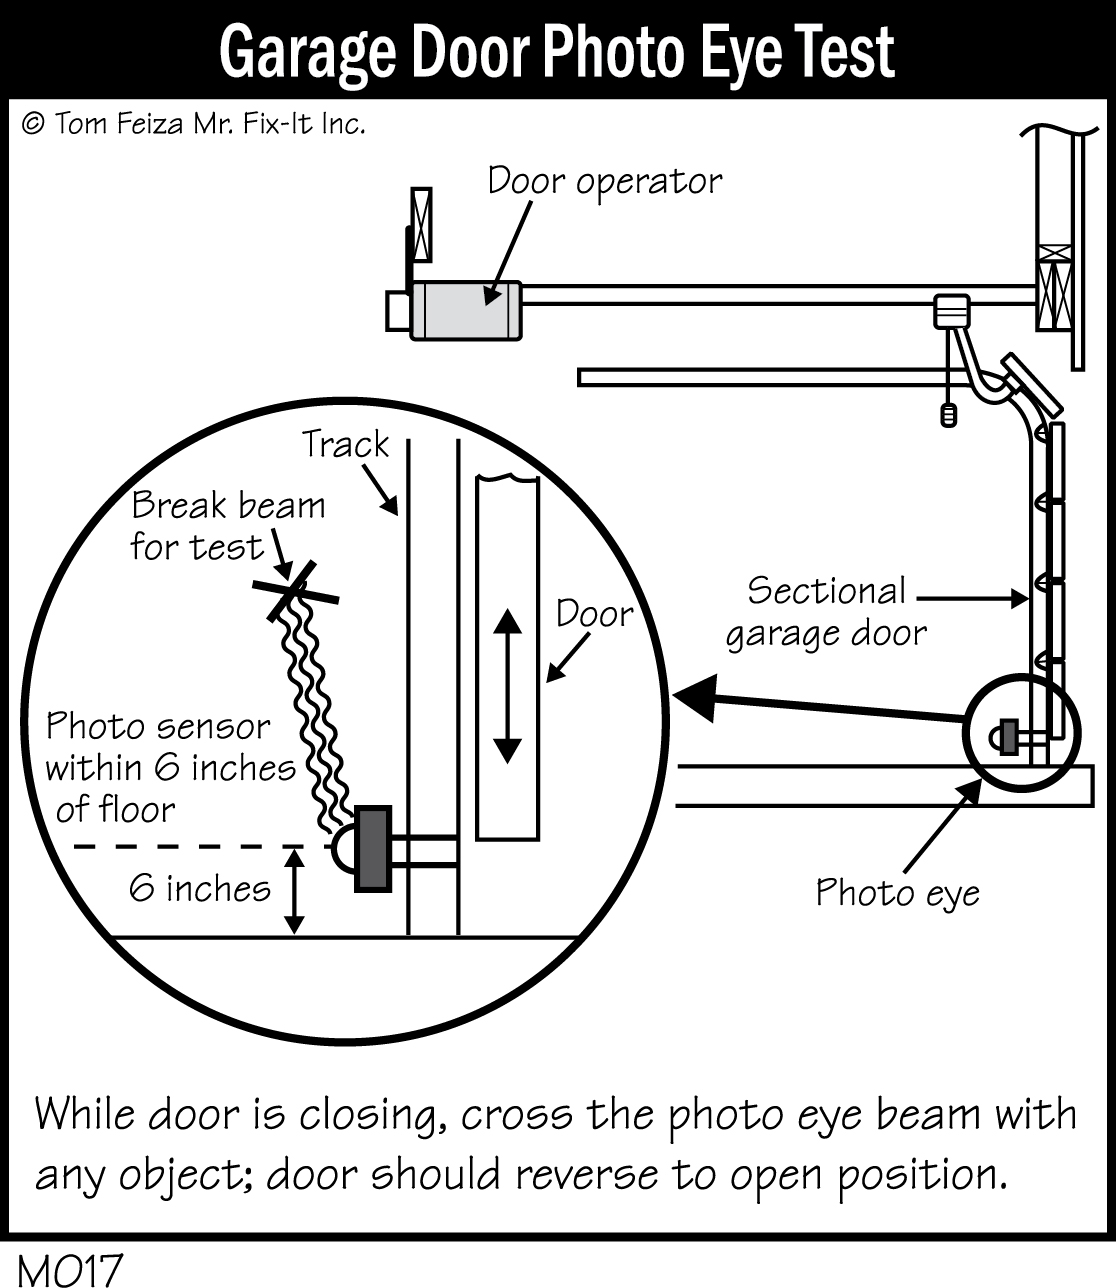
Openers sold after 1993 also have a photocell. When anything blocks or crosses the photocell beam as the door is closing, the door reverses. If your garage door opener doesn’t have this optical safety device, I suggest you replace it with one that does.
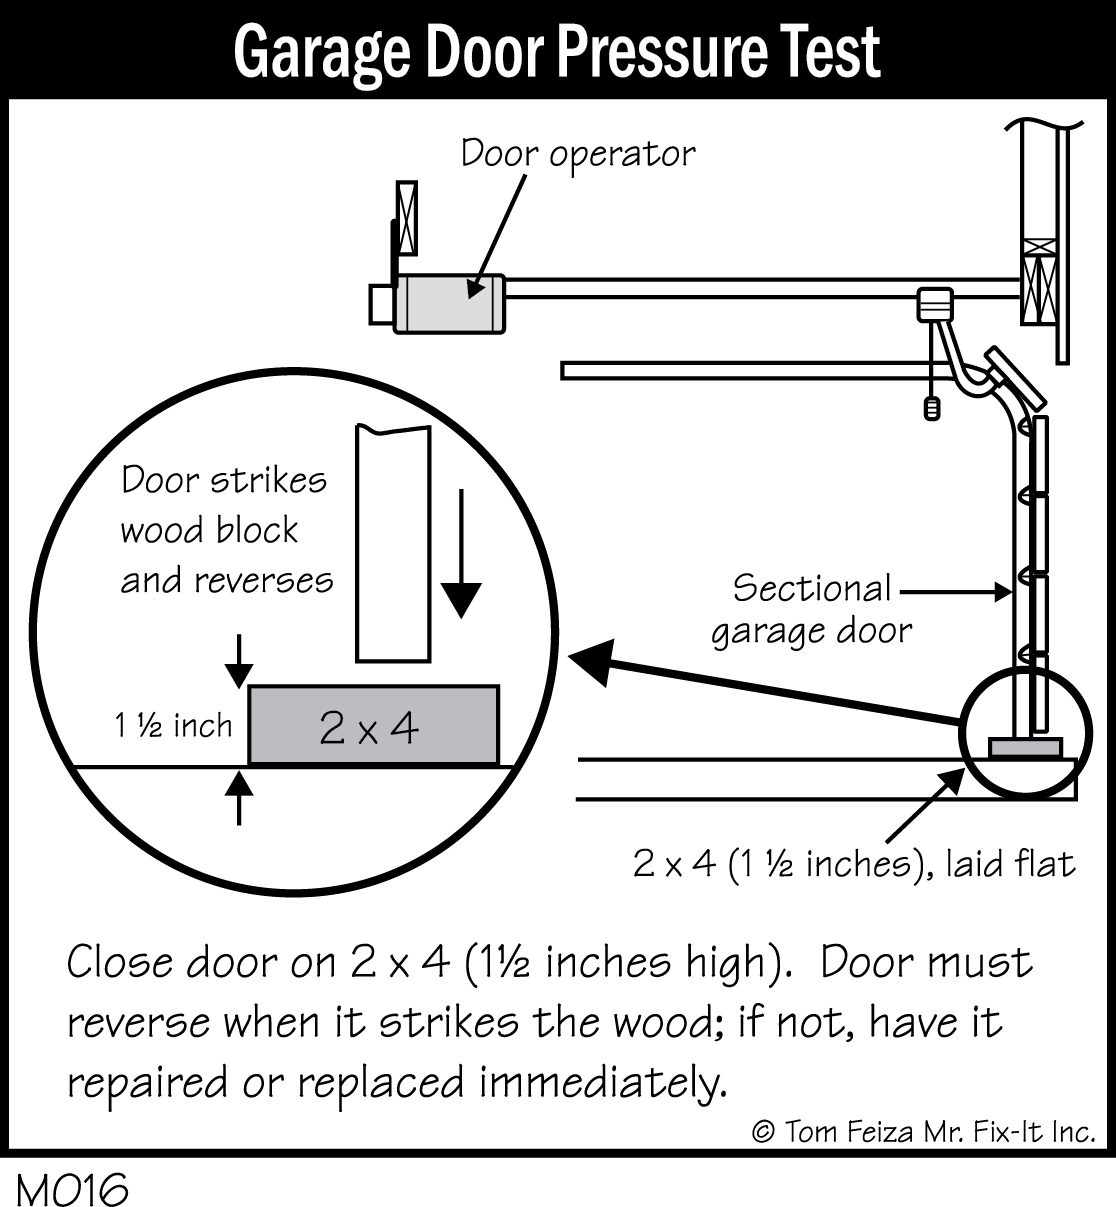
Here’s the procedure for the monthly safety reverse test. (Check with the manufacturer of your operator for more specific details.)
- With the door open, place a 1”-thick block under the center of the door. Use an actual 1”- thick object, not a nominal 1” piece of wood that is actually 3/4” thick. A 2 by 4 laid flat is often used for this test.
- Activate the opener to close the door.
- When the door hits the piece of wood, it should reverse and reopen.
- Activate the opener again. This time, as the door closes, hold up the bottom of the door with your hand. The door should reverse with a few pounds of pressure.
- If your door has a photocell safety control, perform the test again by breaking the beam as the door closes. The door should reverse itself. You can test the door with a 6 by 12 inch object placed progressively along the door opening. With the object in place, the door should stop and reverse to the full open position.
- If the opener fails any of these tests, consult a qualified professional for adjustments and repair.
If the remote control fails to operate your garage door, first check for a weak or dead battery in the remote unit. A cold receiver unit with a weak battery could also cause this problem. If batteries are good, check the transmitter and receiver codes and the antenna on the receiver.
Your garage door opener is designed to open and close a balanced garage door. Strong springs provide lift that balances the weight of the door. If the operator unit sounds loud and works very hard to open or close the door, the door may be unbalanced or there may be a broken spring or damaged hardware.
Inspect the springs and hardware. If there is any damage, consult a professional.
You can also test the balance of the door if the springs appear to be in good condition. Start with the door closed. If you start with the door open, it can crash shut, causing damage and possible injury. With the door closed, disconnect the release mechanism—a cord or lever where the operator arm attaches to the operator frame. You should then be able to lift the door with little resistance; the door should “balance” around the center of its motion. If the door is hard to lift and does not balance, consult a professional to adjust the spring mechanism. Don’t attempt to adjust the springs yourself. They store a dangerous amount of energy and can easily injure you.
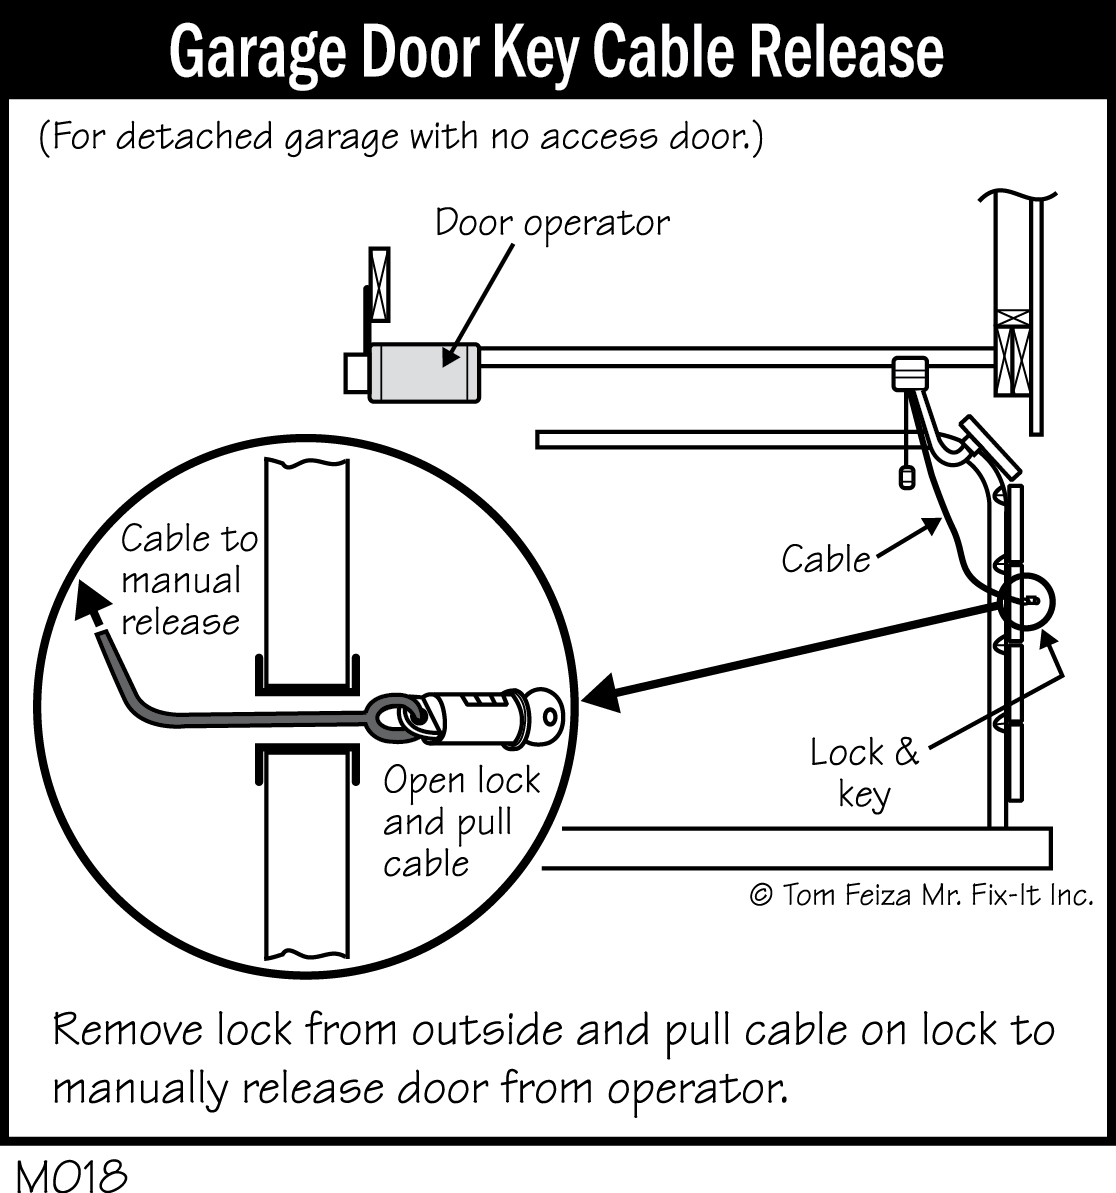
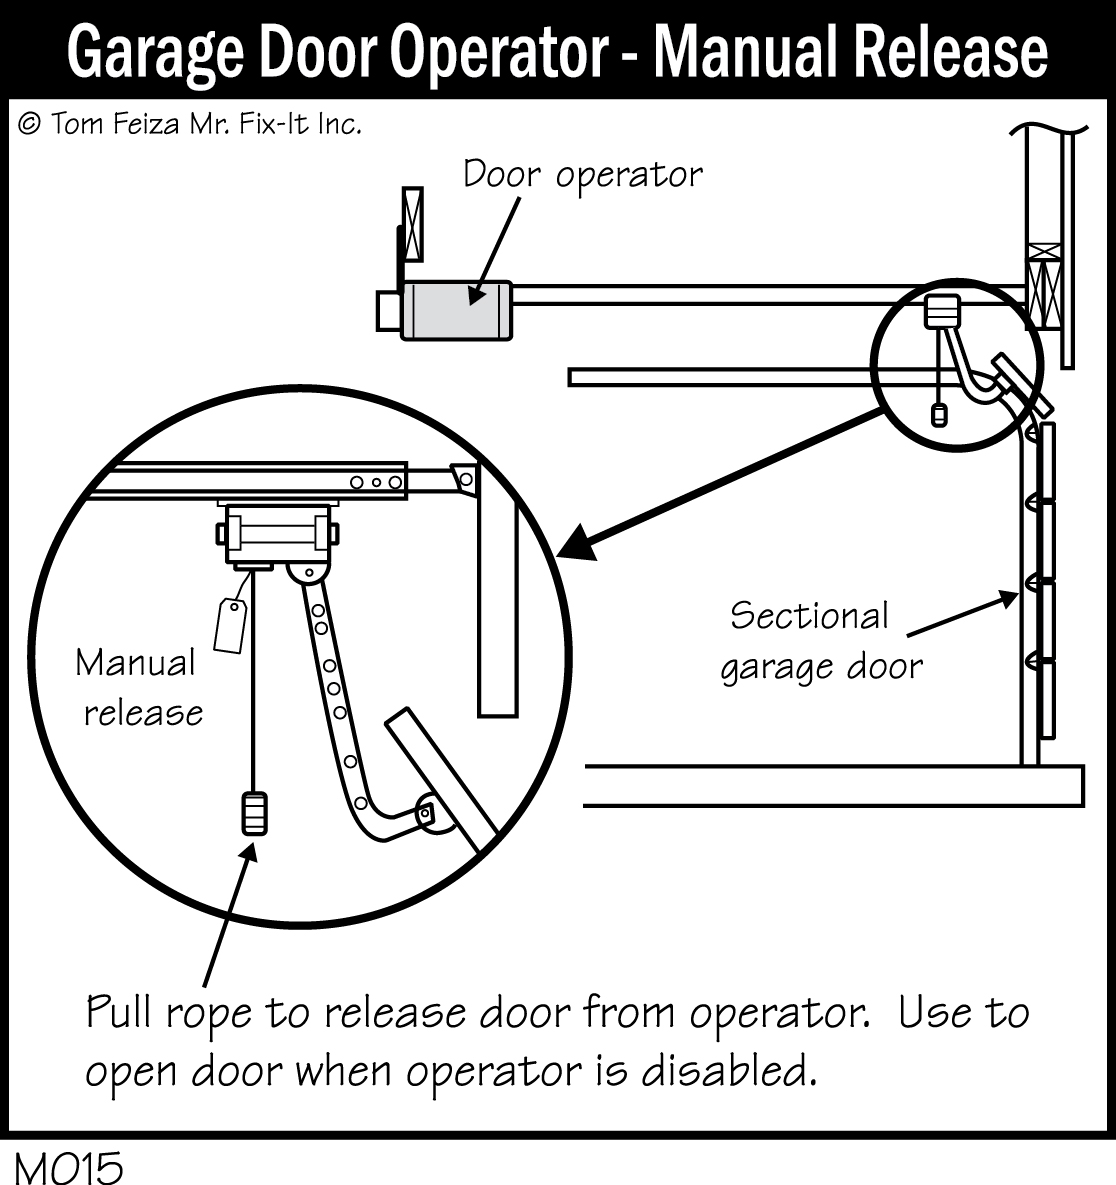
If your garage has an automatic door operator but no service or entry door, how can you open the door when the power is out or the remote control is dead? For this type of situation, there should be a key-operated garage door release on the outside of the overhead door. To open the door, remove the lock cylinder and pull the attached cable to release the door from the operator. Now you can lift the door manually.
Insulation and Ventilation
All homes are insulated in some fashion to protect against heat loss and gain. Older homes may have little insulation; newer homes have insulation that meets government standards for energy efficiency.
Ventilation systems remove excessive moisture and protect insulation from moisture damage. Vapor retarders or barriers prevent moisture from flowing into insulation.
Insulation
Most newer homes are insulated with fiberglass, cellulose fiber, rigid plastic foam, or a combination of these products. Older homes may have vermiculite, wood shavings, paper products, and other types of insulation. Often, homeowners add insulation to walls and attics of older homes to increase energy efficiency.
A note of caution: vermiculite insulation has been found to contain asbestos in some cases. If your home has vermiculite insulation, it should not be disturbed and you should never breathe any related dust. Vermiculite looks like tan and gold gravel particles of about 1/4 to 3/4 inch. It is lightweight, like foam. If you think your home has vermiculite, have it tested by a professional.
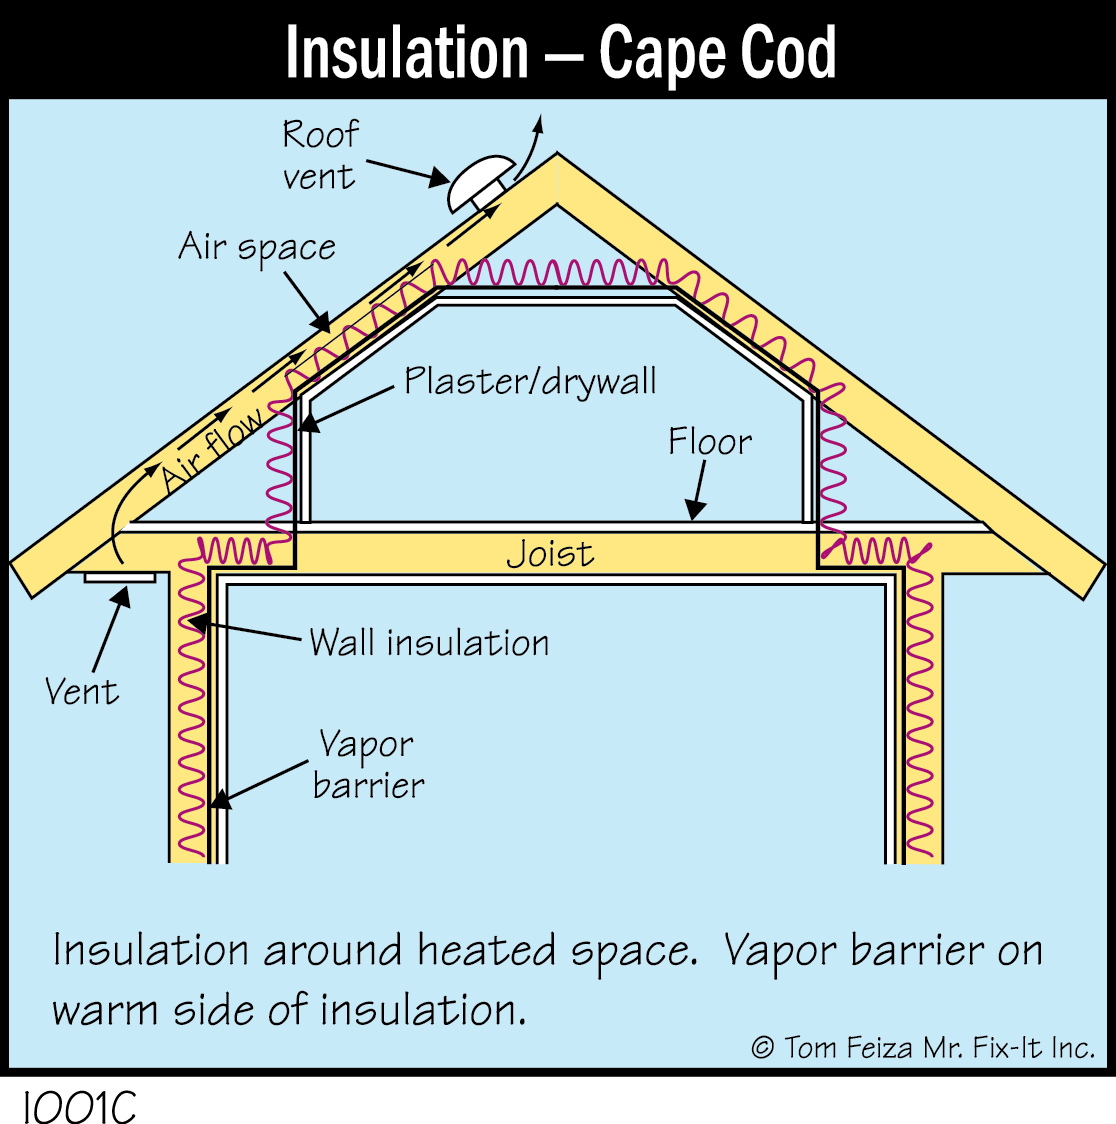
Insulation is rated with an R-value, which simply indicates the resistance to heat flow. The higher the R-value, the higher the resistance. The key thing to remember is that when you double the R-value, you cut the heat loss in half; so the first several inches of insulation result in huge energy savings.
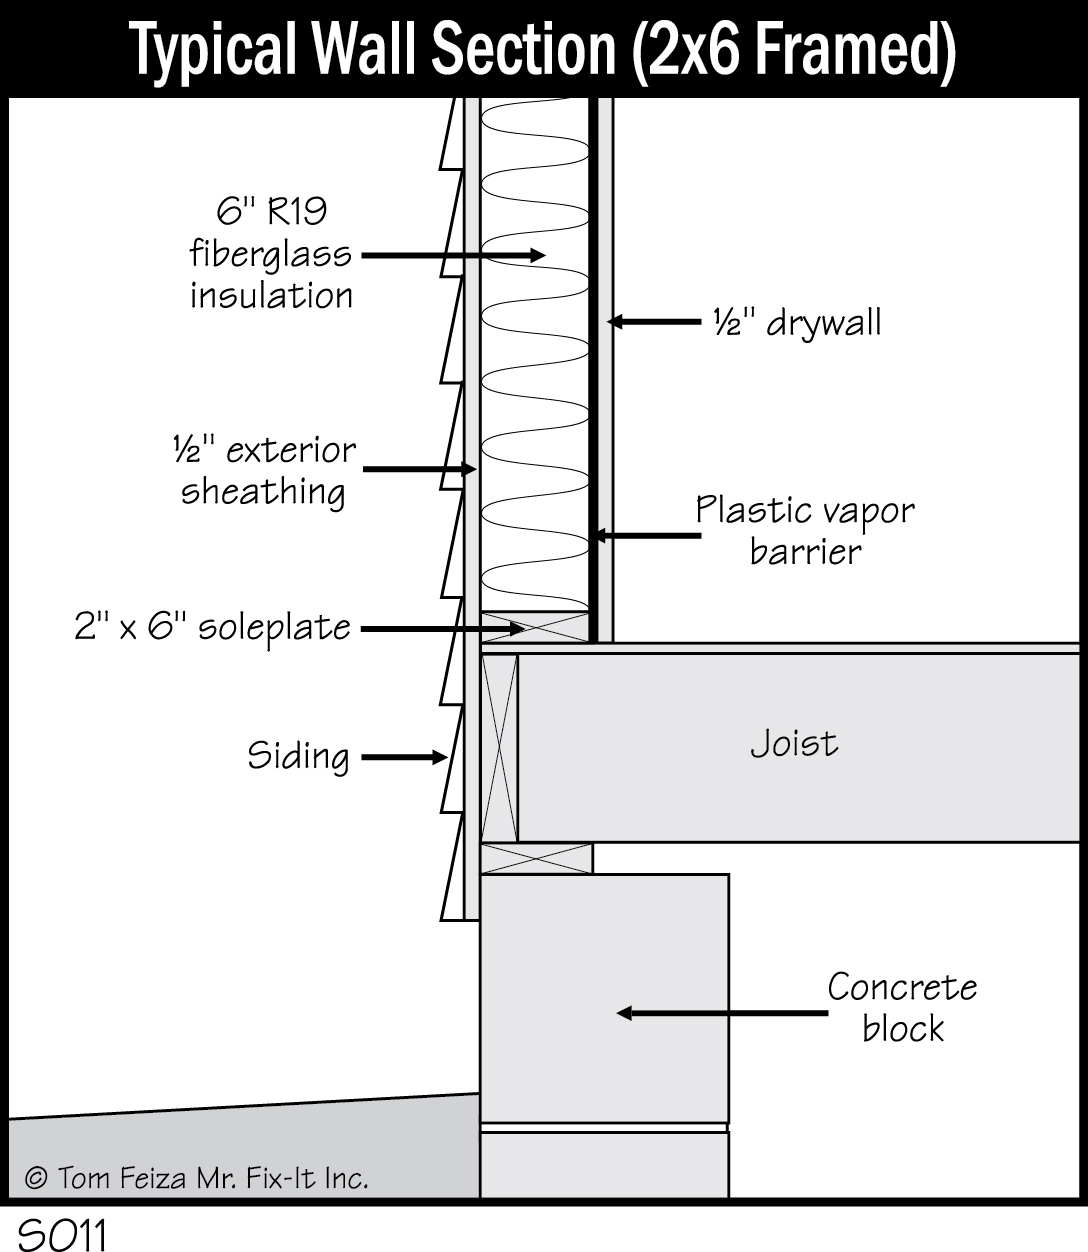
Most fiberglass is rated at about R-3 per inch of thickness. A 6”-thick section is fiberglass would be rated about R-19. The R-value for rigid foam ranges from 5 to 7 per inch. Cellulose and mineral wool provide about R-3 per inch.
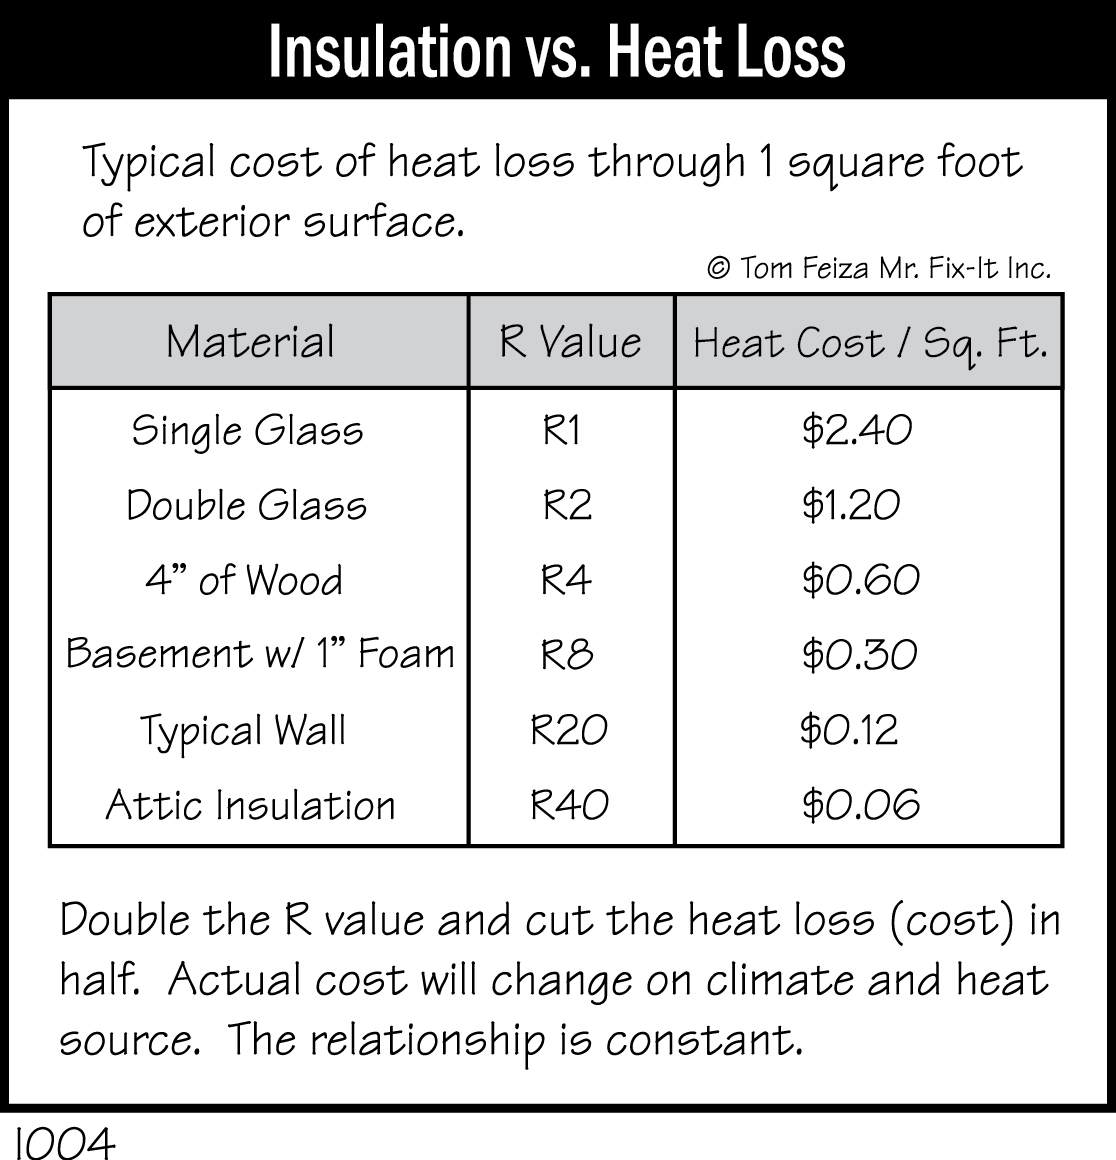

Insulation recommendations vary with climate conditions and state code requirements. In northern climates, attics are insulated to R-38 or more, and walls are insulated to R-19 or more. In southern zones, attics are insulated to about R-26 and walls to R-11.
Vapor Barriers
Vapor barriers or vapor retarders protect insulation and structural framing from moisture damage. Vapor barriers are usually made of polyethylene film. They can also be aluminum foil or kraft paper (brown paper coated with tar).
The vapor barrier, placed behind drywall, plaster or wood flooring and in front of insulation, prevents moisture from moving through the surface and penetrating the insulation. The barrier also prevents air movement through walls and floors; air movement carries tremendous amounts of water vapor.
If moisture were allowed to enter the insulation, it would condense on the cold wood framing of the exterior, causing water damage and potential rot.
In hot and humid climates, such as southern Florida, vapor barriers are not used because the relative humidity outdoors is greater than that in the home, and moisture tends to move into the house. If you have questions about requirements for vapor barriers in your area, consult the local building inspector.
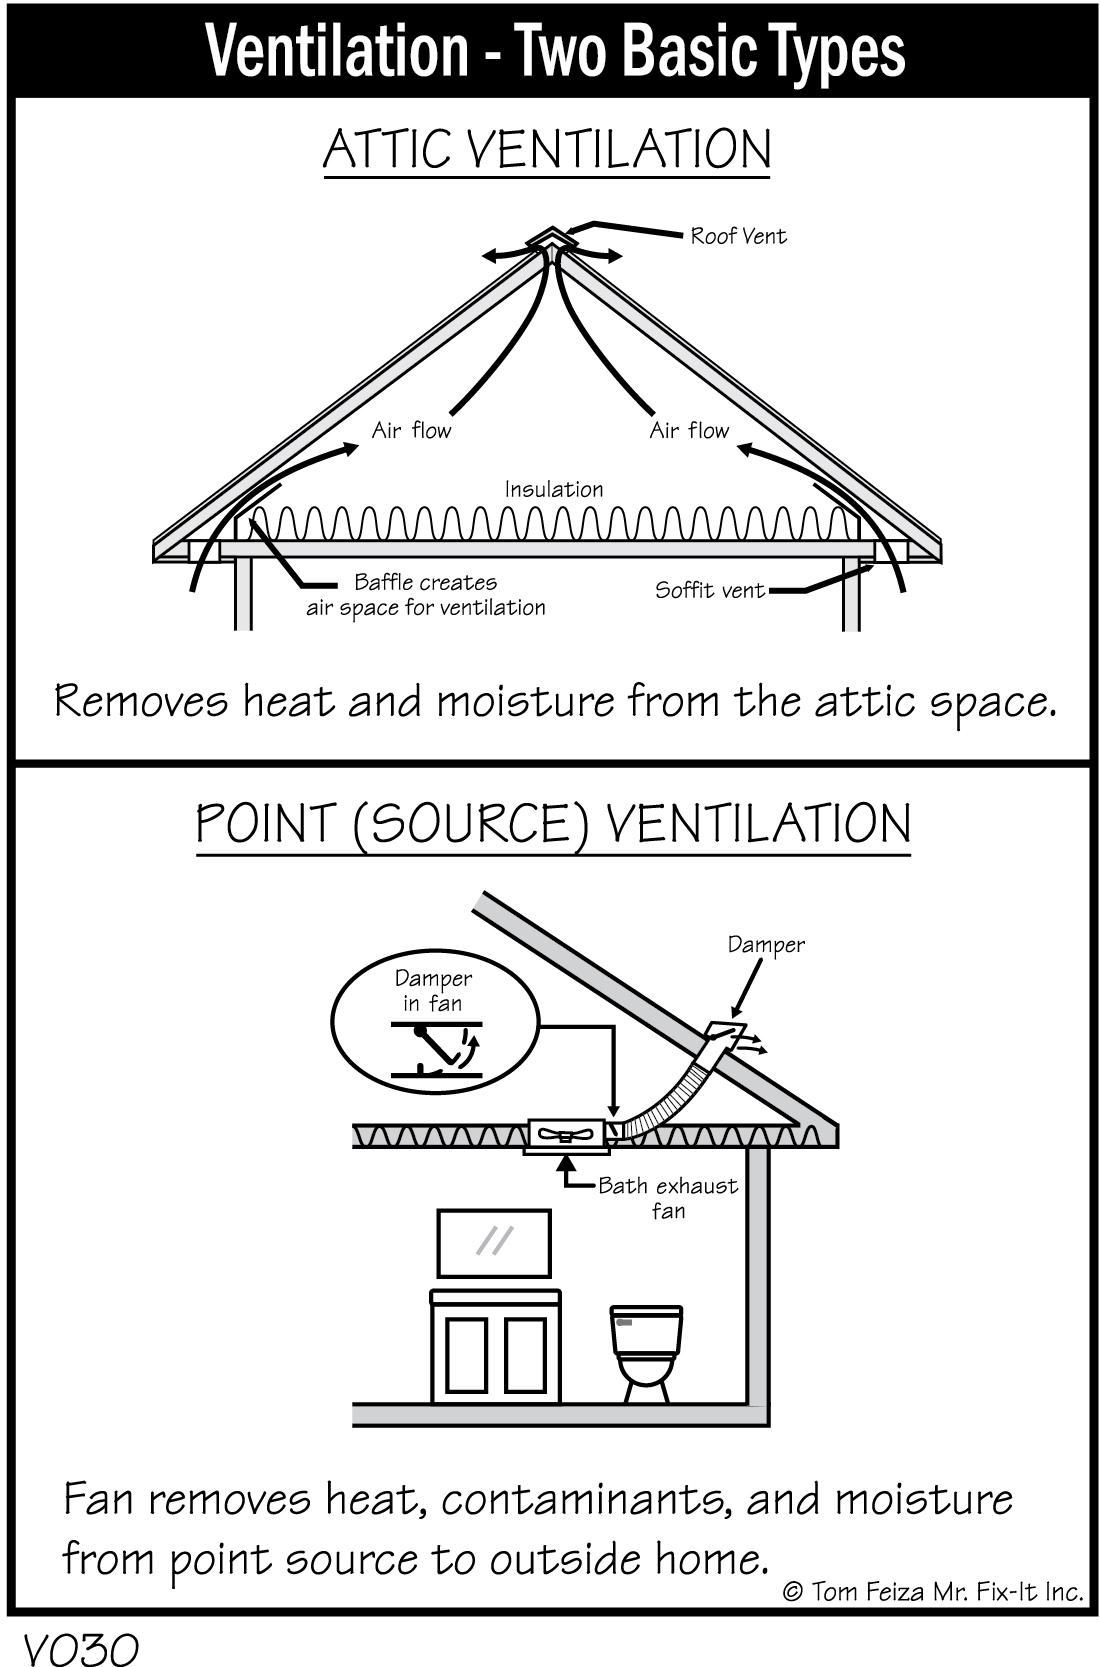
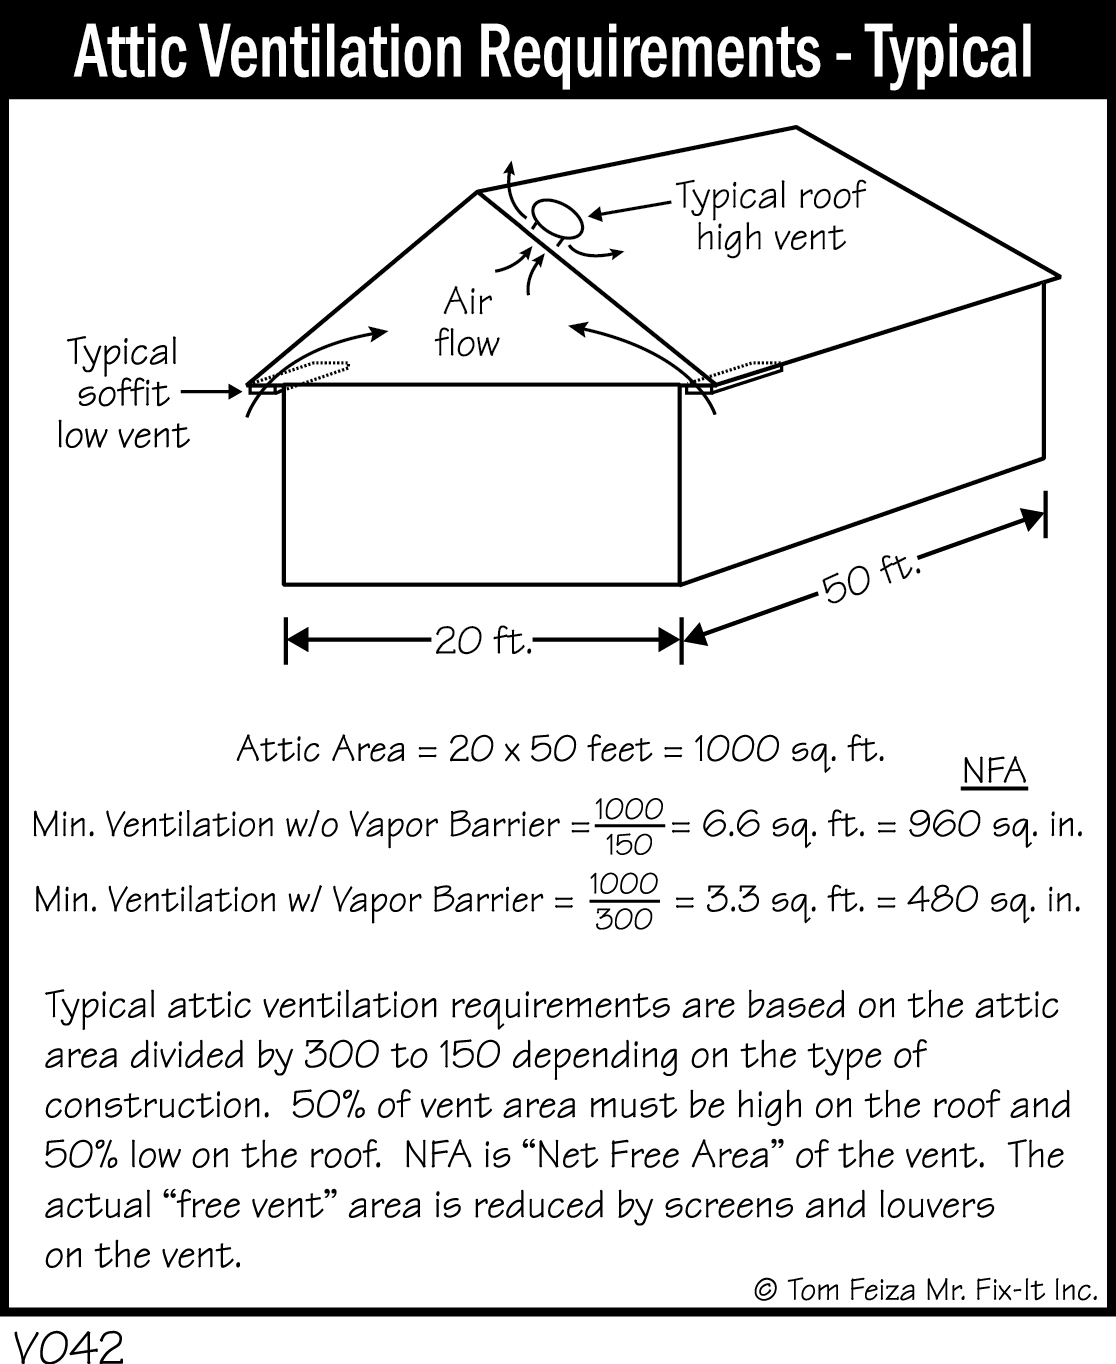
Attic Ventilation
No matter how well a home is constructed, moisture will reach the attic; it’s impossible to completely seal this area. So ventilation is necessary to remove moisture and excessive heat from the attic. This is achieved through various combinations of roof vents, soffit vents, gable end vents, ridge vents, and ventilation fans.
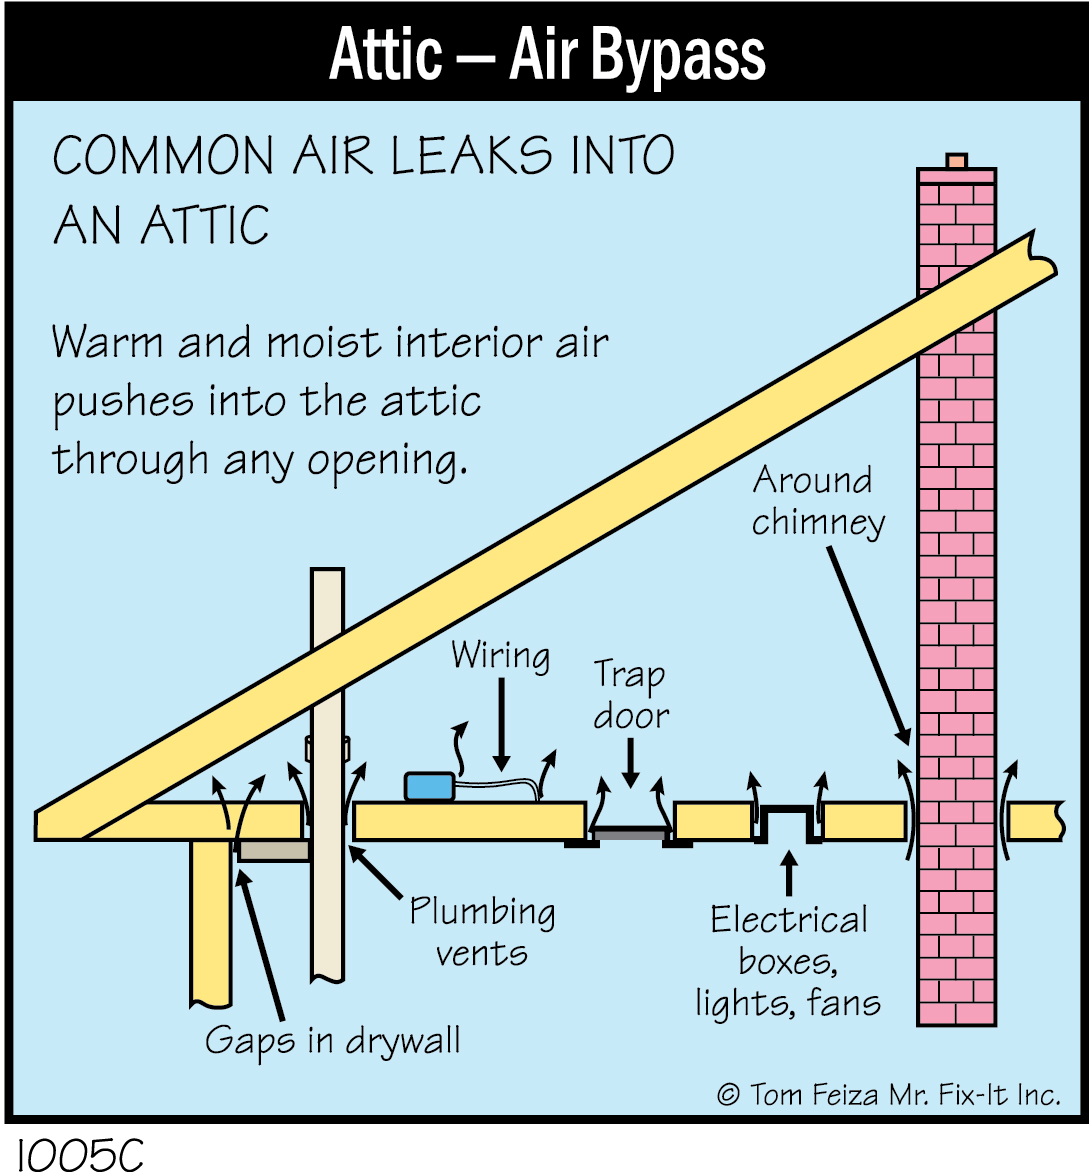
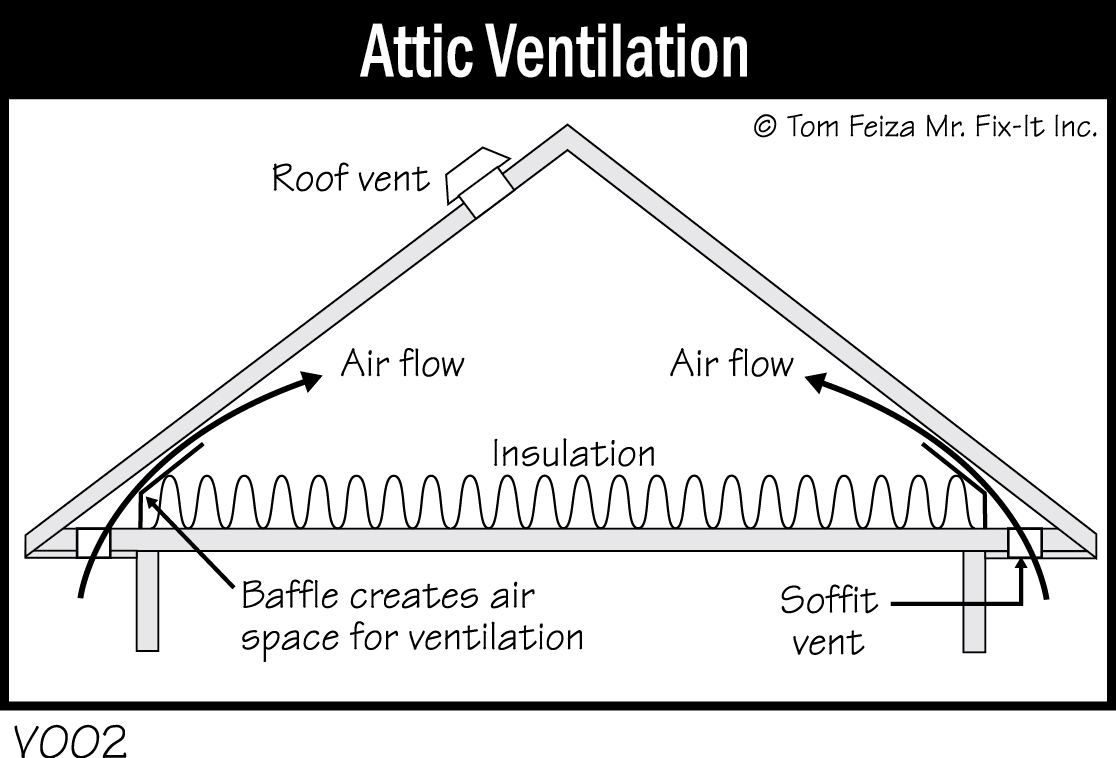
For proper air flow, ventilation must be provided both high and low on the roof. Heat and wind help the vents move air through the attic. As an additional benefit, ventilation reduces the temperature inside the attic, lowering the cost of air conditioning and extending the life of an asphalt shingle roof.
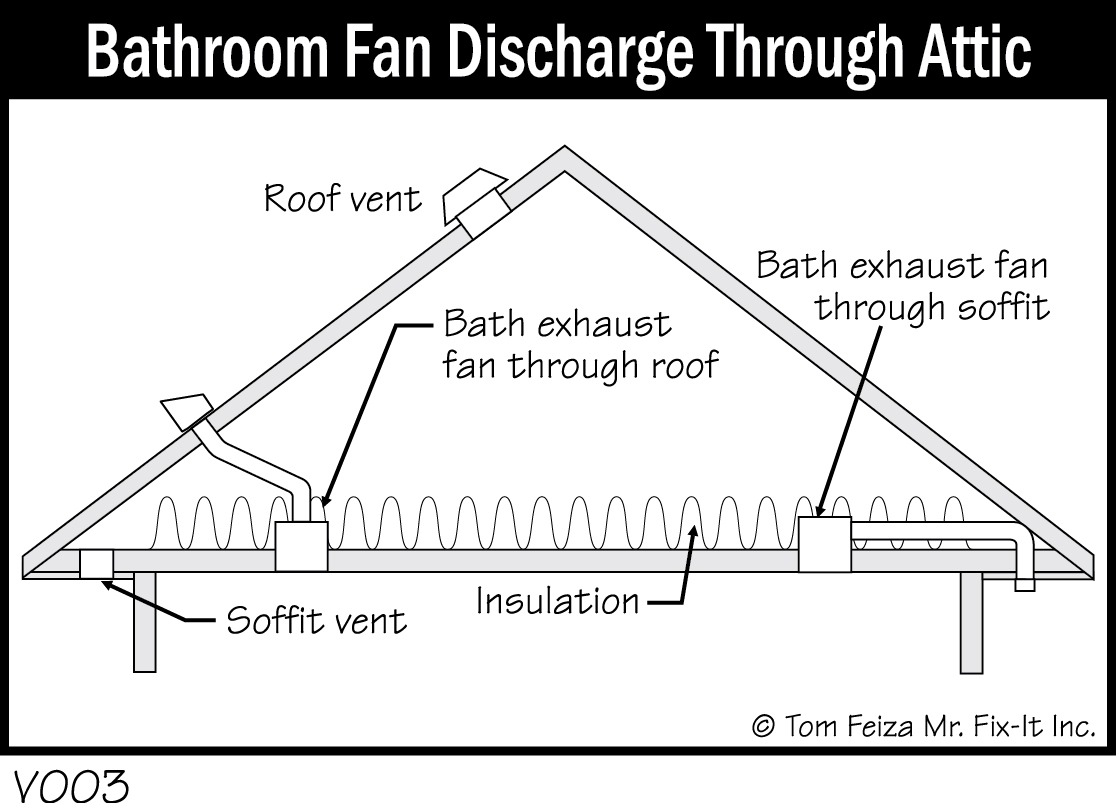
Bathroom and kitchen exhaust fans are needed to remove excessive moisture, but they must be routed to an exterior wall or through the roof. Make sure that the exhaust fans in your home aren’t dumping moist air into the attic.
Must Know / Must Do Attic Ventilation
- Check the attic periodically for signs of moisture condensation. Black or gray mildew stains indicate a need for increased ventilation.
- Make sure that the access door to the attic is insulated and weatherstripped to block air entry.
- Don’t walk through the attic without taking special precautions. You could fall through the ceiling.
- Make sure that bathroom and kitchen exhaust fans aren’t dumping moist air into the attic.
Vapor Barrier in Crawl Space
A crawl space or dirt floor in the basement can release significant amounts of moisture in your home. Even if the soil looks dry, moisture may evaporate from the surface. Cover any bare dirt with a thick (6-mil) poly vapor barrier. The barrier should provide a continuous cover with joints overlapped 12”. Edges should lap up several inches on the foundation wall. Place stones or gravel atop the barrier to keep it in place.
Bathroom Ventilation
Ventilation for bathrooms has been required for many years. The minimum requirement is a window or an exhaust fan. Most of us would prefer, and our homes would like, a dedicated exhaust fan controlled by a switch in the bathroom. This allows us to effectively remove excessive moisture from showers and baths.
Confirm the discharge location of your fan. Make sure it discharges moisture through an exterior wall or through the roof. These fans remove a tremendous amount of moisture, and you don’t want that moisture in your attic.
Homes built prior to 1980 often have ventilation fans that exhaust into the attic space. These should be rerouted through the roof with a simple vent kit available at building supply centers.

Often, bath exhaust fans can’t keep up with the steam of a hot shower, and the bathroom remains full of moisture. This can cause excessive condensation, mildew, peeling paint, and damage to windows. A simple solution is to replace the ordinary fan switch with a timer switch—the type found on heat lamps. Use a timer that will operate for 1 or 2 hours, and run the fan for a timed period after you leave.
Roofs and Gutters
Roof framing and roofing materials contribute significantly to the look and style of your home. The roof also protects your home from the elements. While a roof is easy to ignore, its components do need routine maintenance.
Performing this maintenance requires access to the gutters and valleys and may involve walking on the roof. It’s essential to follow all safety precautions for working at heights and climbing ladders. While some homeowners are comfortable with ladders and heights, others are not. If you are not completely comfortable with the idea of working on your roof, hire a professional.
Roof Styles and Framing
Many roof designs are dictated by the style of the home and the spans between exterior walls. Roofs are also designed to accommodate snow loads, winds, and other environmental factors.
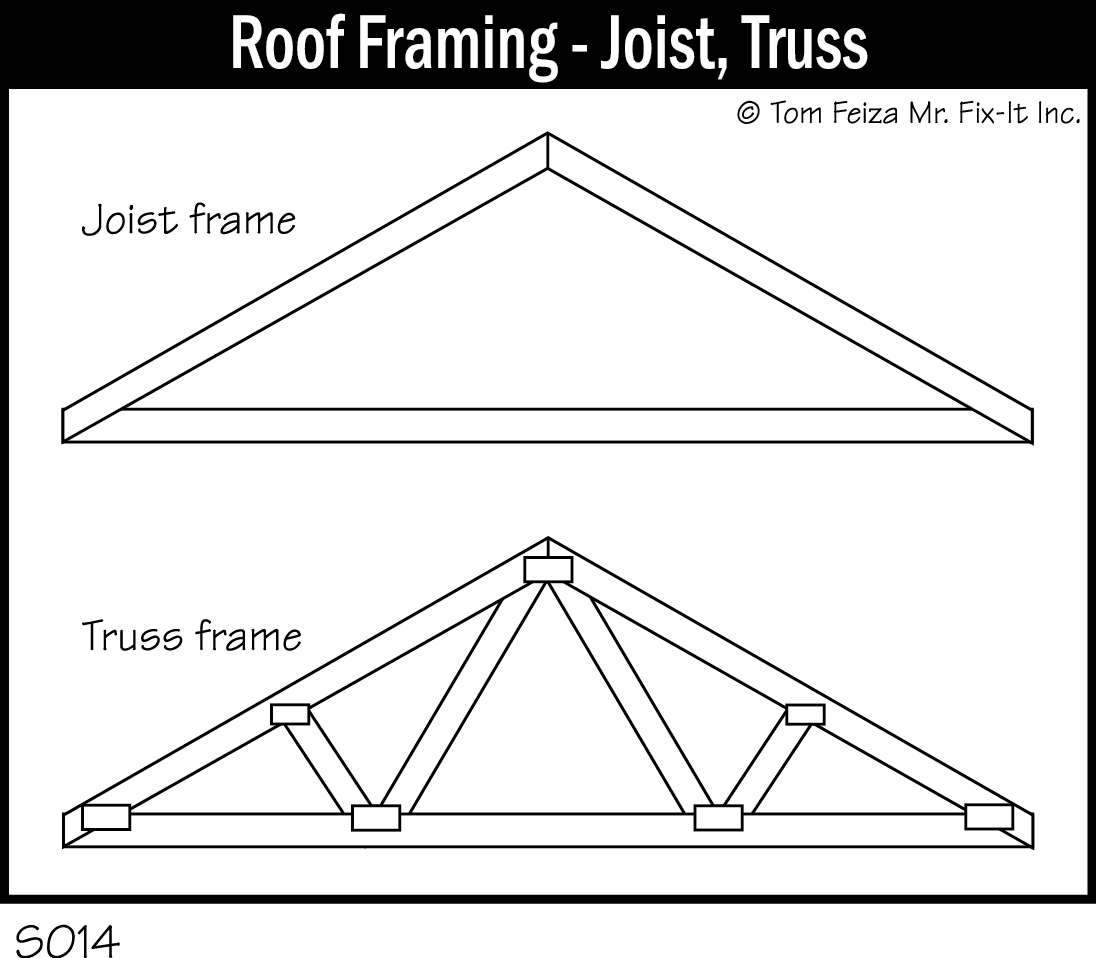
All roofs have structural framing of joists or trusses that support a wood deck. The deck may be boards, plywood or oriented strand board. Roofing material is attached to the wood deck.
In general, the two basic styles are sloped and lowslope (or flat) roofs.
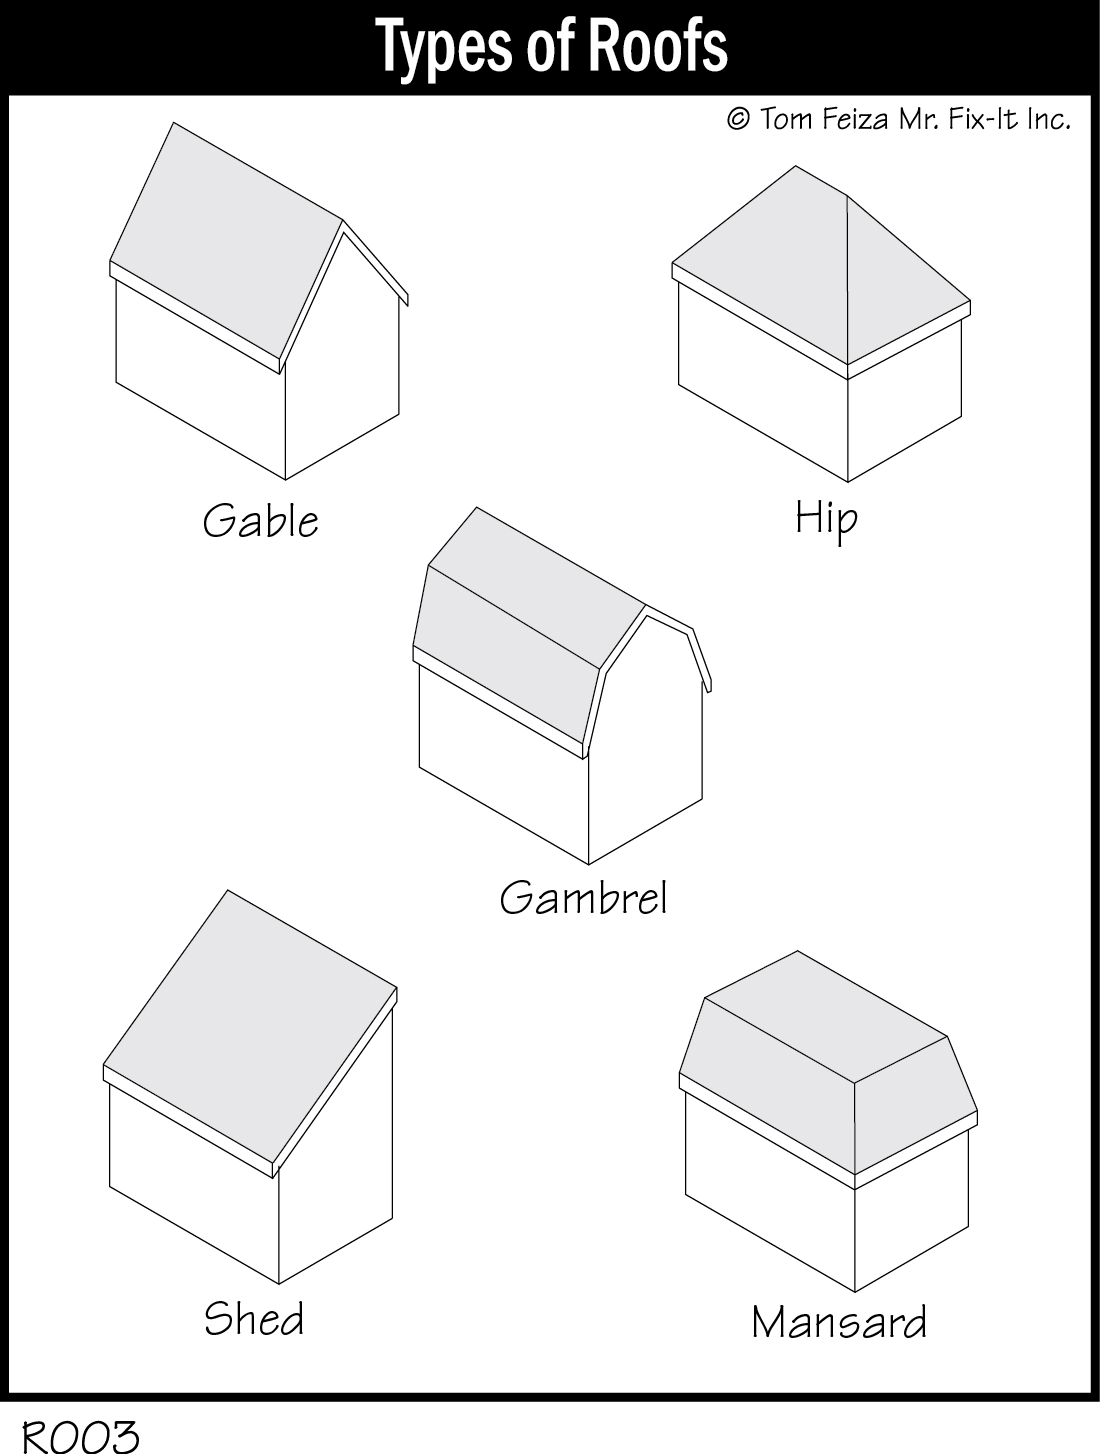
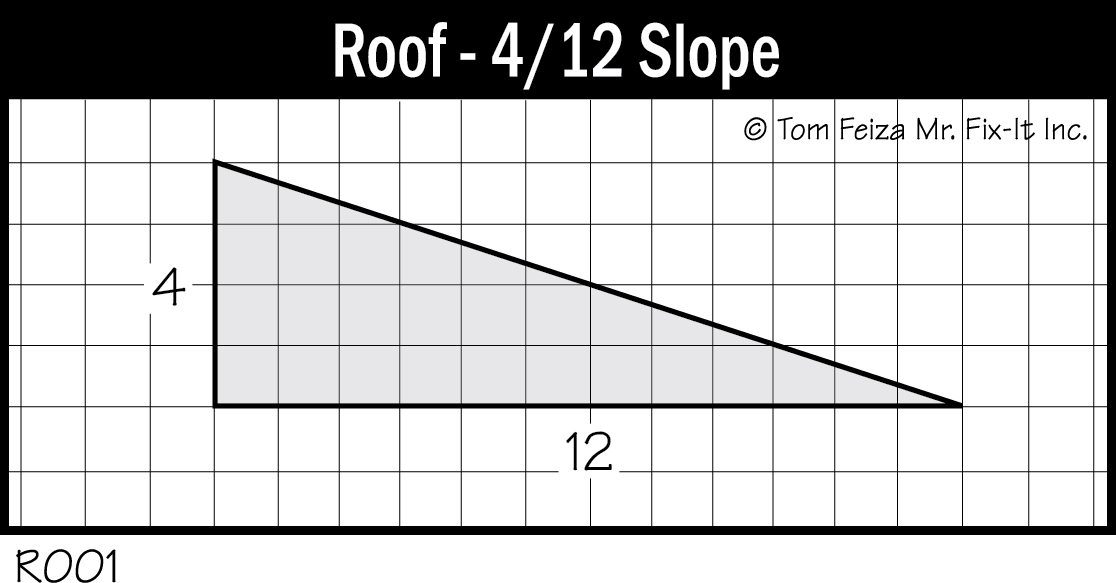
Sloped roofs are those with a slope greater than 4” in 12” or 4/12. This is equivalent to a 1/4 slope (just convert the fraction), meaning that the roof drops 1 foot for every 4 feet of horizontal run. To determine the slope of your roof, level a 4-foot board and measure the drop at the outer edge. If the pitch drops 4 feet within this 4-foot length, the slope is 4 in 4—and, by extension, 12 in 12. This is often expressed as a 12/12 roof. Styles of sloped roofs include gable, shed, hip, gambrel, mansard, and combinations of various types.
Low-slope or flat roofs have a slope that is less than 4 in 12. These require special waterproof or membrane materials because they do not shed water as well as roofs with a steeper slope. Most “flat” roofs do have a slight pitch to drain water to the edges or to roof drains.

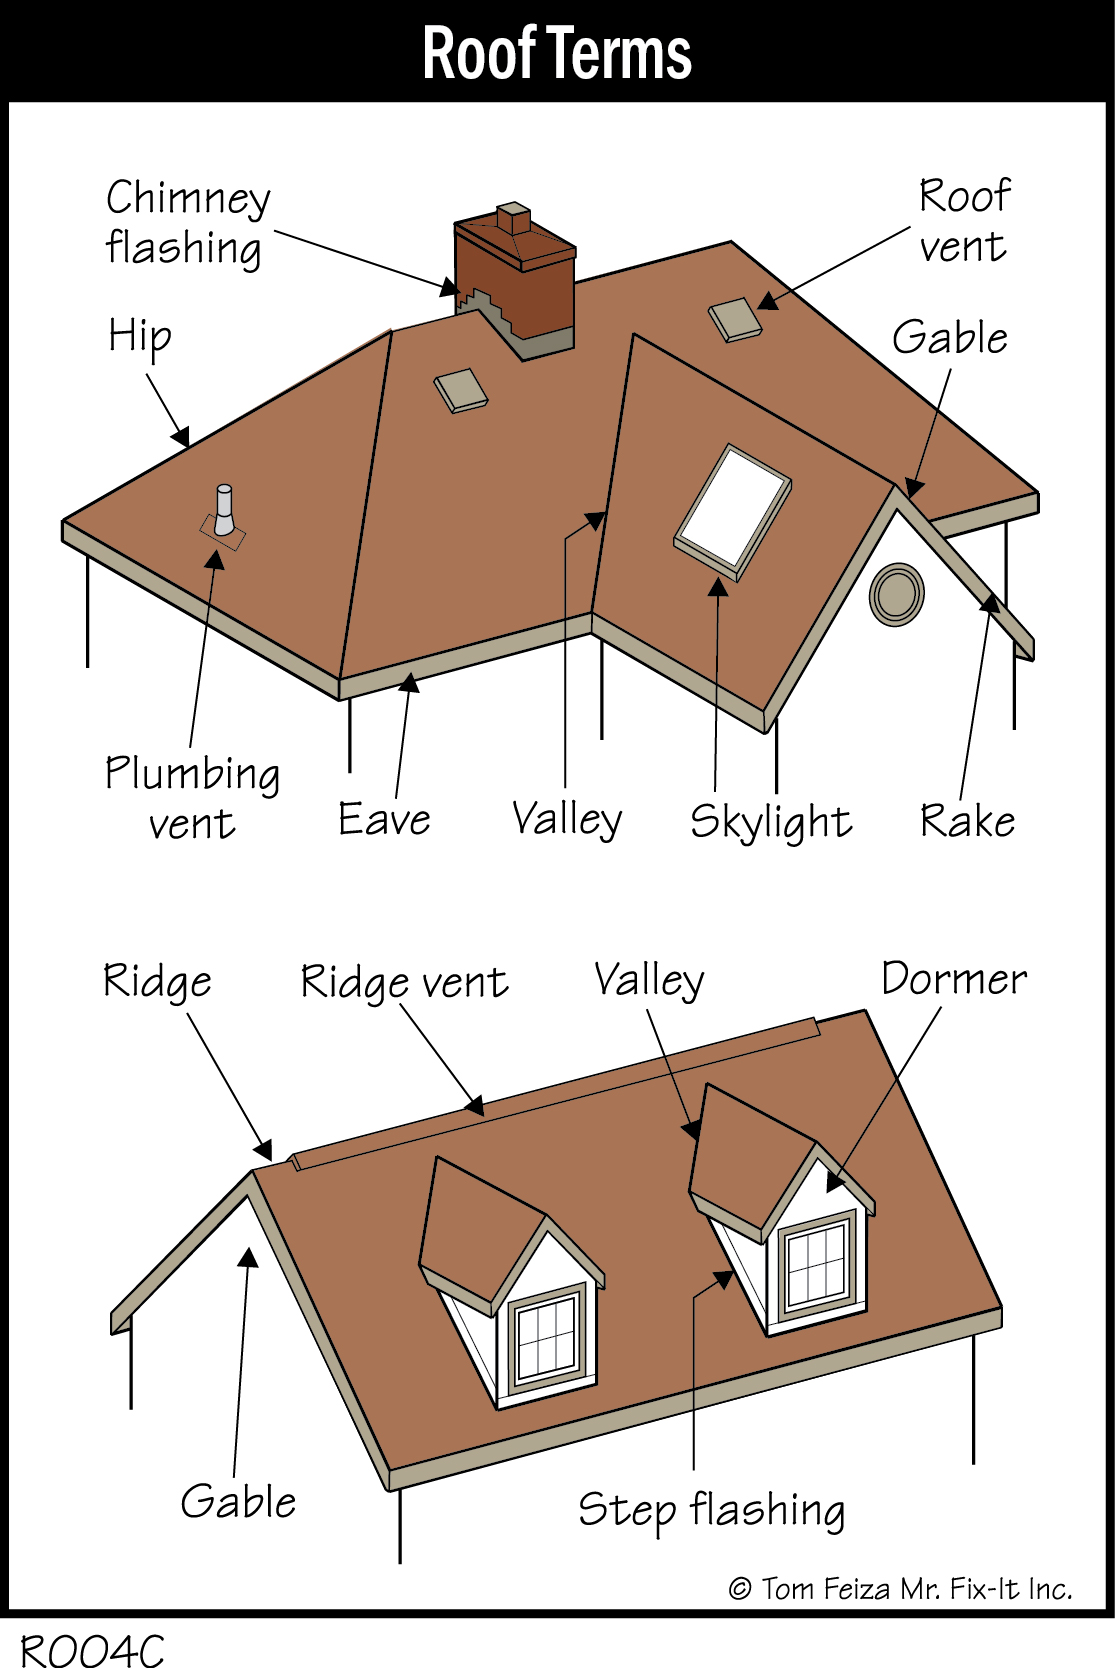
Other components of a roof include valley and sidewall flashings, edge flashings, and flashings at all roof penetrations. The roof will have a ventilation system and may have a gutter and drainage system.
Roofing Materials
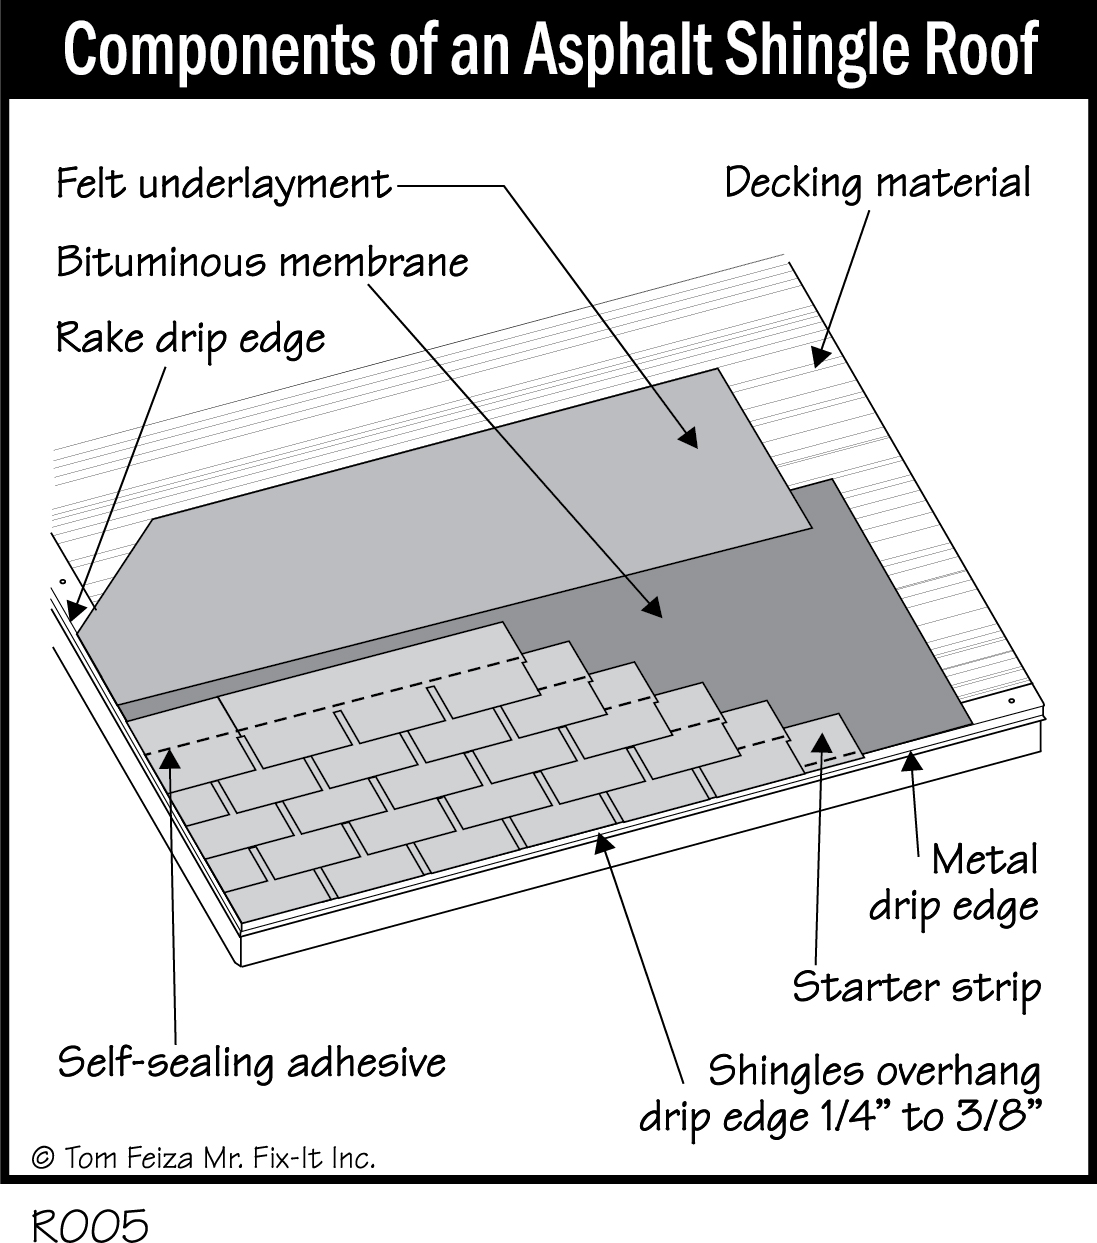
Asphalt shingles are the material most commonly used on conventional pitched roofs (1 in 4 and greater). An organic or fiberglass “mat” that forms the body of the shingle is covered with granules to protect the mat from the sun and add color and visual variety. A typical asphalt shingle will last from 15 to 40 years, depending on the original quality and local weather conditions. Asphalt shingles come in many shapes and sizes. Some are designed to imitate wood or tile.
Other materials used for pitched roofs include wood shakes, wood shingles, cement asbestos, tile, slate, metal, and cement tile. All of these are more expensive than asphalt shingles, but they offer unique design qualities and potentially longer life. Tile, slate and cement often last 50 years or more and are highly resistant to sun damage, wind and fire. However, heavier roof materials require special structural designs.
Wood Roofs
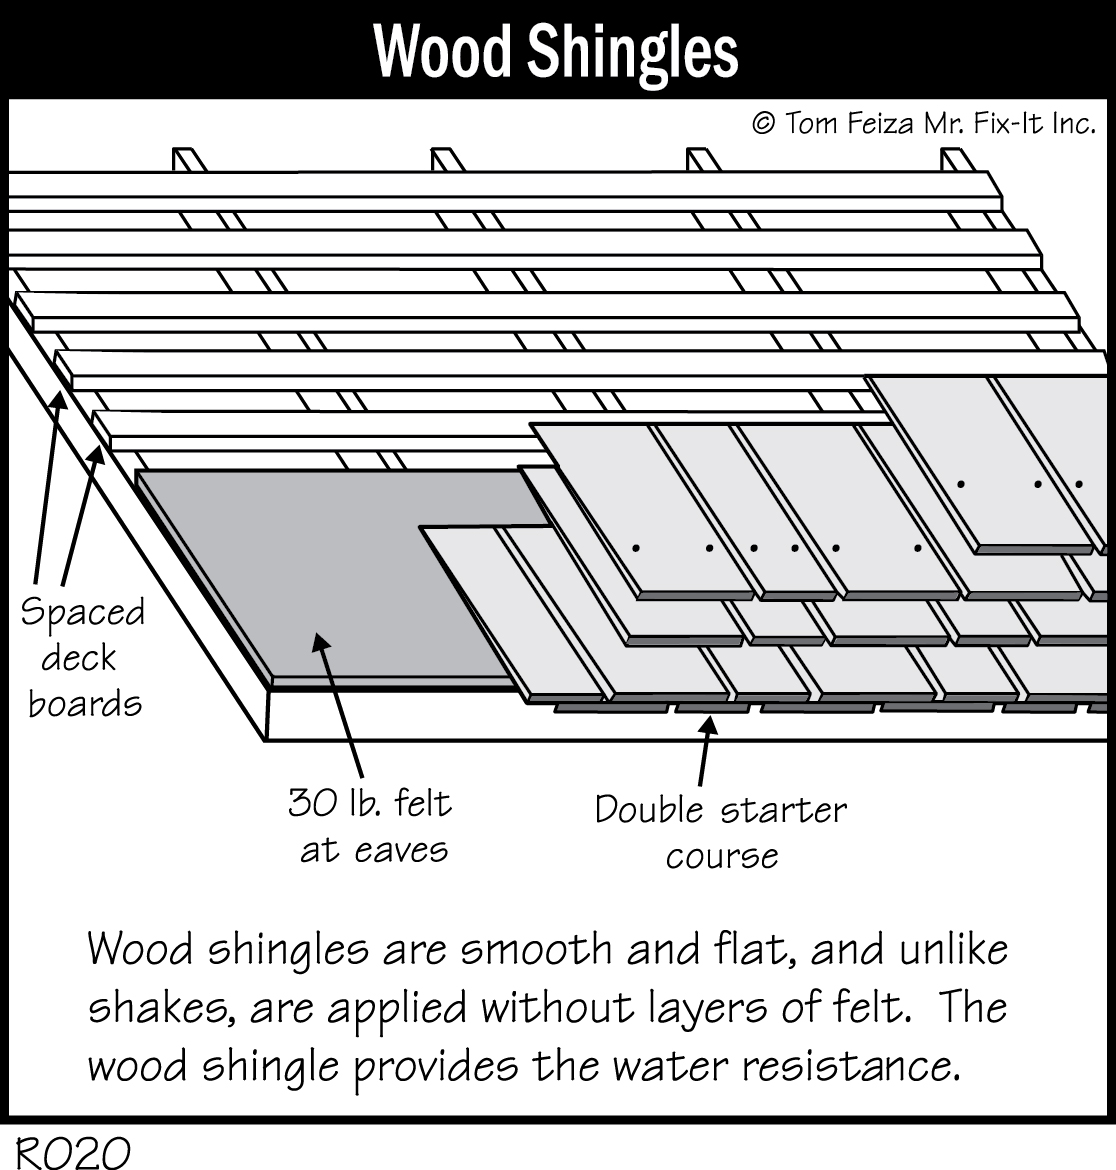
Years ago, most roofs had wood shingles. These flat, smooth shingles were applied without any tar paper beneath them. Today, most wood shingle roofs have been removed or covered with asphalt shingles.
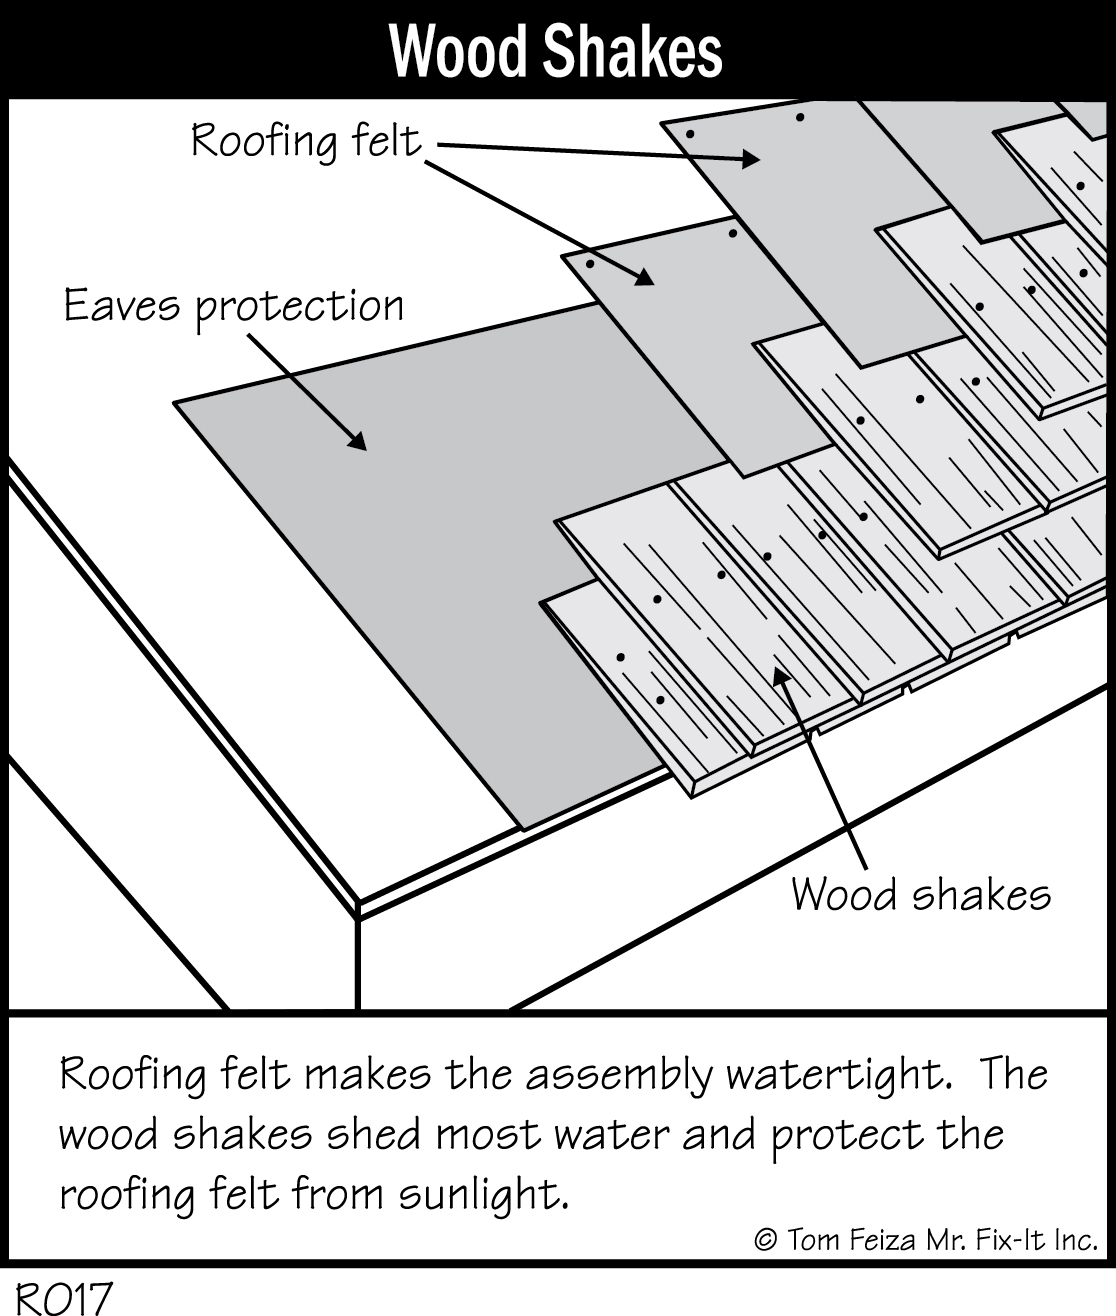
Today when we see a wood roof, it is almost always a wood shake roof. Wood shakes are generally rougher and more irregular than wood shingles. Tar paper under the wood shakes provides a watertight covering. The wood shakes reject some water and protect the tar paper from the ultraviolet rays of the sun. Wood shake roofs need routine maintenance. The shakes must be kept clear of debris, and a periodic treatment may extend the life of the shakes.
Wood roof maintenance information is available at the Cedar Bureau: www.cedarbureau.org.
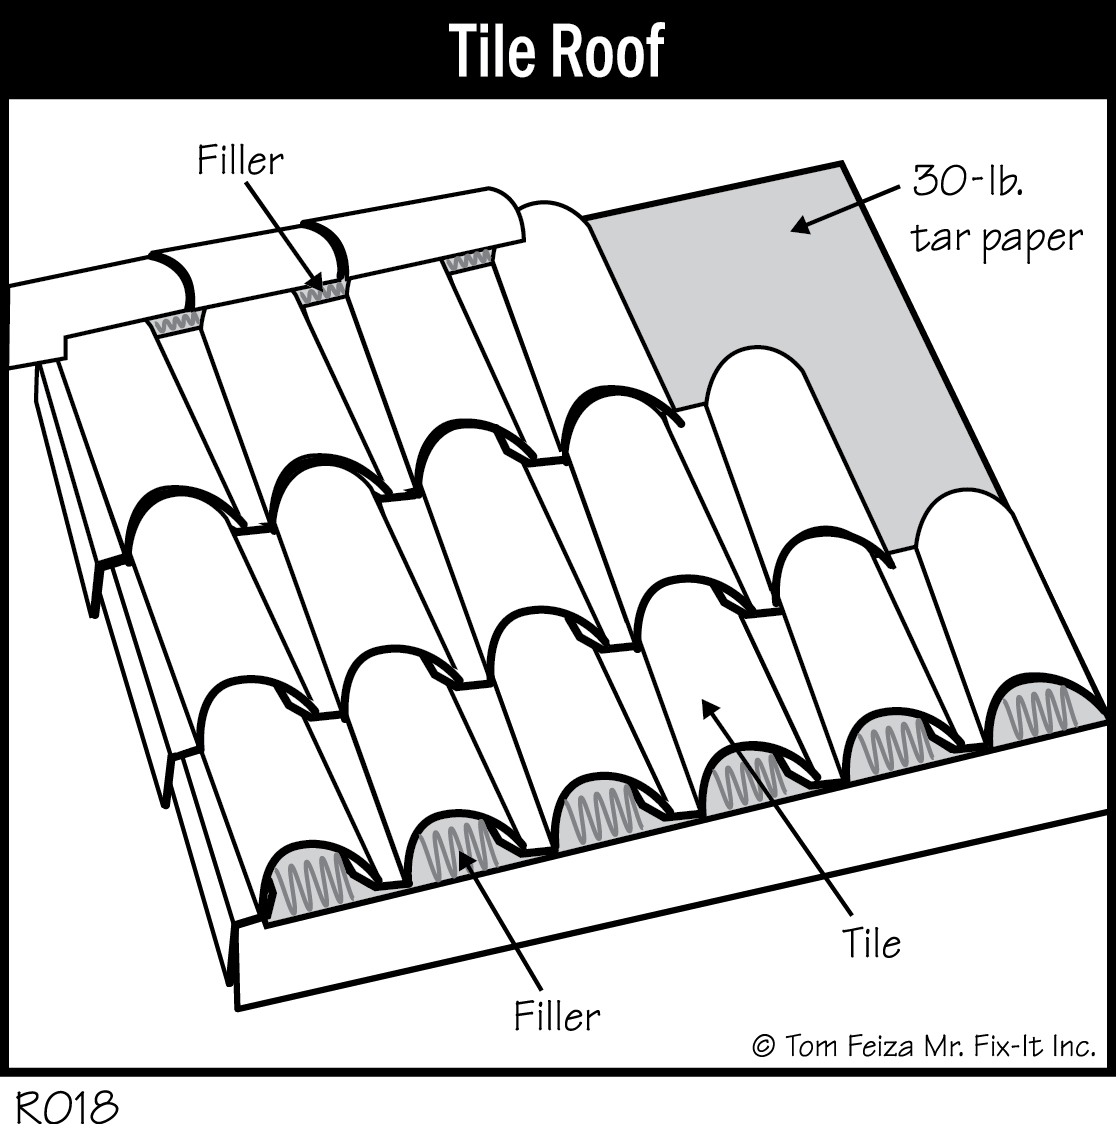
Tile Roofs
Tile roofs are found on older, expensive homes and on homes in the South or Southwest. Tile roofs are durable and resistant to sun damage. Because tile is slippery and fragile, you should never walk on a tile roof. Maintenance involves keeping gutters and valleys clear and watching for physical damage to the tile. Today some tile roofs are made from cement- based products in various styles and cross-sections.
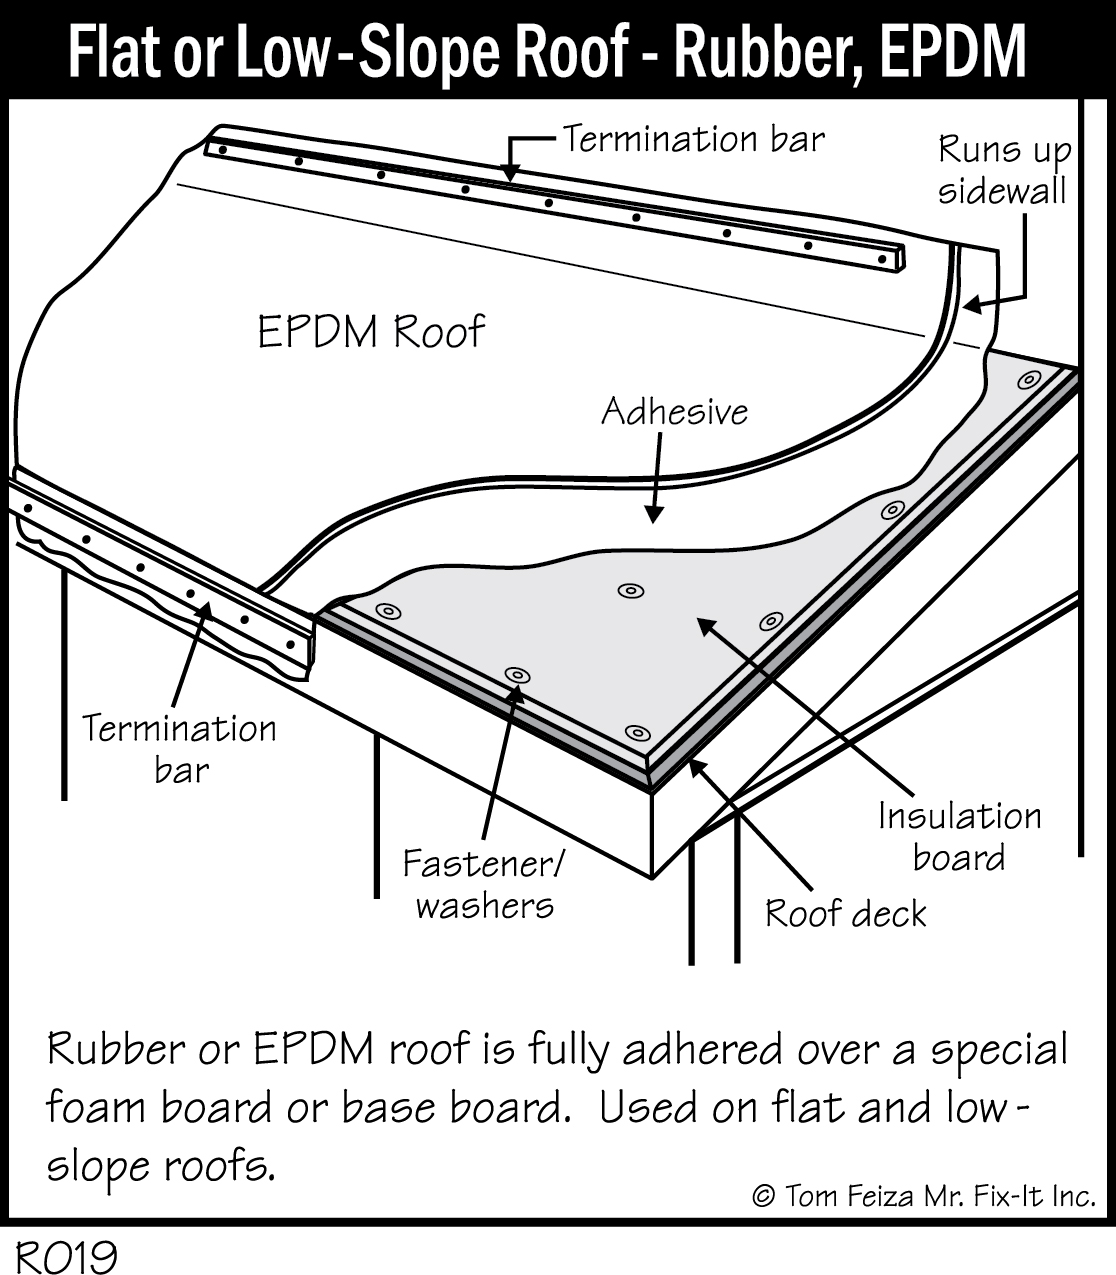
Low-slope or flat roofs require a special roofing material to seal against moisture. Since the slope is low, water does not easily run from the surface. Materials used include single-ply rubber, roll roofing, torch down (a modified bitumen), metal, and built-up roofing. Rubber roofing is quite common; technically, this material is ethylene propylene diene monomer, or EPDM. All of these materials require special installation and maintenance by experienced contractors.
A flat roof should have a slight slope to prevent ponding of water. Roof drains may be placed along the edges or in the center.
Gutters and Downspouts
When it rains, your roof sheds a tremendous quantity of water that must be moved away from the foundation to protect the basement or crawl spaces. Gutters, downspouts and downspout extensions serve this function.
Gutters may drain to the surface of your yard. They may be channeled underground to drain into a lower area of your yard. In urban areas, where storm systems collect rainwater, gutters may drain underground into the storm sewer system. For more information on storm sewers, see the section about basements.
Roofing material manufacturers provide excellent free information in printed materials and on their websites.
Must Know / Must Do – Roof, Gutters and Downspouts
- Inspect (or hire a professional to inspect) the roof and flashings twice a year.
- Gutters must be cleaned and kept clear of debris. Sometimes twice a year is enough. At other times this must be done once a week, depending on the prevalance of leaves and other materials.
- Keep the drains of a flat roof clear of debris.
- Make sure all downspouts are directed away from the foundation.
- Downspouts routed underground must be cleared or repaired if they “back up.”
- Check the roof for wear every few years. Plan for eventual replacement based on professional advice.
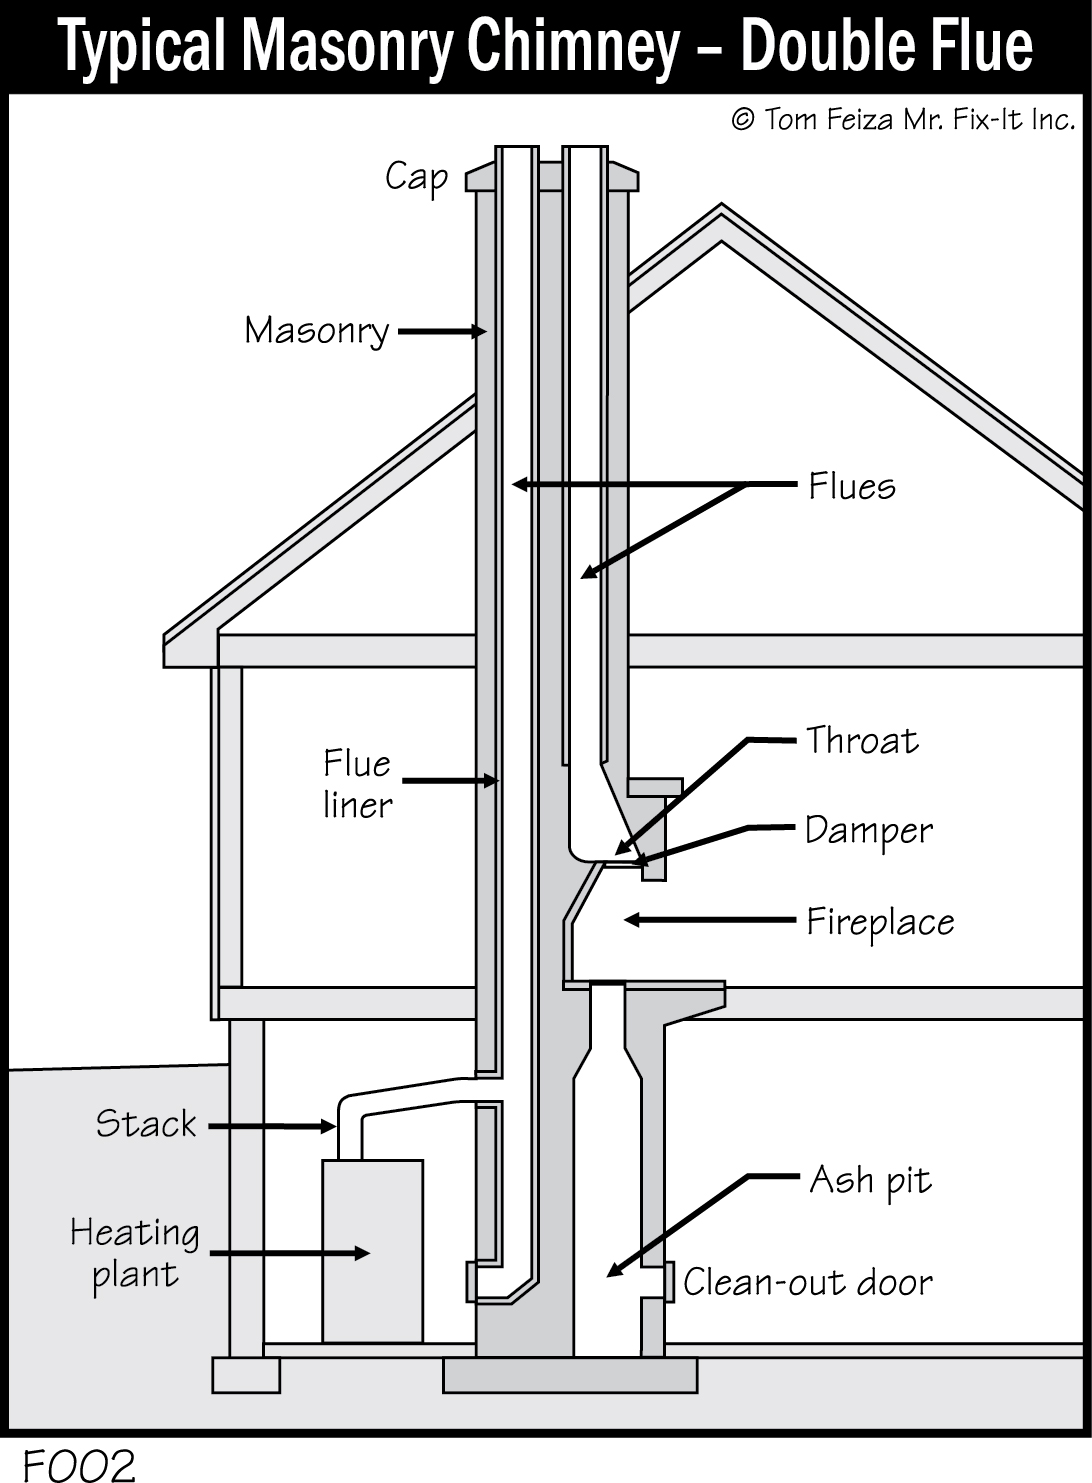
Chimney, Flue and Vent
When you burn natural gas, oil, wood or any other fossil fuel, the toxic smoke and other products of combustion must be vented from your home through the chimney. Toxic gas rises up the chimney and flows outside because the gas is lighter than air. Various types of chimneys will accomplish this effect. You should understand chimney basics and know how to recognize problems.
Masonry Chimney
An older home may have a masonry or brick/stone chimney. This type of chimney can vent a wood-burning fireplace as well as an appliance like a furnace or water heater. The clay tile liner of a masonry chimney provides a smooth, uninterrupted surface that eases the flow of combustion gas. The liner harnesses combustion products and protects the brick of the chimney from heat and moisture.
You can view the tan or red tile liner by looking down into the chimney from the top or peering up the fireplace with a flashlight. It’s common for a masonry chimney to have several flue liners. Gas and oil appliances often share a liner but cannot use the same flue as a wood-burning fireplace.
A home built before 1900 may have a masonry chimney with no clay tile liner; instead, the inside has exposed brick and some mortar coating. Never use this type of chimney without evaluation by a specialist. Also, be aware that this chimney can’t be used to vent a gas appliance.
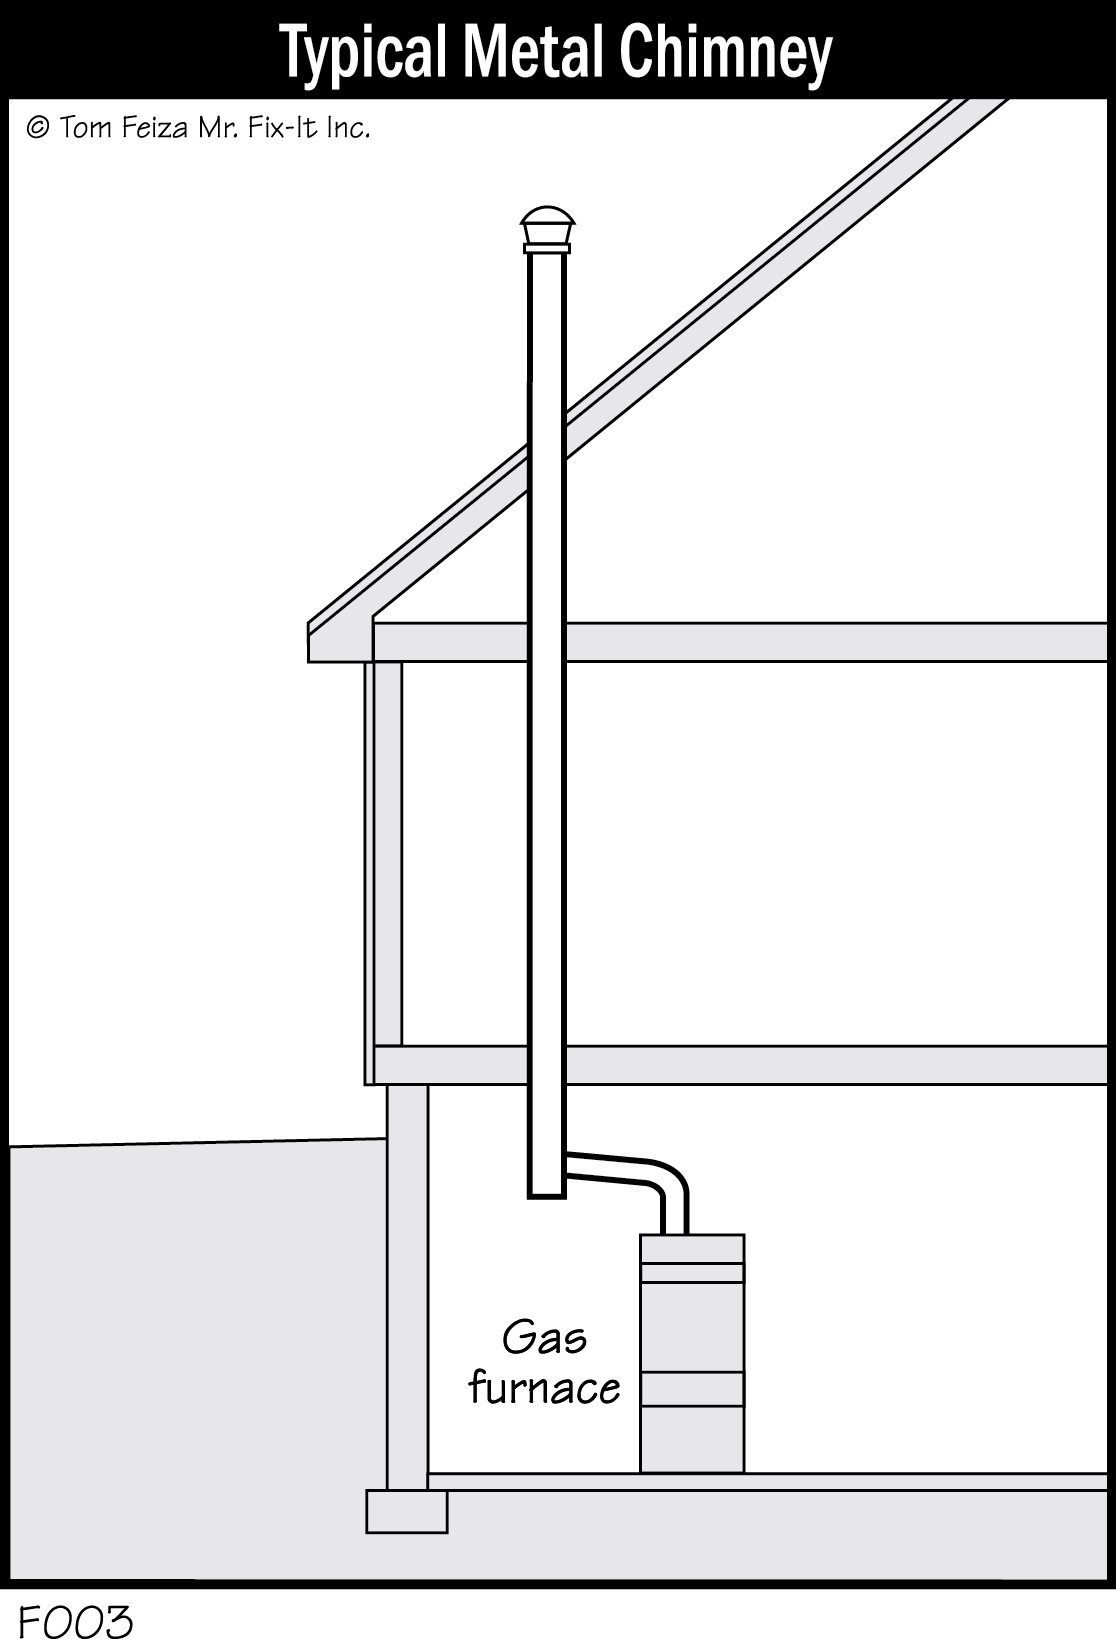
Metal Chimney
A newer home may have a metal chimney, which may be a simple round chimney pipe with a metal liner. A metal chimney might be built into a masonry or wood chimney structure.
All Chimneys
Chimneys look simple, but they are actually complex devices, designed and installed with safety in mind. Chimney designs take into account the type of fuel burned, the heat of the fire, the size of the burner or fireplace, the height of the chimney, the horizontal distance to any appliance they vent, and other factors.
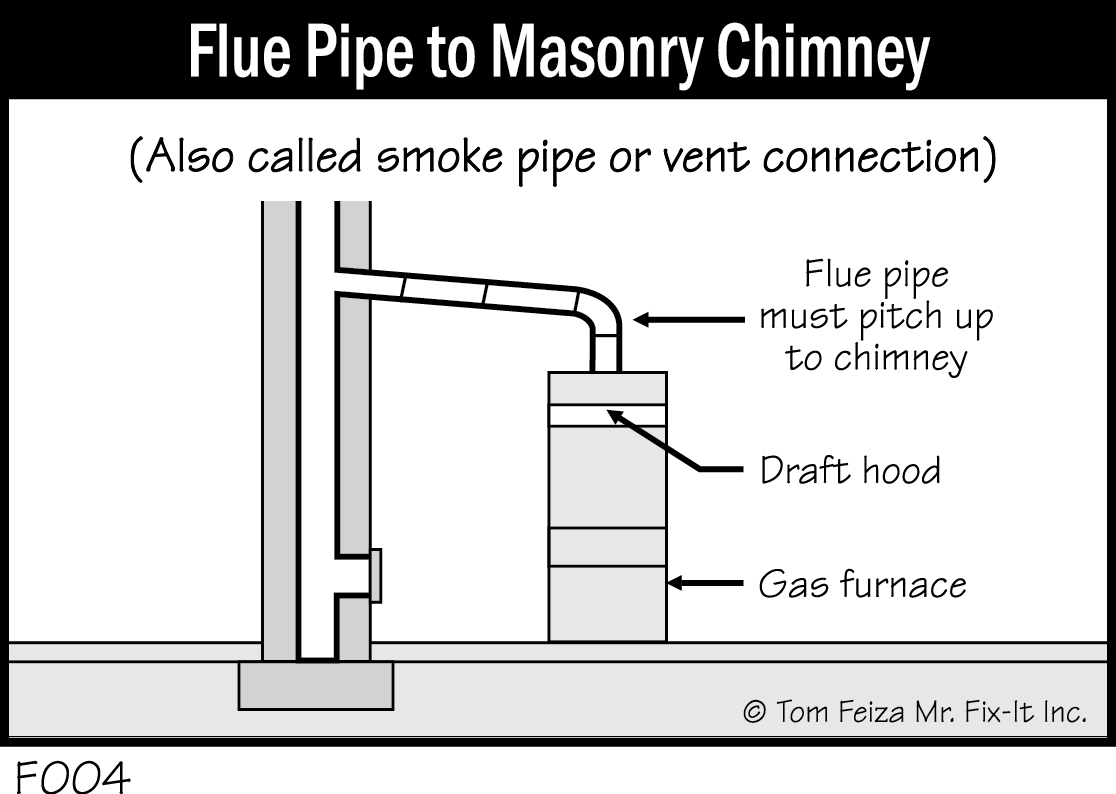
A flue pipe or smoke pipe connects gas and oil-fired appliances to a chimney. This pipe, specifically sized for the appliance, must be pitched upward into the chimney. The gas appliance also has a special draft hood or draft diverter that allows air to enter the flue pipe, helping to create a proper draft up the chimney. At the chimney, the flue pipes are connected to the flue liner by special metal connectors or mortar.
Must Know / Must Do – Chimneys and Vent Pipes
- Never modify a chimney or flue pipe. Hire a professional for repairs and maintenance.
- Frequently inspect the vent pipe and draft hood. It should not be corroded, loose or leaking.
- Vent pipes are hot. Provide adequate clearance—at least 6” away from any combustible material. Don’t use vent pipes as storage shelves or as racks to dry rags.
- Schedule professional inspection and cleaning for wood-burning stoves and fireplaces. The frequency of the need for maintenance depends on how often you build fires. Annual inspections are the norm.
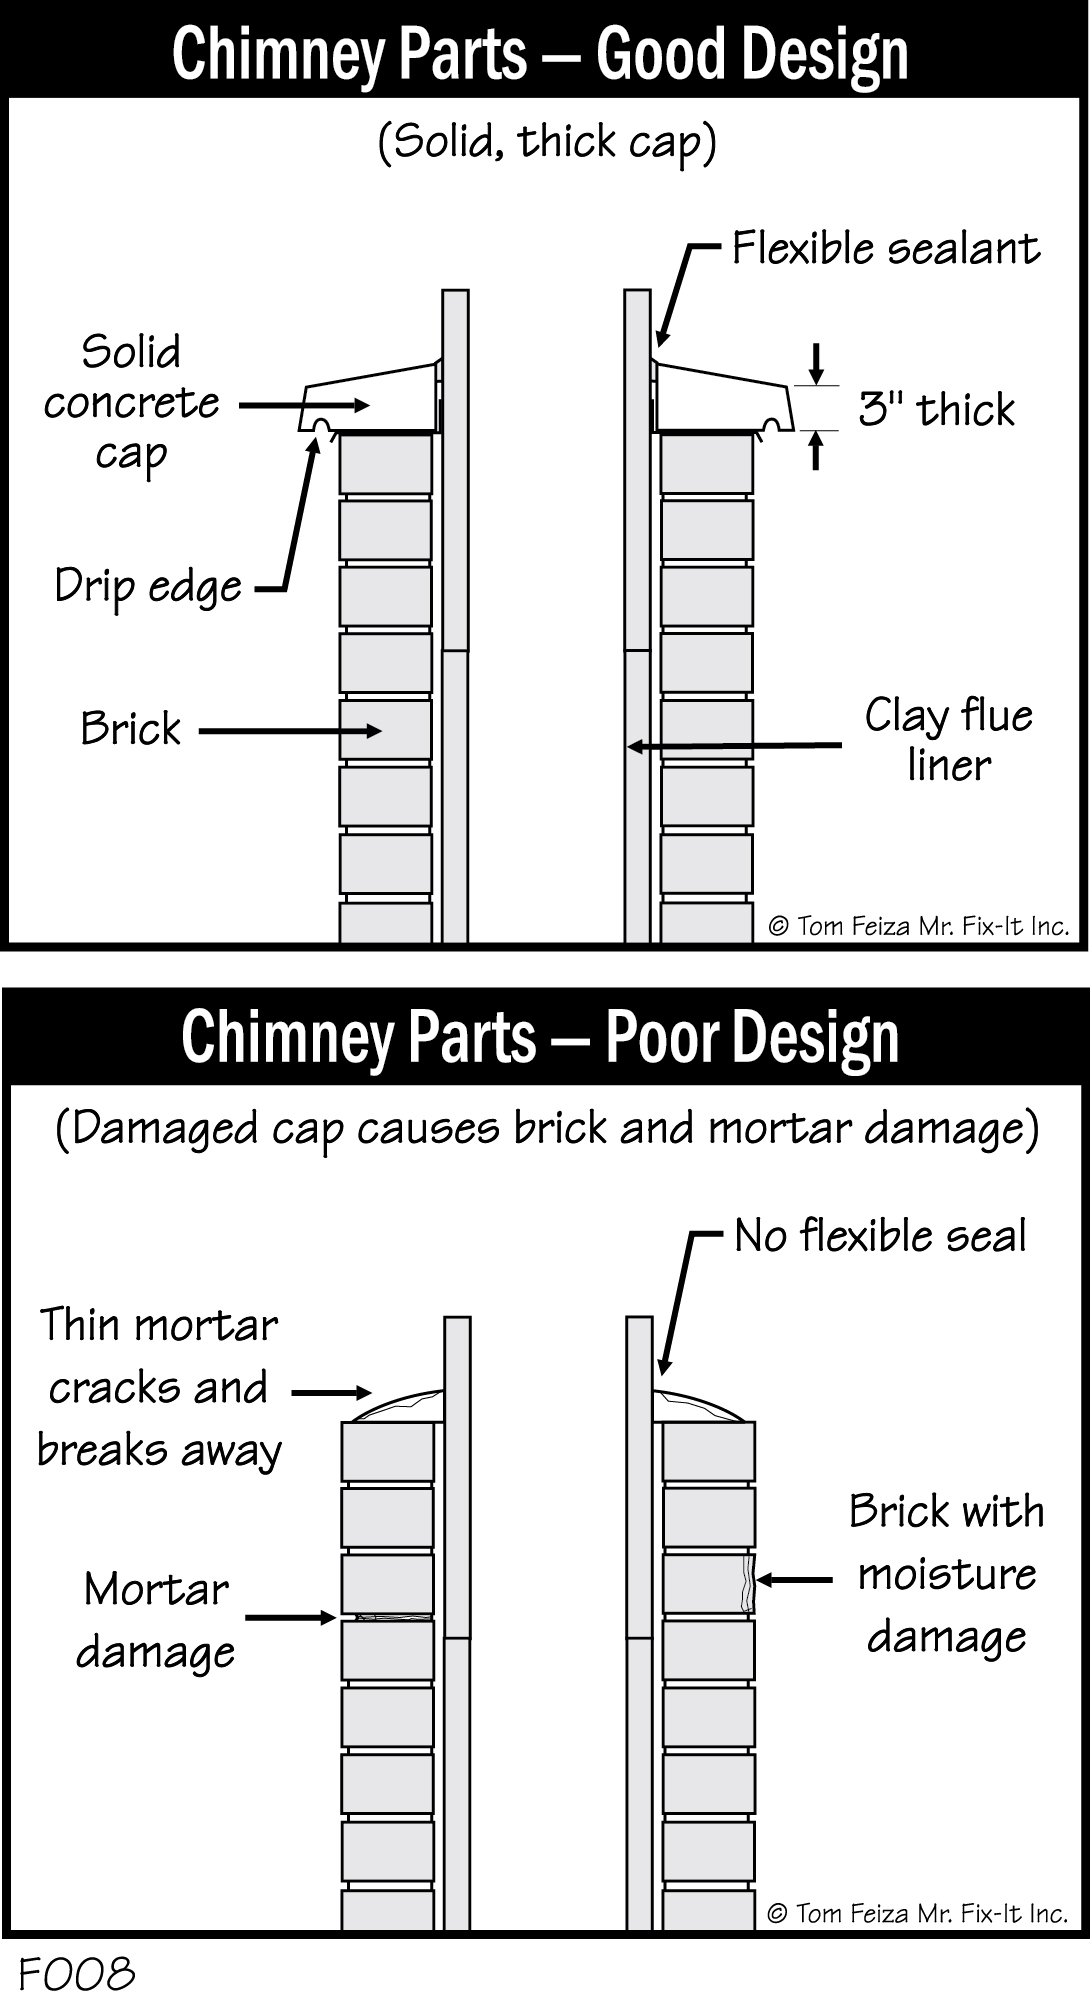
- Routinely check the condition of the chimney top. A masonry chimney must have tile, brick mortar, flashings and the concrete cap in excellent condition to prevent serious moisture problems. A metal chimney must have a cap in good condition. Chimney damage can create safety problems.
- Install a carbon monoxide alarm.
- Add a rain cap to your chimney to keep out rain and animals.
Backdrafting
Proper operation of combustion appliances and chimneys requires a supply of combustion air and dilution air. A burning fire consumes oxygen from the air supply and draws additional air up the chimney. This additional (dilution) air is provided by the draft hood or opening in the flue pipe or above the burner in the housing of the appliance.
The air that’s exhausted up the chimney must be replaced somehow. This may occur as air enters through small leaks in the structure of the house. If you’ve ever built a large fire in the fireplace and then opened the front door, you may have noticed that air rushes in to help replace air flowing up the chimney. This same exhaust process occurs with all combustion appliances.
As we build our homes tighter and tighter to aid energy conservation, we limit the number of air leaks and decrease the supply of combustible air. Exhaust fans in the bathroom and kitchen, clothes dryers, and downdraft cooktops also draw air out of the home. This can create problems with backdrafting and spillage of combustion products into the home. For instance, combustion gas from an appliance can be drawn back down the chimney, and if the appliance isn’t operating properly, dangerous carbon monoxide can linger indoors.
What can you do to prevent this? Watch for signs of backdrafting. Check flue pipes for rust or water stains, and look for rust or burn marks at draft diverters. If you notice these signs, contact a specialist. Have gas appliances serviced yearly, and ask the contractor to check all chimneys and flue connectors.
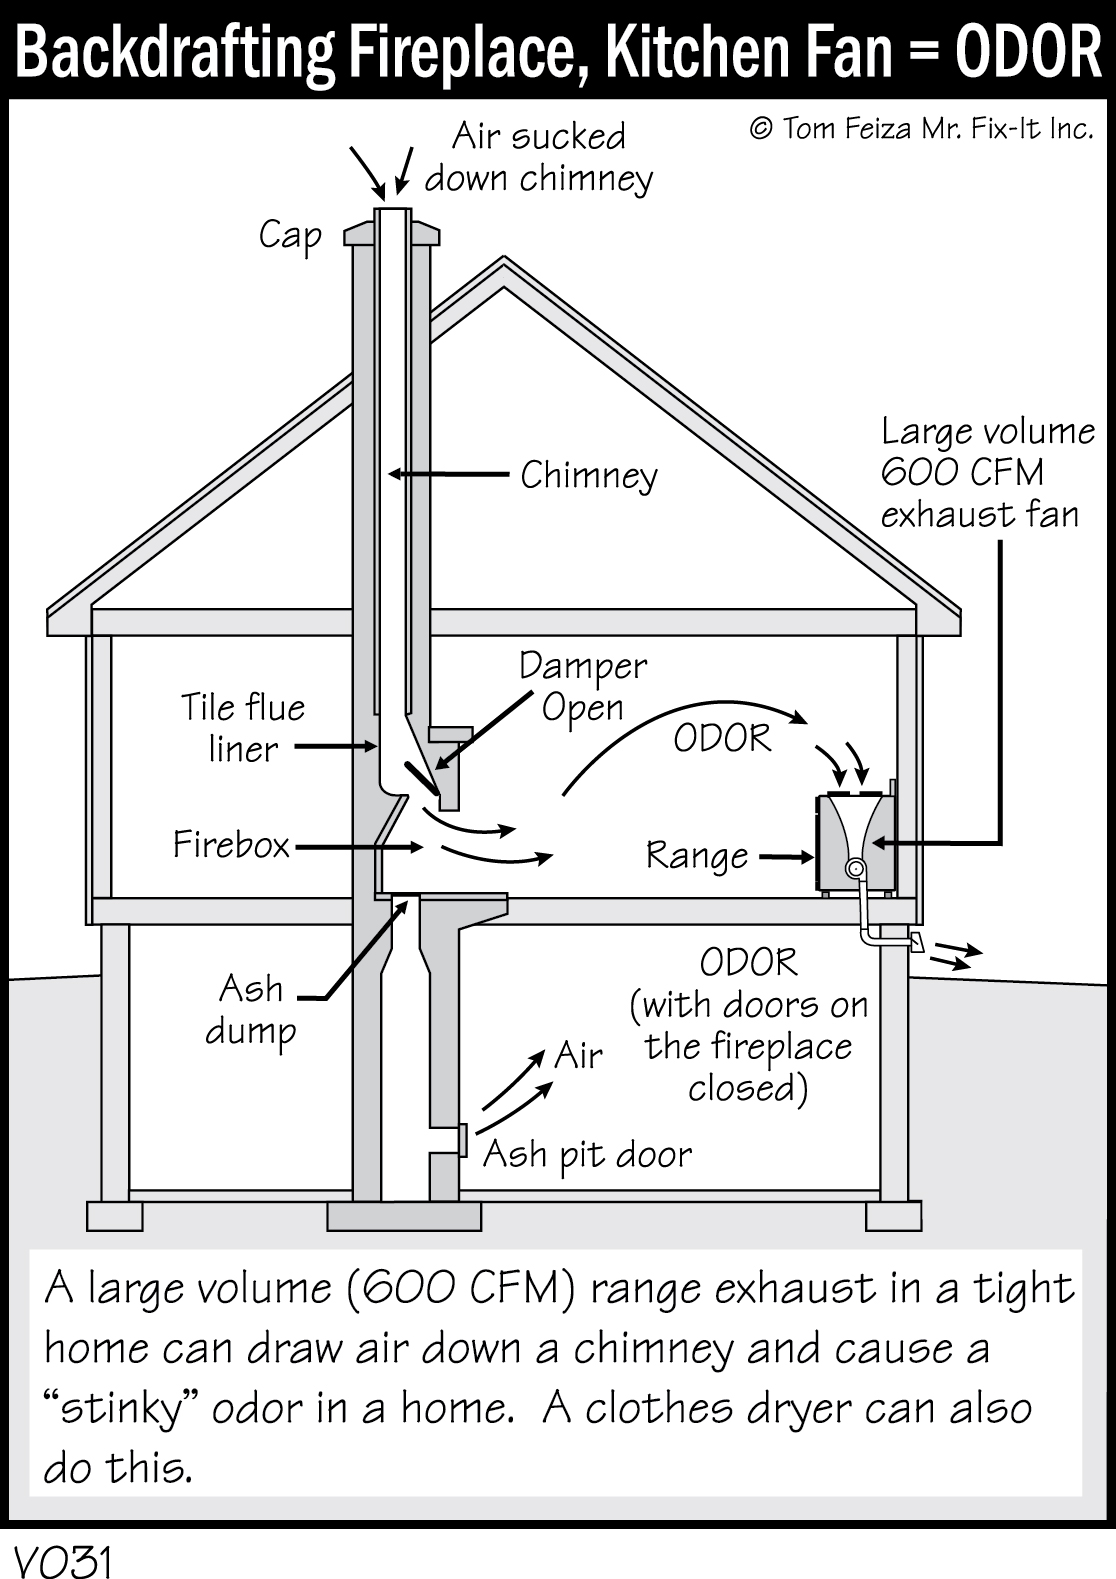
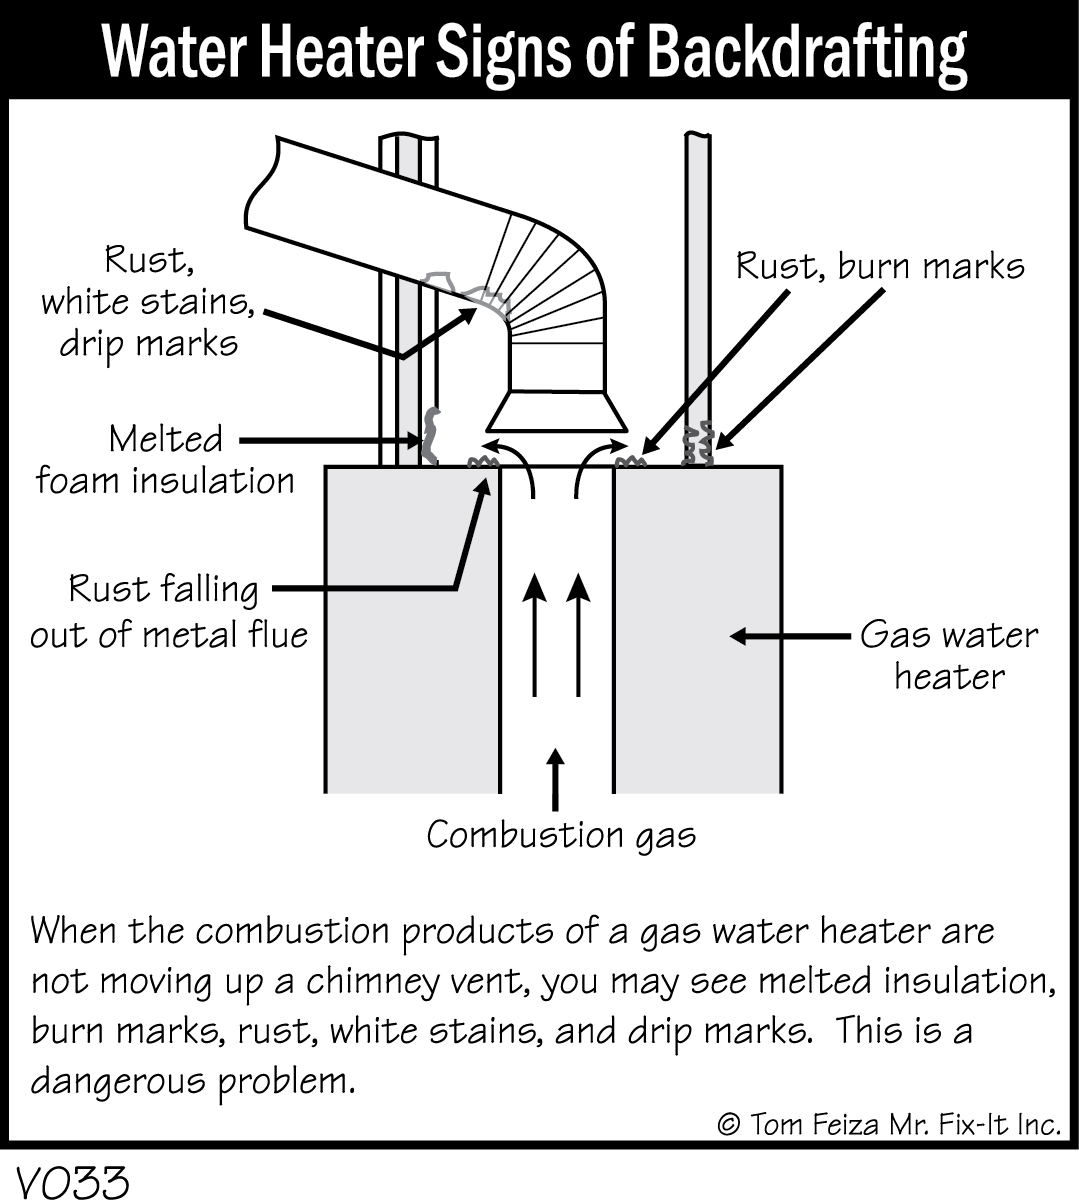
Also, install a carbon monoxide alarm. It’s good insurance against a backdrafting problem that allows carbon monoxide into your home.
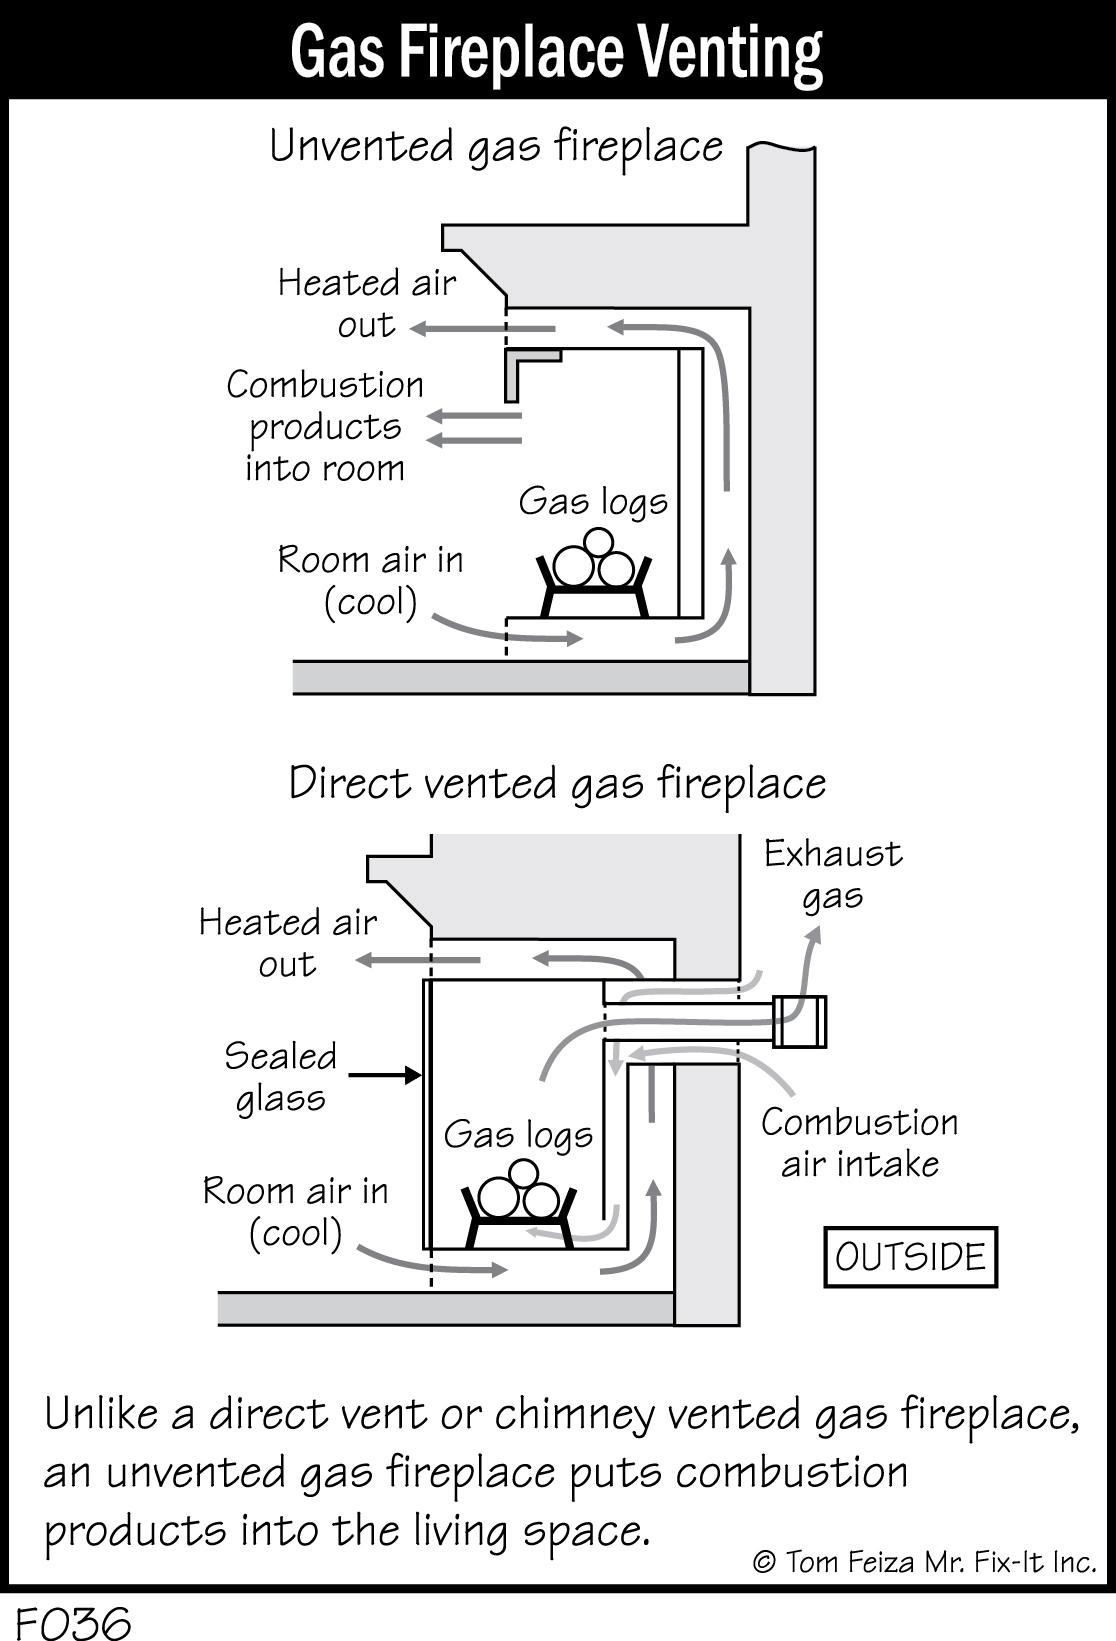
No Chimney for a Gas Appliance?
A modern gas furnace may have a sealed combustion system that doesn’t require a chimney; the furnace is vented by plastic pipes to the exterior. Some gas water heaters also direct-vent through a side wall with plastic pipe or a special metal vent. Newer gas fireplaces can vent directly through a side wall, and some have their own combustion air supply.
With today’s tighter homes, always consider using fuel-burning appliances that have a built-in combustion supply that draws in air from outside.

Some states allow the installation of gas fireplaces without any vent or chimney, but many states forbid this type of installation because of the potential for safety problems. If you have any questions about the requirements in your area, check with the local building inspector.
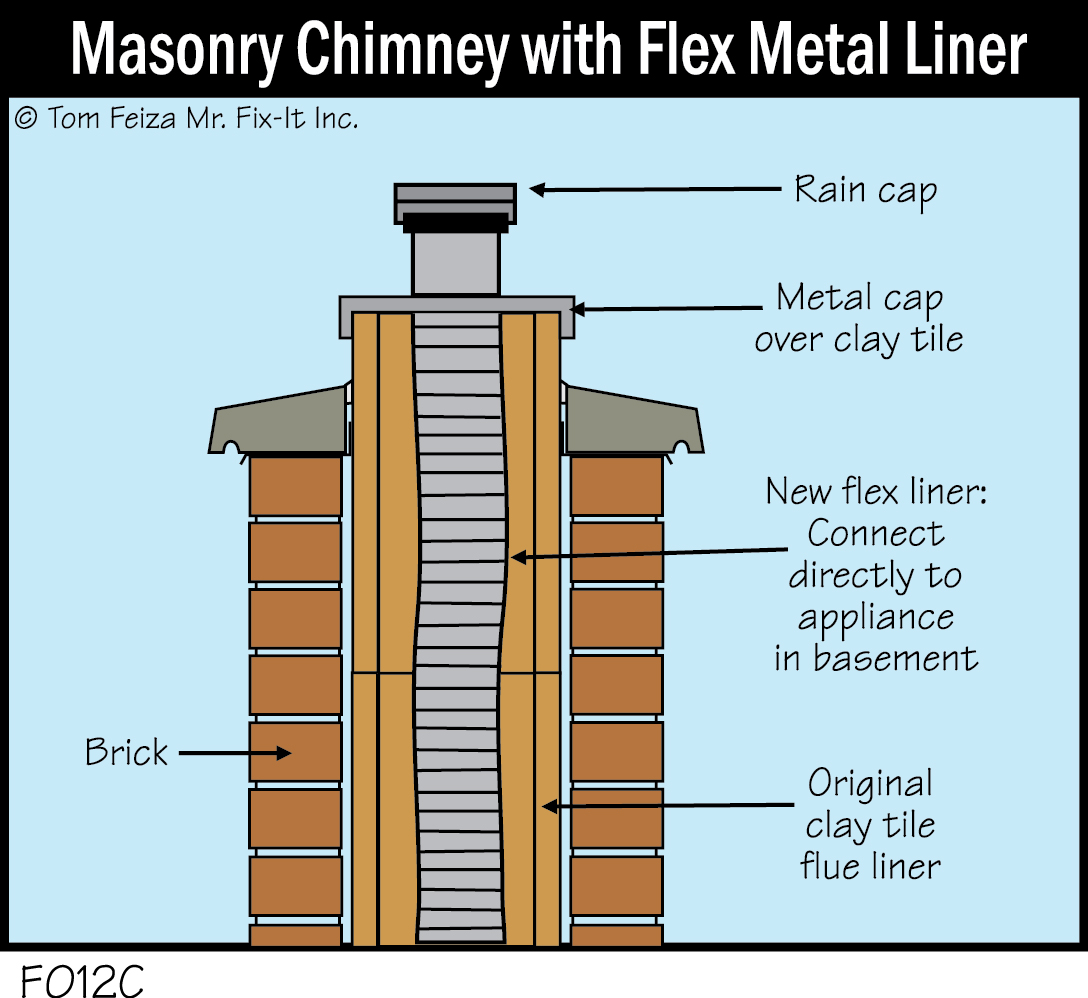
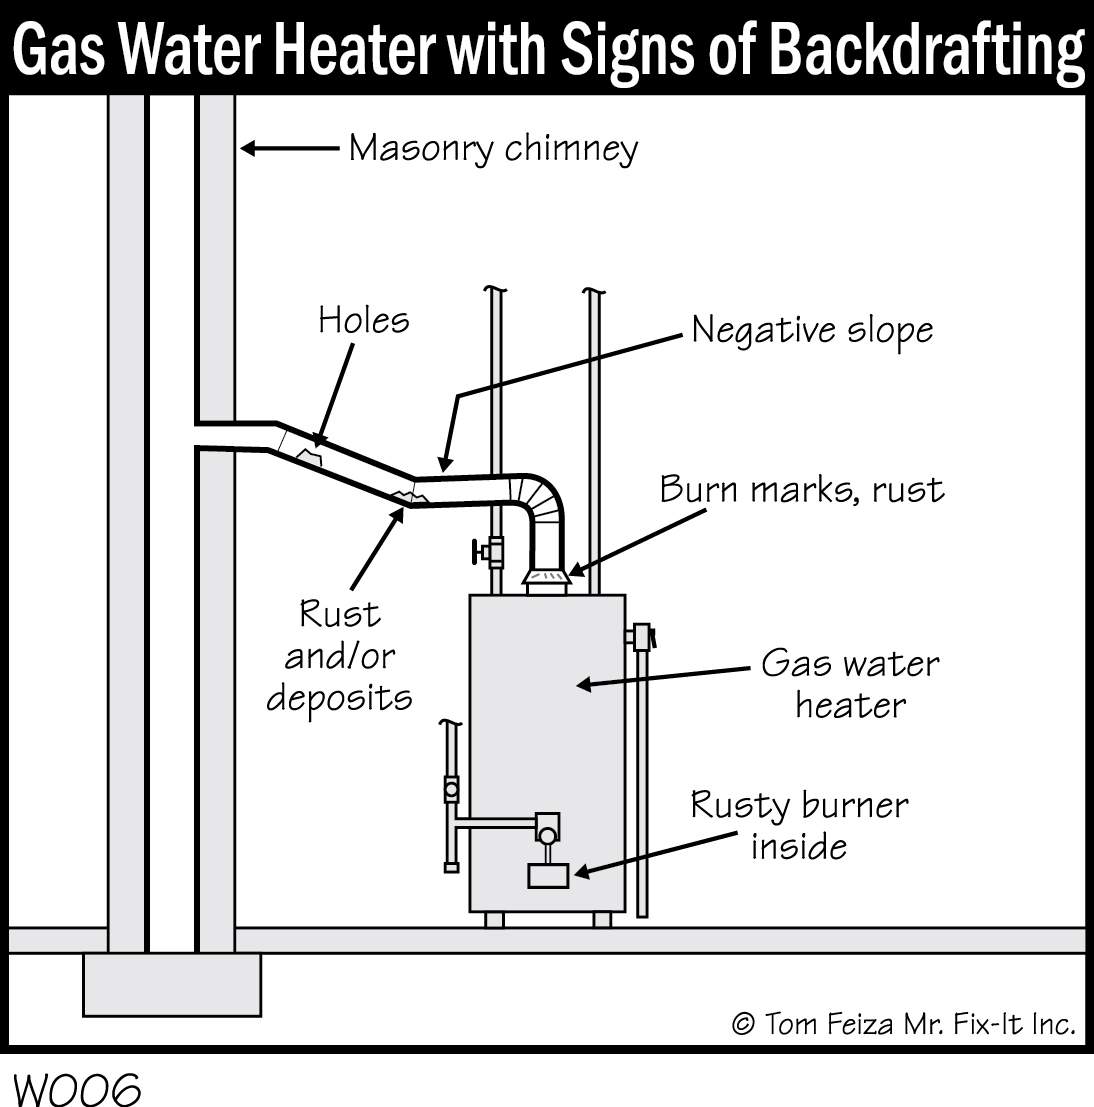
Orphaned Water Heater in Masonry Chimney
Today many high-efficiency furnaces are installed to replace inefficient old furnaces. The new efficient furnace vents outdoors through a plastic pipe, and the old furnace connection to the masonry chimney is eliminated. Sounds great, right?
Well, it is great to use a high-efficiency furnace, but you can’t just remove the exhaust flue from the masonry chimney if the chimney is shared with a gas water heater. The old furnace operated at only 50 to 65 percent efficiency. That means a lot of the energy from the gas flame went up the chimney, keeping the chimney nice and warm. When you remove this heat source, the chimney stays cold and the remaining (orphaned) water heater can’t keep the chimney warm.
This results in condensation of the products of combustion in the chimney. Since water (steam) is a major component of the combustion gas, water condenses inside the chimney flue. This condensation will damage the chimney and can even leak into your home. You can solve the problem by adding a lightweight metal liner to the chimney. This thin, flexible metal liner runs from the water heater to the top of the chimney. The liner quickly warms from the combustion gas of the water heater, and condensation does not occur.
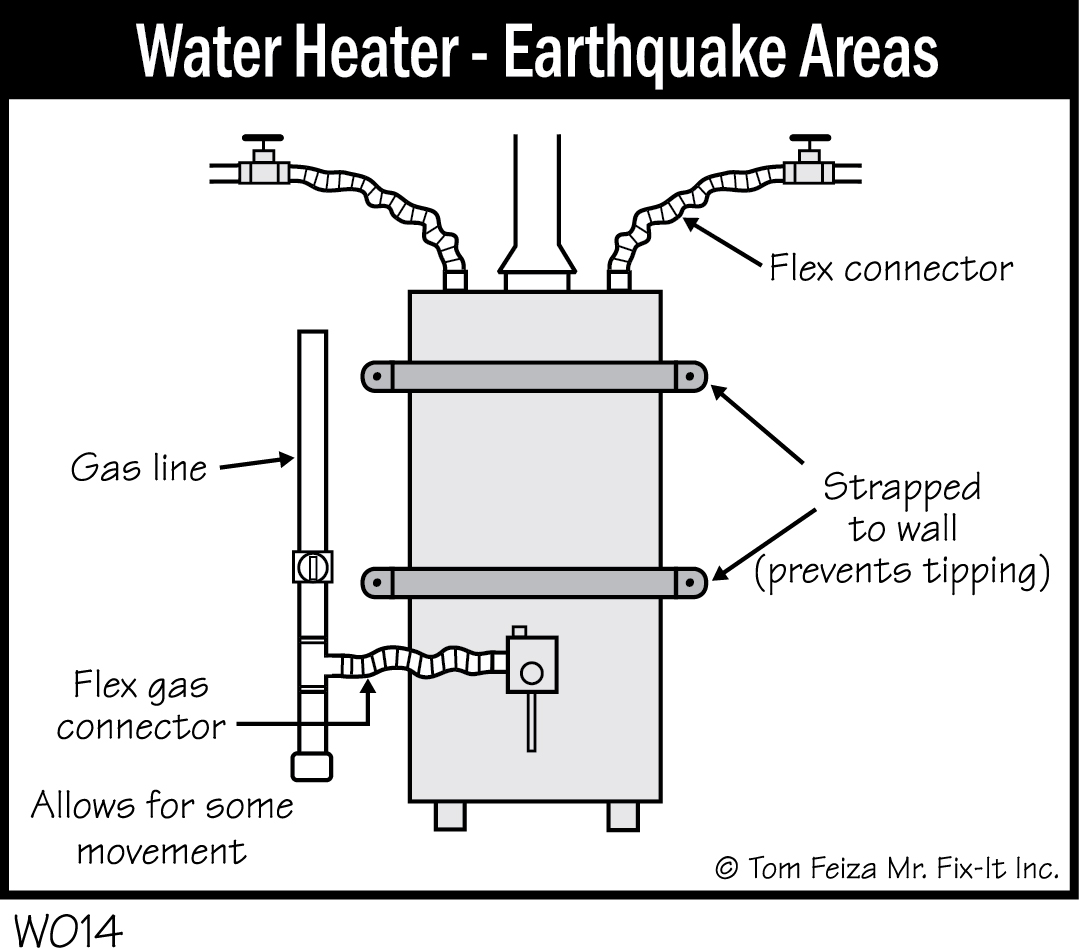
Seismic Movement
In certain parts of the country, earthquakes and tremors are a real concern. When a home shakes, piping can break, causing a major gas or water leak. In areas prone to seismic movement, water heaters often are strapped to the structure to prevent tipping, and flexible gas and water lines are attached to fixed appliances to accommodate movement. (Interestingly, flexible gas lines to fixed appliances are not allowed in some areas of the country.)